Hi, today, I’m going to revisit a very old topic, Setup Repeater Bridge Using A dd-wrt Router. This reminds me of my FIRST startup Misc Vision that used to resell Foscam home security IP cameras. That is a long story. Anyway, this blog is going to heavily cite the contents on this page.
PART A: Flash A Supported Router with DD-WRT Firmware
Before we start to tackle the problem, the open source firmware DD-WRT is strongly recommended to flash your router.
1. DD-WRT and OpenWRT
Two widely used open source router firmware have been published online for quite a bit of time: DD-WRT, OpenWRT In fact, each of these two are OK for router firmware flashing.
2. DD-WRT Supported Routers
To check if your router is supported by DD-WRT, you need to check this page.
3. DD-WRT SL-R7202
In my case, I got a lot of such routers in hand and am selling them on Craigslist (if anybody is interested in it, please let me know). You can also find some either continued or discontinued such products on the market, such as Gearbest.
DD-WRT SL-R7202 looks good:

In one word, find some DD-WRT supported router, and have it successfully flashed FIRST. As a lazy man, I’m NOT going to flash anything but just use a router coming with an existing DD-WRT firmware, namely, DD-WRT SL-R7202.
PART B: The Problem
The problem that we are going to deal with is how to connect multiple routers, so that the Internet range can be expanded. For routers with dd-wrt firmware, there are mulitple ways to connect routers, please refer to https://www.dd-wrt.com/wiki/index.php/Linking_Routers.
1. Linking Routers
In the following, most contents are CITED directly from Linking Routers and its extended webpages.
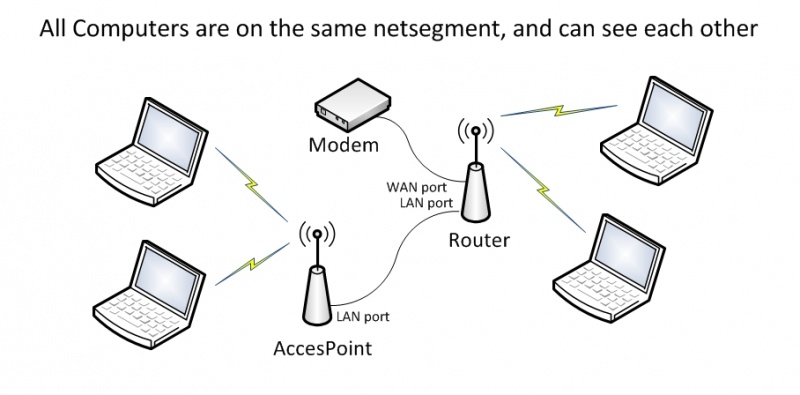
Access Point / Switch - Extend the Wireless access area using more routers, with WIRED connections between routers, or turn a WIRED port on an existing network into a Wireless Access Point. All computers will be on the same network segment, and will be able to see one another in Windows Network. This works with all devices with LAN ports, and does not require dd-wrt to be installed. “
- Wireless Access Point - Extend Wi-Fi & LAN (Requires physical(just WIRED) ethernet connection between routers)
- Switch - Similar config as WAP, but radio disabled (accepts only WIRED connections)
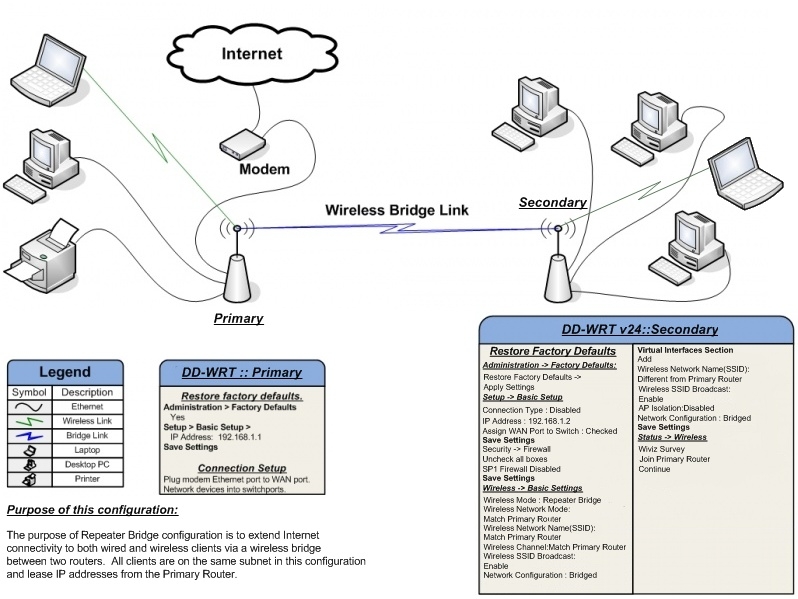
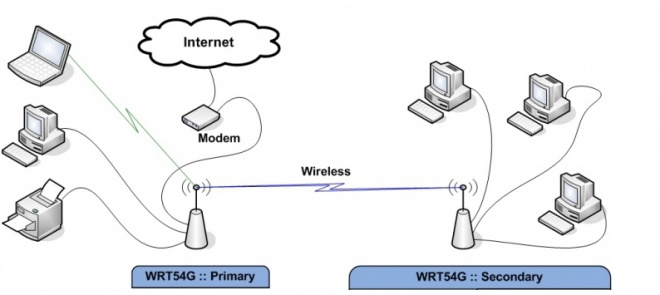
Repeater / Repeater Bridge - Extend the Wireless access area using a second router WIRELESSLY connected to the primary. The secondary router must have dd-wrt installed; the primary does not need dd-wrt.
- Repeater Bridge - A wireless repeater with DHCP & NAT disabled, clients on same subnet as host AP (primary router). That is, all computers can see one another in Windows Network.
- Repeater - A wireless repeater with DHCP & NAT enabled, clients on different subnet from host AP (primary router). Computers connected to one router can not see computers connected to other routers in Windows Network.
- Universal Wireless Repeater - Uses a program/script called AutoAP to keep a connection to the nearest/best host AP.
Client / Client Bridge - Connect two wired networks using a WiFi link (WIRELESS connection between two routers). The secondary router must have dd-wrt installed; the primary router does not need to have dd-wrt.
- Client Bridged - Join two wired networks by two Wireless routers building a bridge. All computers can see one another in Windows Network.
- Client Mode - Join two wired networks by two Wireless routers (unbridged). Computers on one wired network can not see computers on other wired network in Windows Network.
WDS - Extend the Wireless access area using more routers connected WIRELESSLY. WDS is a mesh network. Routers must almost always have the SAME chipset type for WDS to work, and any non dd-wrt routers must be WDS compatible. Using identical routers is best, but not always necessary if all devices have the same chipset types. (All Broadcom or all Atheros etc)
OLSR - Extend the Wireless access area using more routers. Extra routers do not need any wired connections to each other. Use several ISP (Internet) connections. OLSR is a mesh network.
2. Down-to-earth Case
In my case, my laptop and some of my IoT devices can be easily connected to the ShawCable Modem/Router combo, which is on the 2nd floor in my living room and directly connected to the Internet. However, my R&D office is located in my garage on the 1st floor, where dd-wrt router is put in. In such a case, my dd-wrt router must be connected to my ShawCable Modem/Router WIRELESSLY.
Due to the reason explained in the section Difference between Client Bridge and Repeater Bridge. A standard wireless bridge (Client Bridge) connects wired clients to a secondary router as if they were connected to your main router with a cable. Secondary clients share the bandwidth of a wireless connection back to your main router. Of course, you can still connect clients to your main router using either a cable connection or a wireless connection.
The limitation with standard bridging is that it only allows WIRED clients to connect to your secondary router. WIRELESS clients cannot connect to your secondary router configured as a standard bridge. Repeater Bridge allows both WIRELESS AND WIRED clients to connect to a the Repeater Bridge router, and through that device WIRELESSLY to a primary router. You can still use this mode if you only need to bridge wired clients; the extra wireless repeater capability comes along for free; however, you are not required to use it.
Therefore, we select Repeater Bridge as our solution. Here, DD-WRT SL-R7202 is selected as the Repeater Bridge. The difficulty is how to setup DD-WRT SL-R7202 to make it work as a wireless Repeater Bridge?
PART C: About Firmware (Optional)
1. Do We Need Firmware Upgrading?
Actually, before I come to this step, I’ve already:
- strictly followed the configuration process written on https://www.dd-wrt.com/wiki/index.php/Repeater_Bridge, but FAILED many times.
- and afterwards, I found a video solution at https://www.youtube.com/watch?v=ByB8vVGBjh4, which seems to be suitable for my case.
However, it finally turns out that my DD-WRT SL-R7202 router comes with a firmware version DD-WRT (build 13064), but the tutorial on Youtube uses a router with firmware version DD-WRT (build 21061).
It seems to me that a firmware upgrading is a must before we setup the Wireless Repeater Bridge Mode. But, How?
2. Reset to Factory Defaults on DD-WRT Router (The 2nd Router)
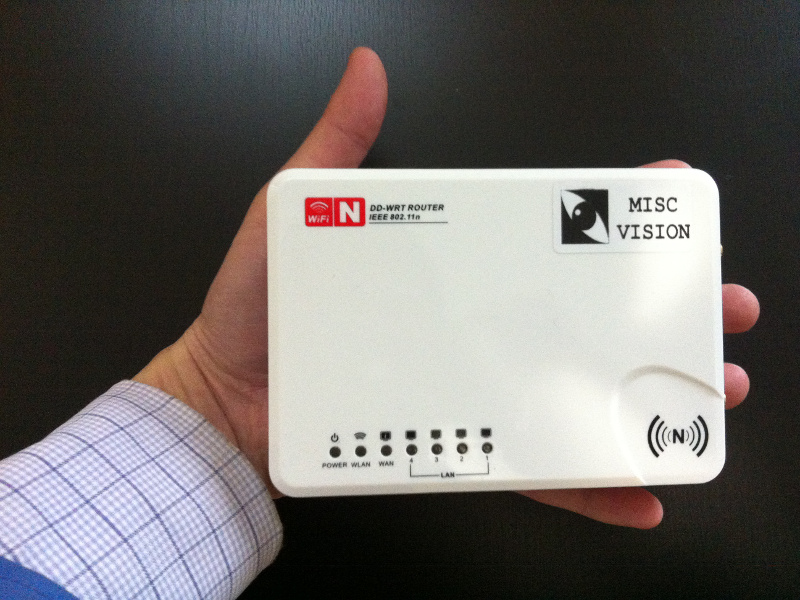
First of all, we need to reset DD-WRT. There is a black button on my DD-WRT SL-R7202, as shown:
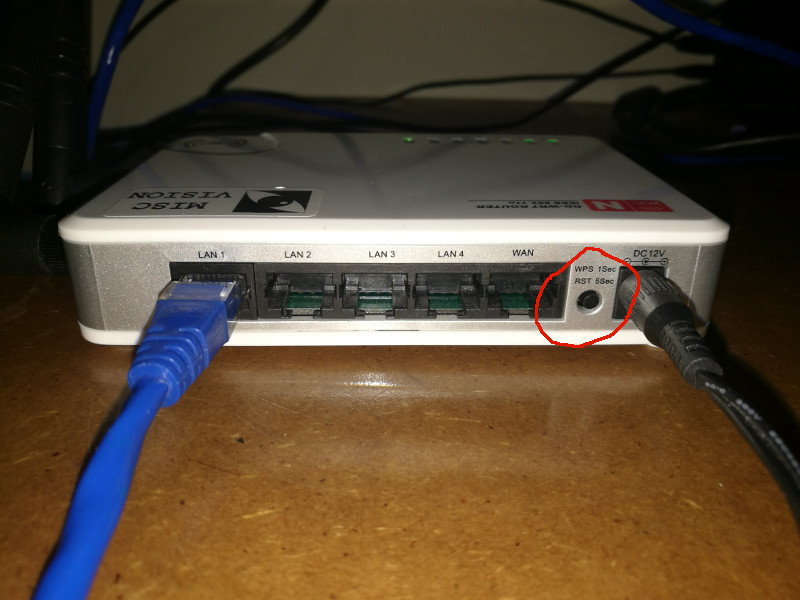
In fact, how to reset DD-WRT needs to be paid attention to. > Hold the reset button until lights flash (10-30sec) or 30-30-30 if appropriate for your router. (DO NOT 30-30-30 ARM routers.)
3. Visit http://192.168.1.1:
After successfully reset DD-WRT router to factory default, connect it with your host computer via a WIRED cable, for better stablity. Then, we change our network connection from our FIRST router to SECOND router: dd-wrt router. Afterwards, let’s visit http://192.168.1.1.
- NOTE: My host computer’s IP address on the FIRST router, namely, ShawCable Modem/Router is staticly set as 192.168.0.8 (which is able to connect to the Internet). After I switch to the Wifi dd-wrt, my host’s IP is DHCP allocated to 192.168.1.103. The gateway on ShawCable is 192.168.0.1, which is different from the gateway on dd-wrt 192.168.1.1 by default.
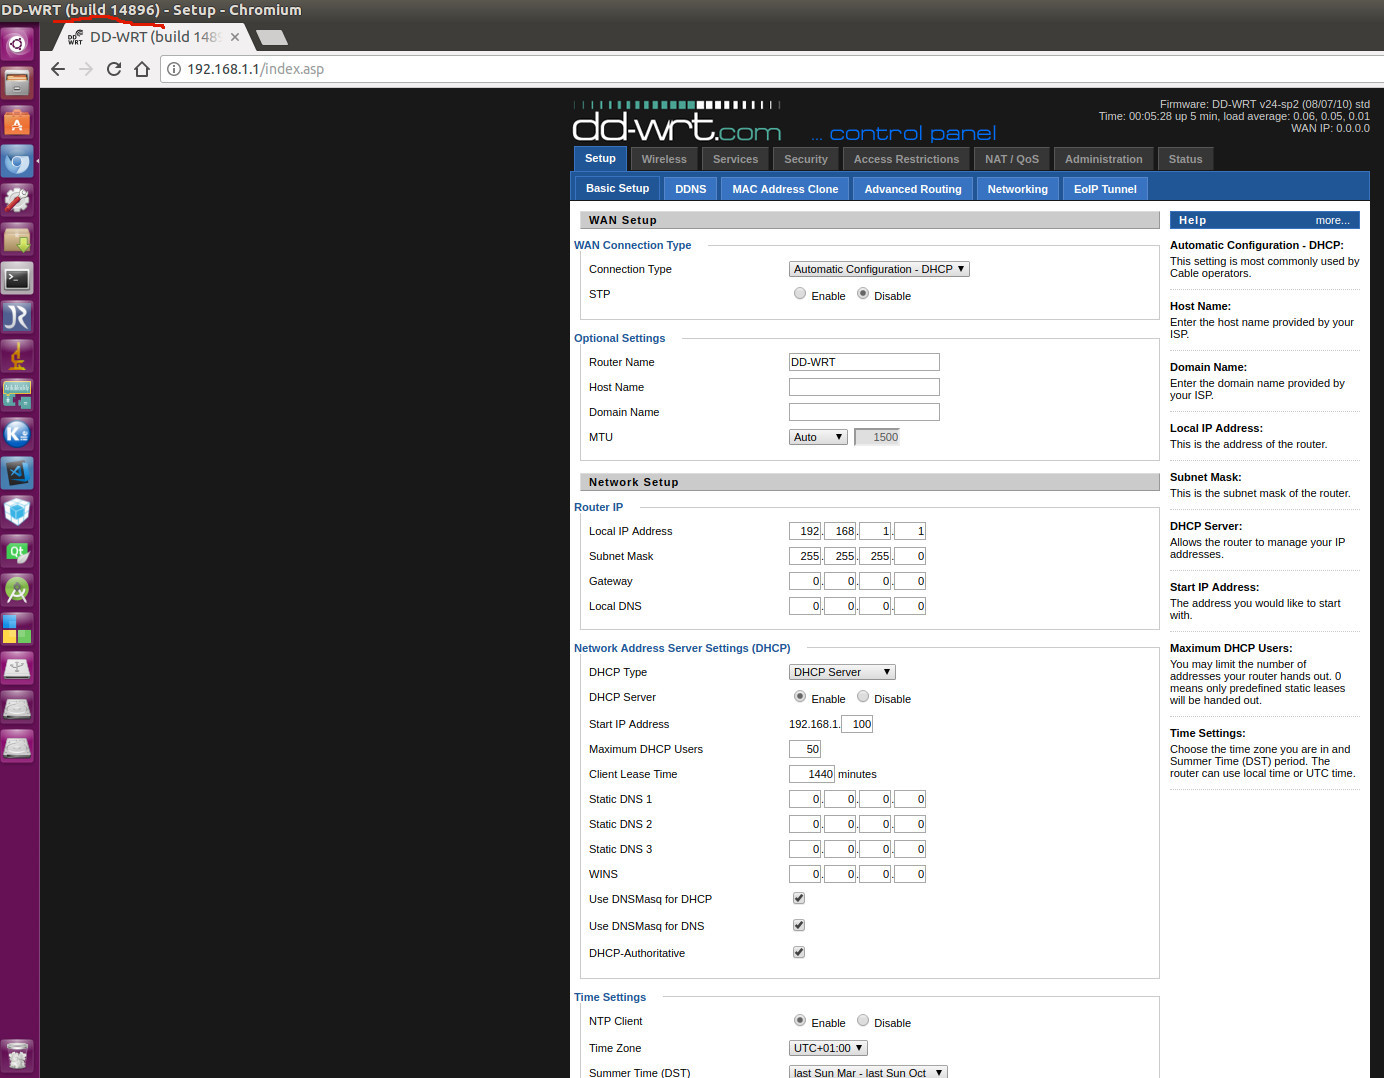
1) FIRST Page
DD-WRT home page looks like:
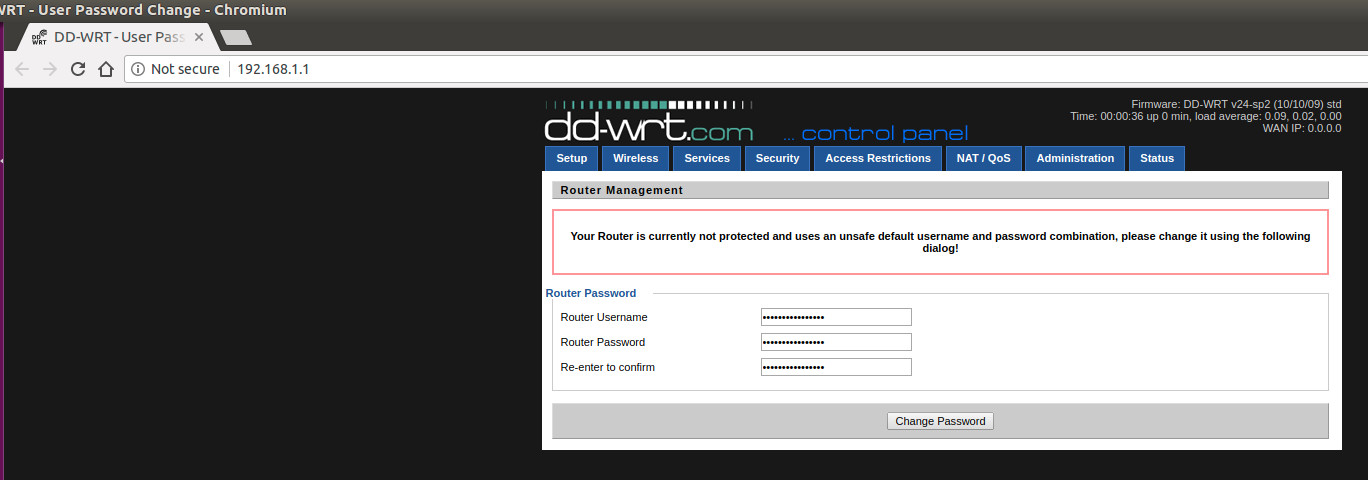
And it’s suggested we input a new router username root and password admin. After the button Change Password is clicked, we are entering the very first page of DD-WRT Web GUI.
- We can easily tell the firmware’s info on the top right corner.
1 | Firmware: DD-WRT v24-sp2 (10/10/09) std |
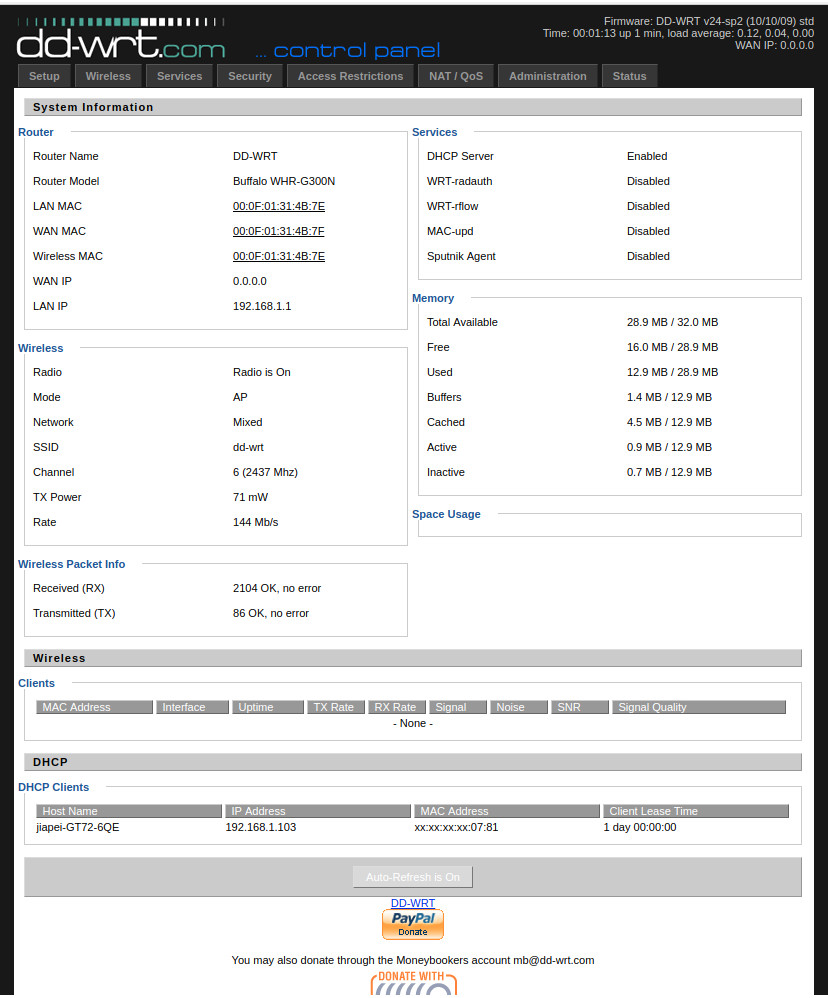
- And, we can also easily tell from the bottom of this page that for now, only 1 DHCP client is connected to this router, which is just our host computer: jiapei-GT72-6QE.
2) System Info on Status Page
DD-WRT Status page tells a lot about what’s in this router:
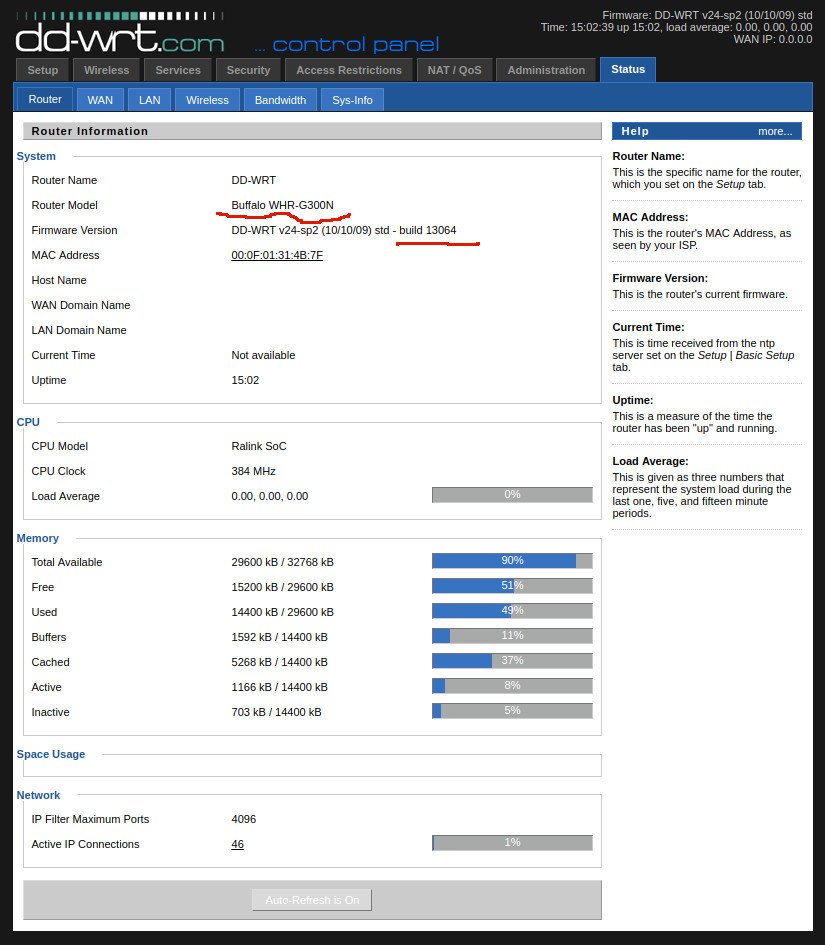
Clearly, our router model is Buffalo WHR-G300N, and our firmware build version is 13064.
3) Upgradable?
We then visit https://www.dd-wrt.com/site/support/router-database, and input WHR-G300N, two routers will be listed as:
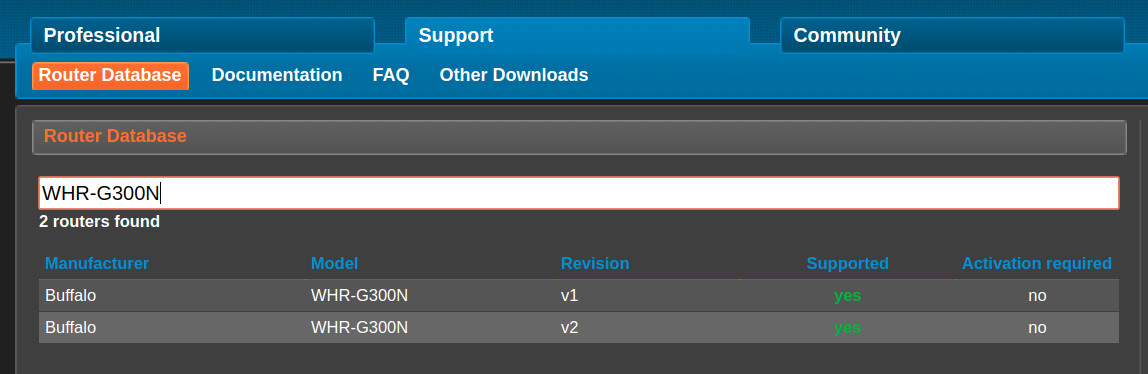
By click the FIRST one, namely v1, we get:
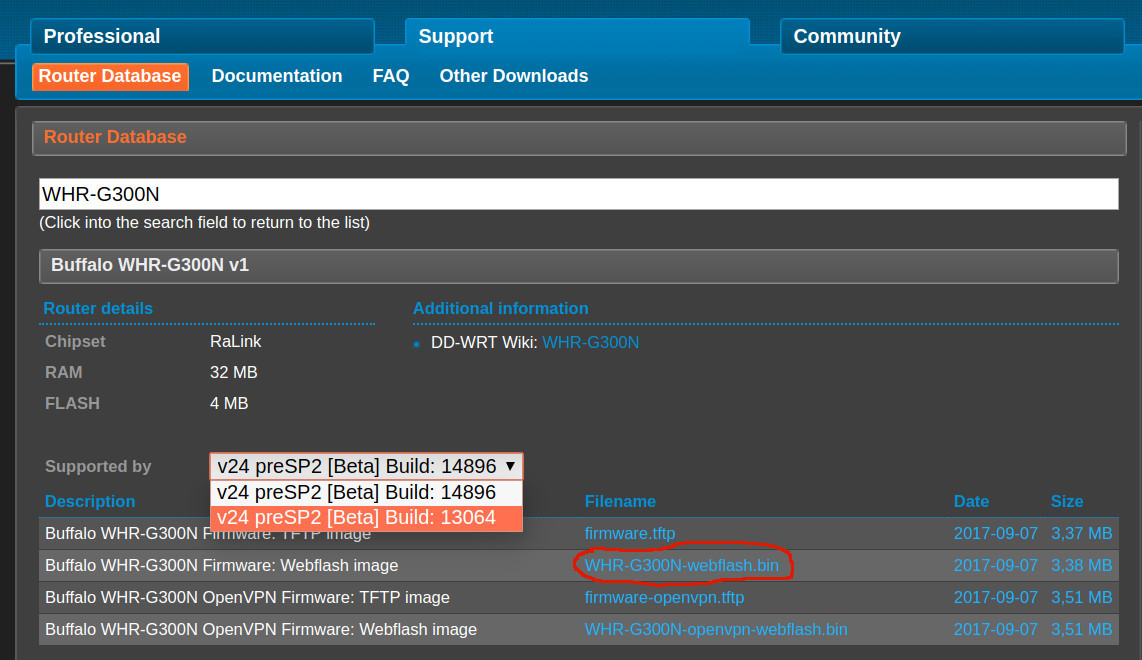
Clearly, we should be able to upgrade from our current firmware version 13064 to the newer one 14896.
With the existing firmware version 13064 installed on the router SL-R7202, we can directly upgrade the firmware through web flash by downloading the firmware WHR-G300N-webflash.bin, but ignoring downloading all TFTP and openvpn files.
4) Firmware Upgrading
Just click Administration -> Firmware Upgrade, and then choose WHR-G300N-webflash.bin.
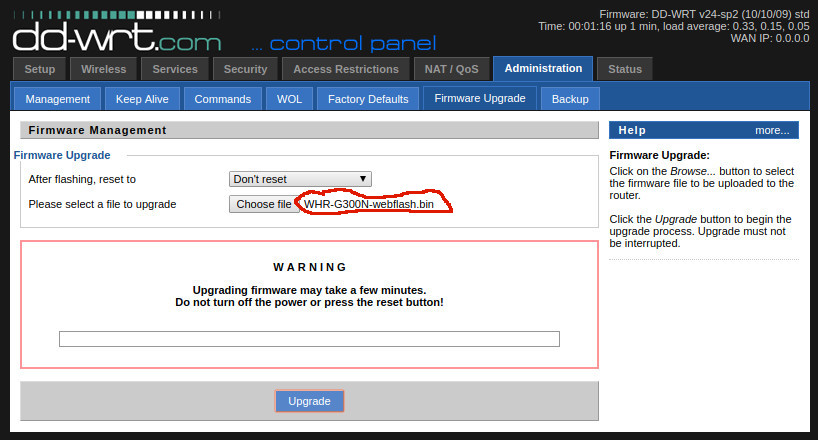
After clicking Choose file, the system is automatically upgraded after several minutes.
NOTE: Do NOT touch anything during the upgrading process.

After firmware upgrading, we can easily tell some difference: From Setup Page, on the left-top corner, we can see the builder version is now 14896. And from the right-top corner, the current firmware info is:
1 | Firmware: DD-WRT v24-sp2 (08/07/10) std |
From the Status Page, we can doublecheck the firmware version is now 14896.

5) Firmware Upgrading is Problematic !
However, upgrading the firmware version from 13064 to the newer one 14896 is problematic, please refer to https://jgiam.com/2012/07/06/setting-up-a-repeater-bridge-with-dd-wrt-and-d-link-dir-600. After carefully reading this article, and due to my practical try later on, I summarized the conclusion here first:
- NOTE:
- KEEP using firmware version 13064, instead of 14896
- NEVER adding the Virtual Interfaces
PART D: Wireless Repeater Bridge (Same Subset)
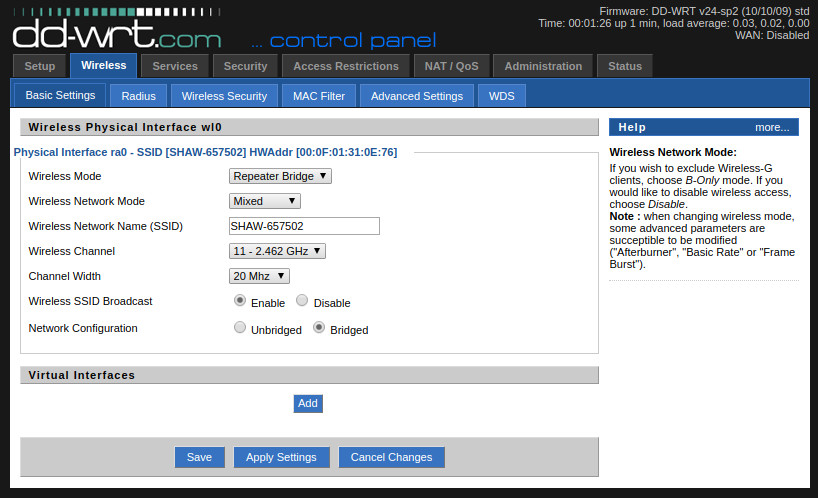
1. Wireless -> Basic Settings
We modify the parameters accordingly (Cited from the blog Setting up a repeater bridge with DD-WRT and D-Link DIR-600 ):
- Physical Interface Section
- Wireless Mode: Repeater Bridge
- Wireless Network Mode: Must Be Exactly The Same As Primary Router
- Wireless Network Name (SSID): Must Be Exactly The Same As Primary Router. Be Careful: DD-WRT is ONLY a 2.4G router. If your primary router has two bands, namely, 2.4G and 5G, make sure you connect to the 2.4G network.
- Wireless Channel: Must Be Exactly The Same As Primary Router
- Channel Width: Must Be Exactly The Same As Primary Router
- Wireless SSID Broadcast: Enabled
- Network Configuration: Bridged
Then, click Save without Apply, we get:
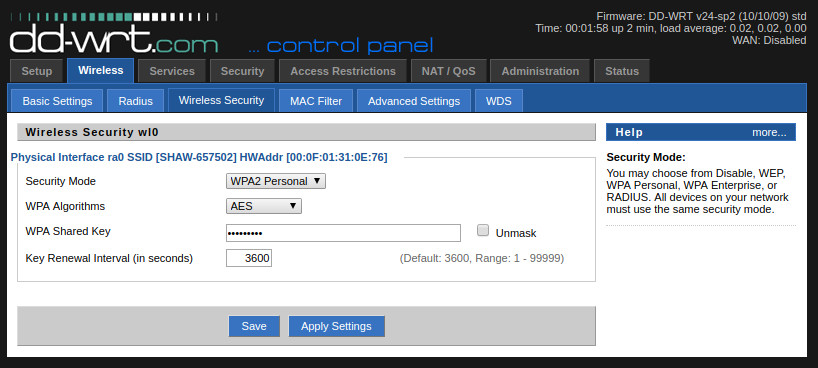
2. Wireless -> Wireless Security
- Physical Interface section
- Security Mode: Must Be WPA2 Personal, and The Primary Router Must Be Exactly The Same.
- WPA Algorithms: Must Be AES, and The Primary Router Must Be Exactly The Same.
- WPA Shared Key: Must Be Exactly The Same As Primary Router
- Key Renewal Interval (in seconds): Leave as it is, normally, 3600.
Then, click Save without Apply, we get:
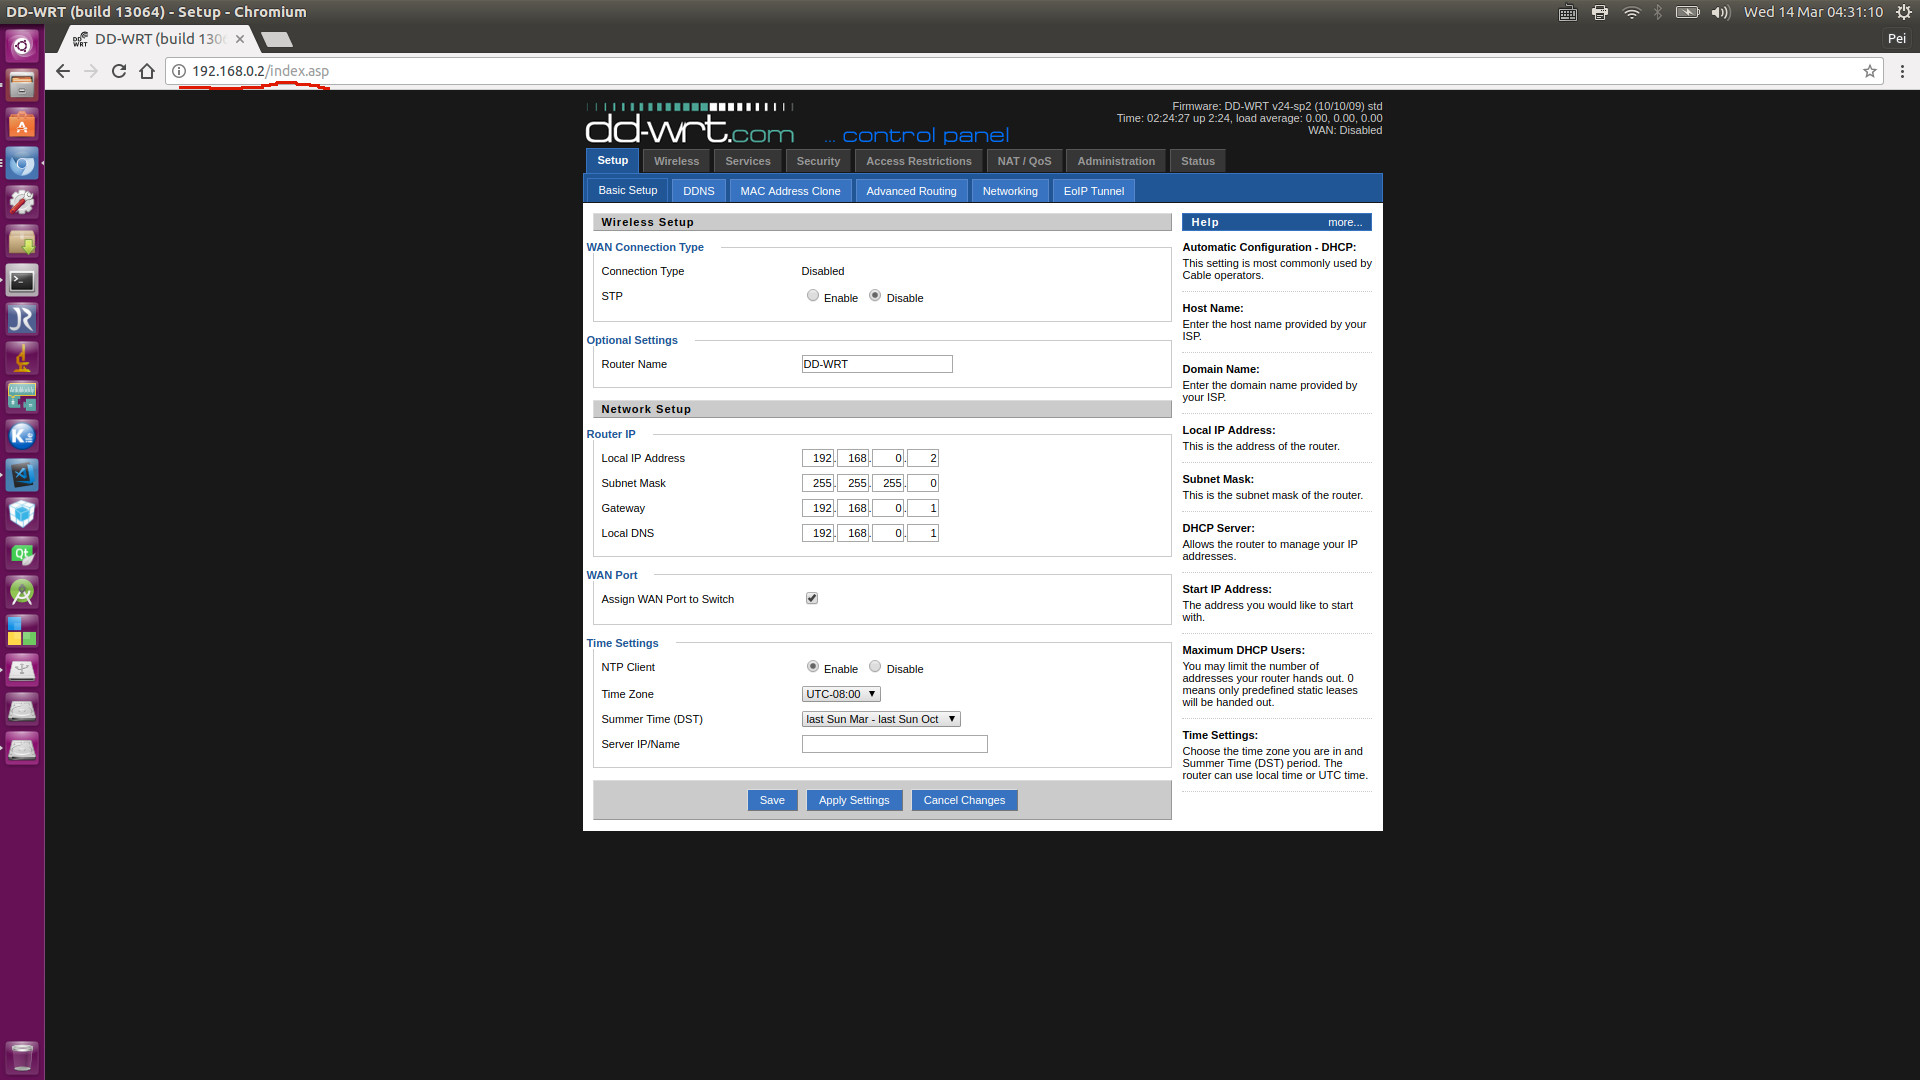
3. Setup -> Basic Setup
- WAN Connection Type Section
- Connection Type: Disabled
- STP: Disabled
- Optional Settings
- Router Name: DD-WRT, just let it be
- Router IP
- IP Address: 192.168.0.2 (in my case, my Primary Router IP is 192.168.0.1, and 192.168.0.2 has NOT been used yet.)
- Subnet Mask: 255.255.255.0
- Gateway: 192.168.0.1 (Must Be Primary Router IP)
- Local DNS: 192.168.0.1 (Must Be Primary Router IP)
- WAN Port
- Assign WAN Port to Switch: tick
- Time Settings
- Time Zone: set correspondingly
Then, click Save without Apply, we get:

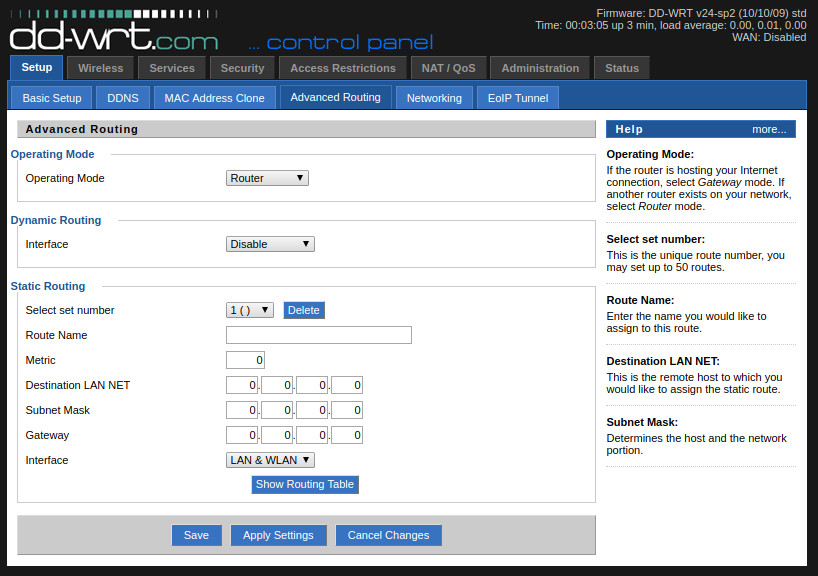
4. Setup -> Advanced Routing
- Operating Mode Section
- Operating Mode: Router
Then, click Save without Apply, we get:
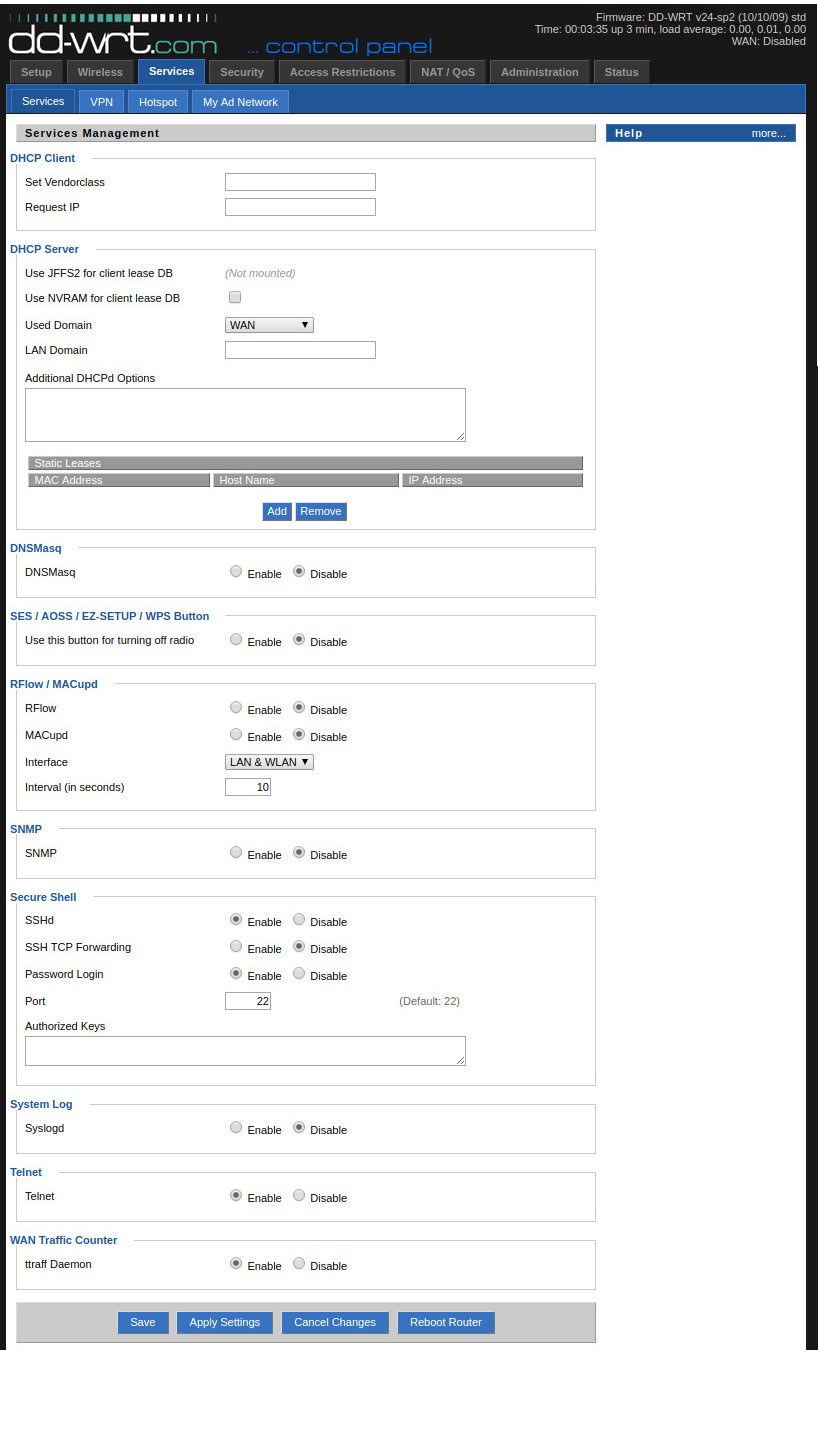
5. Services -> Services
- DNSMasq Section
- DNSMasq: Diable
- Secure Shell Section
- SSHd: Enable
- Telnet Section
- Telnet: Enable
Then, click Save without Apply, we get:
6. Security -> Firewall
Note: Process in Sequence.
- Block WAN Requests
- Block Anonymous WAN Requests (Ping): untick
- Filter Multicast: tick
- Filter WAN NAT Redirection: untick
- Filter IDENT (Port 113): untick
- Firewall Protection
- SPI Firewall: Disable
Then, click Save without Apply, we get:

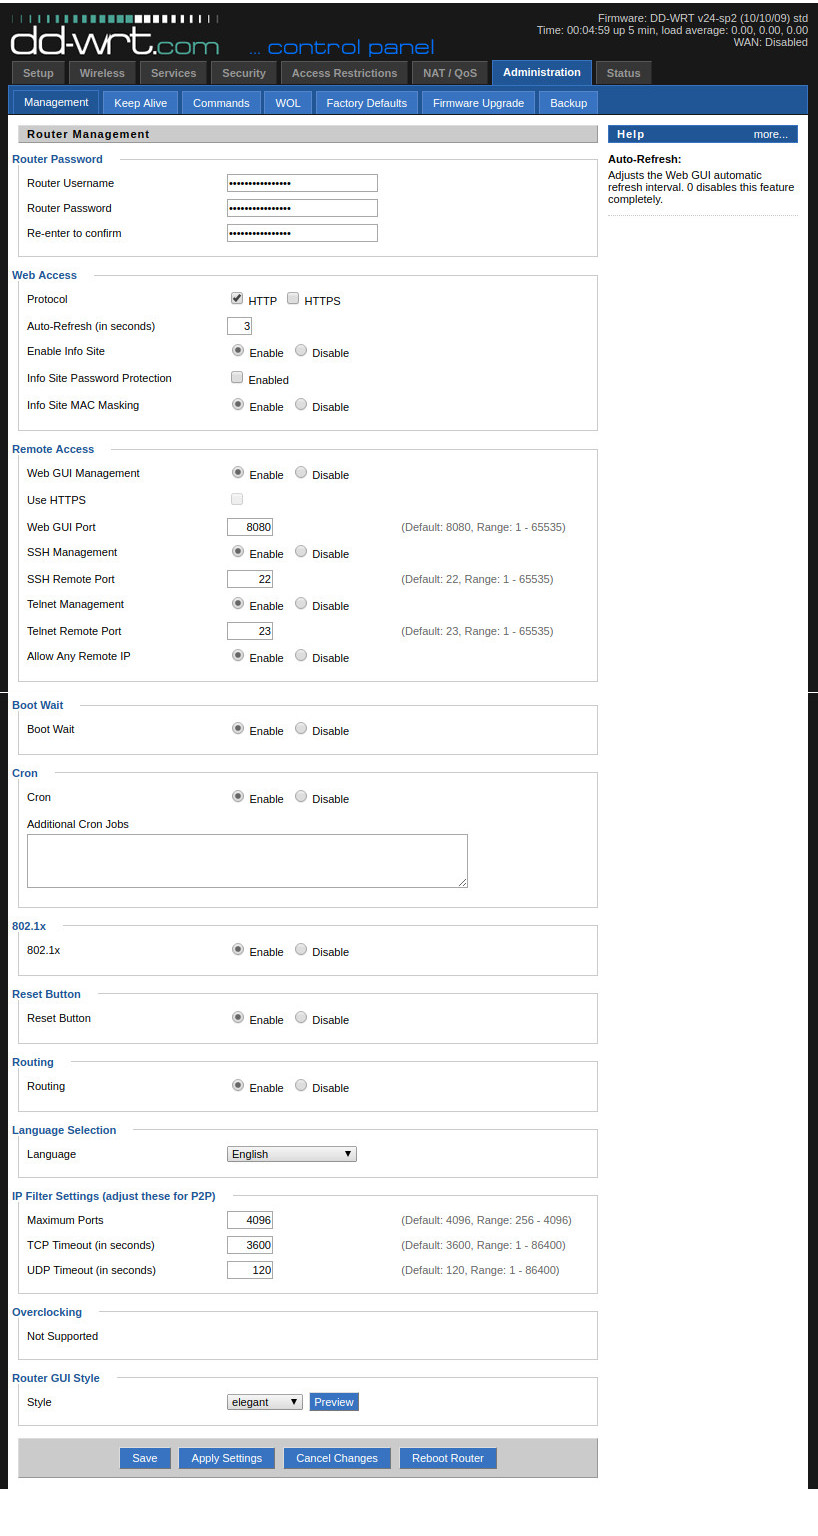
7. Administration Management
- Remote Access Section
- Web GUI Management: Enable
- SSH Management: Enable
- Telnet Remote Port: Enable
- Allow Any Remote IP: Enable
Then, click Save without Apply, we get:
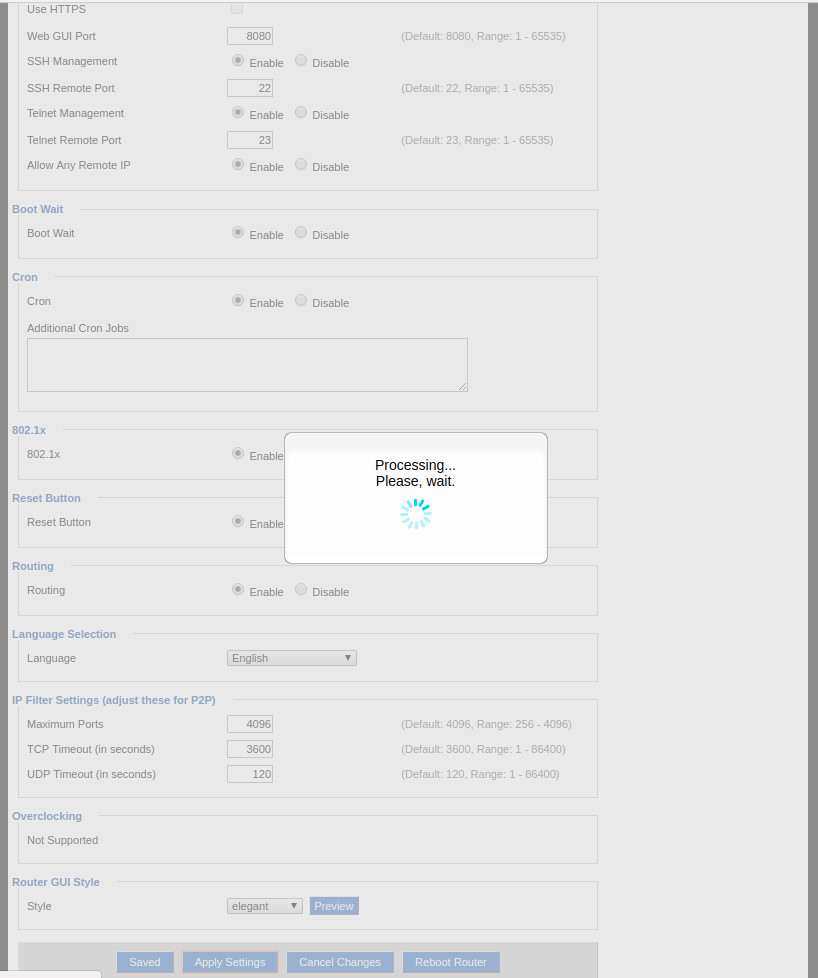
Now, it’s the time to Apply Settings
And finally, click Reboot Router
PART E: Doublechek Repeater Bridge
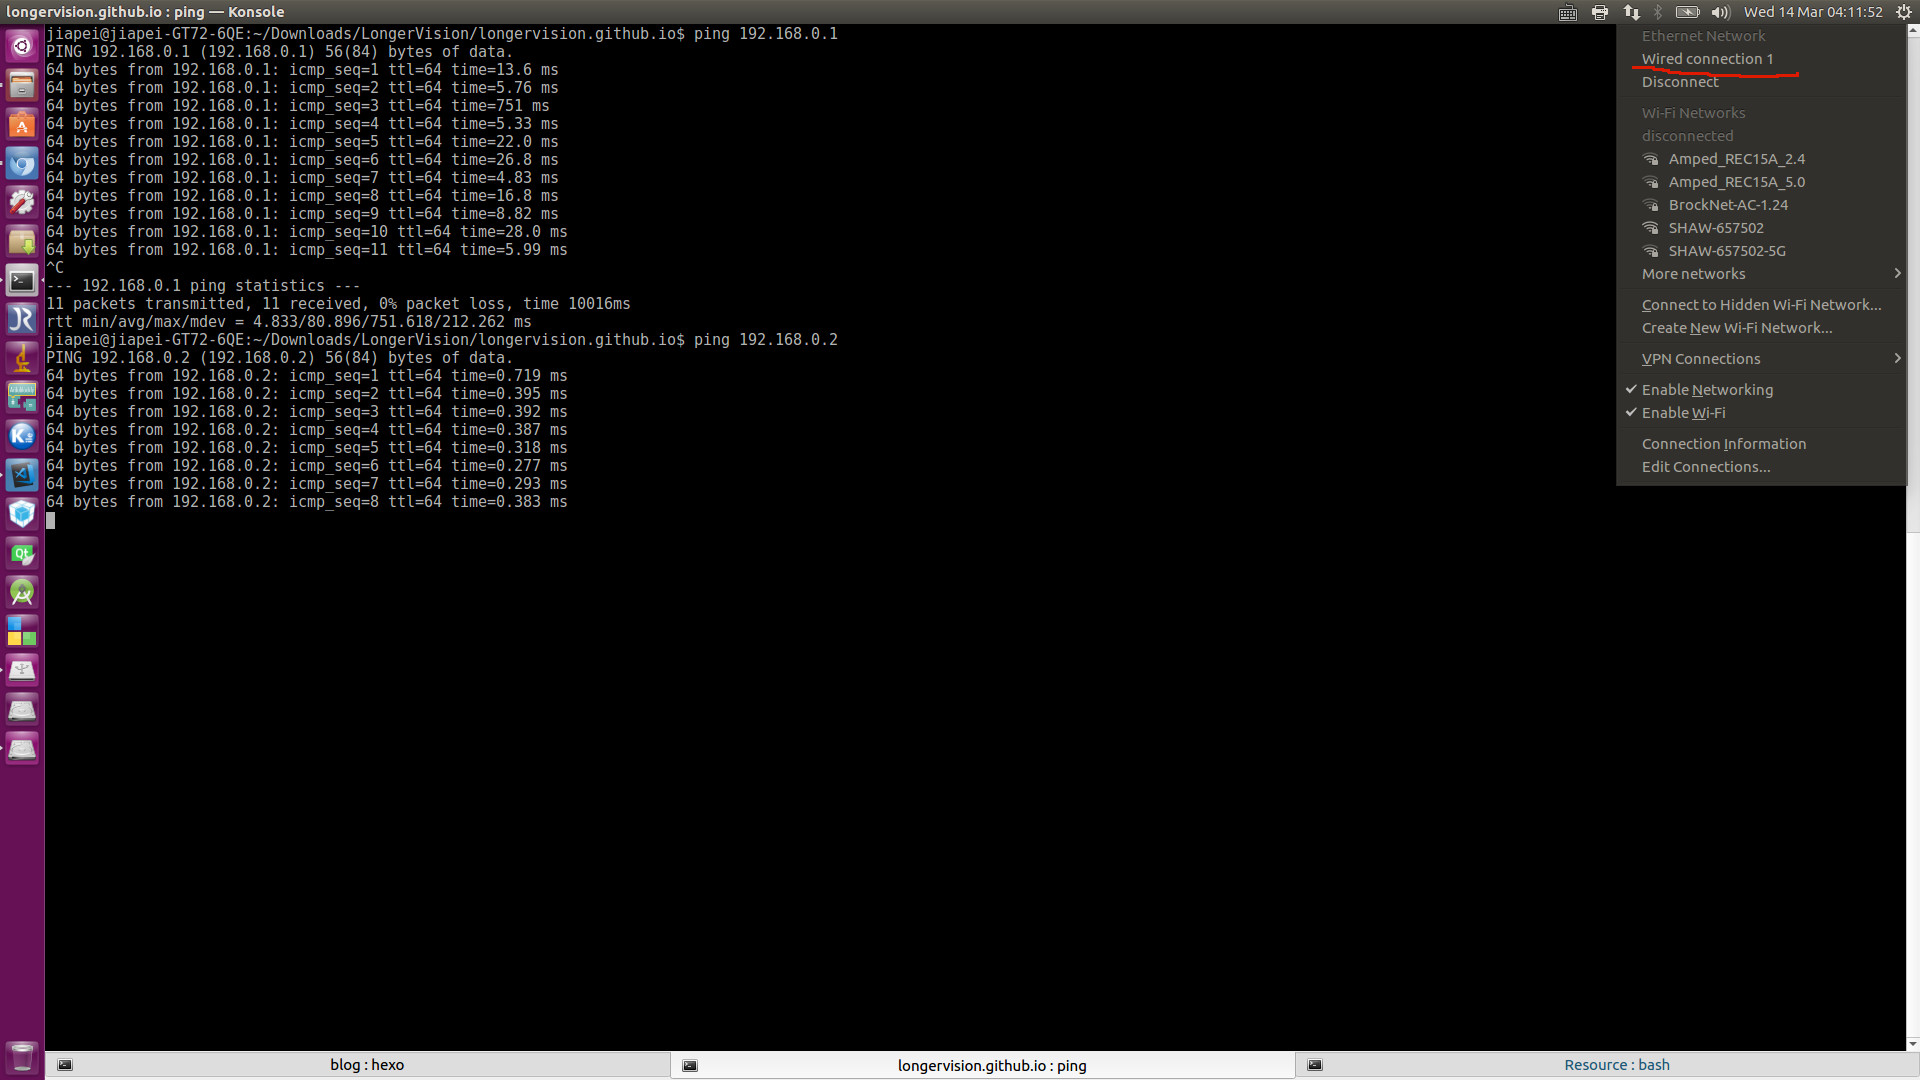
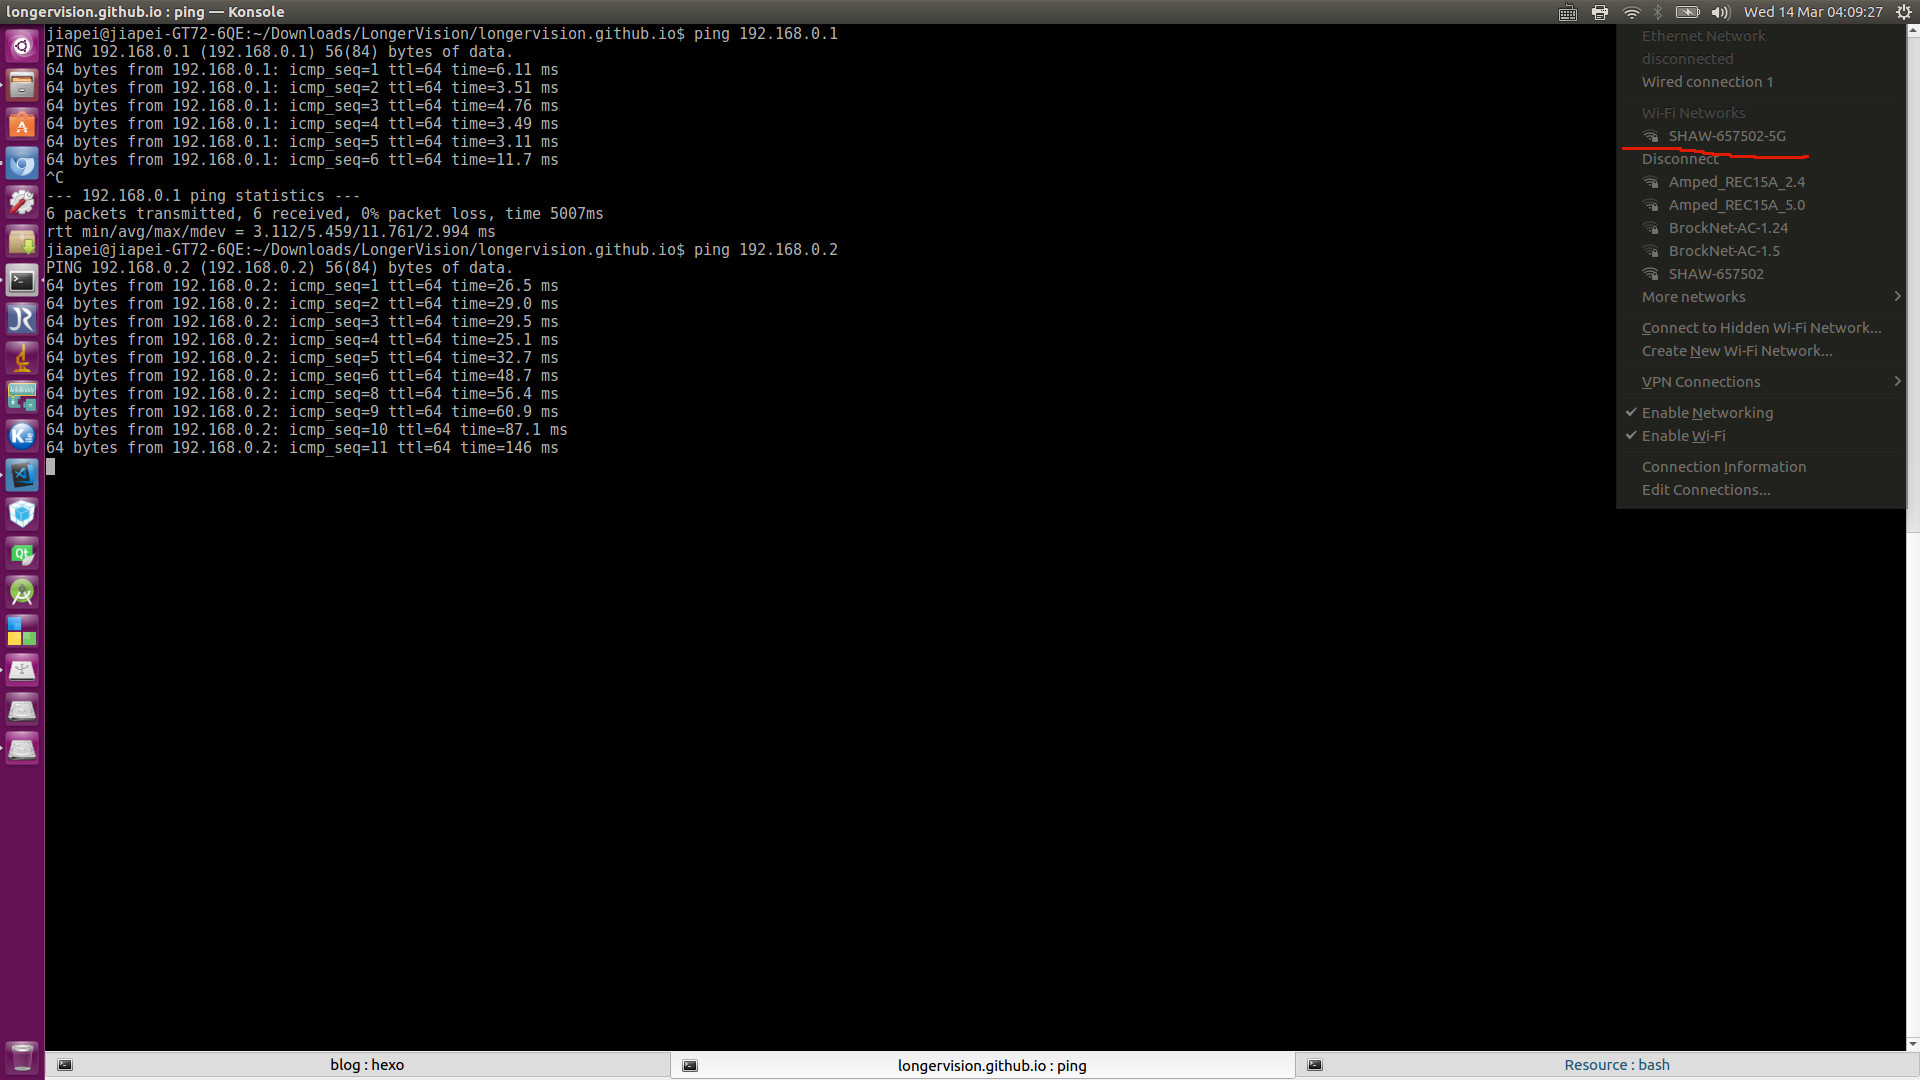
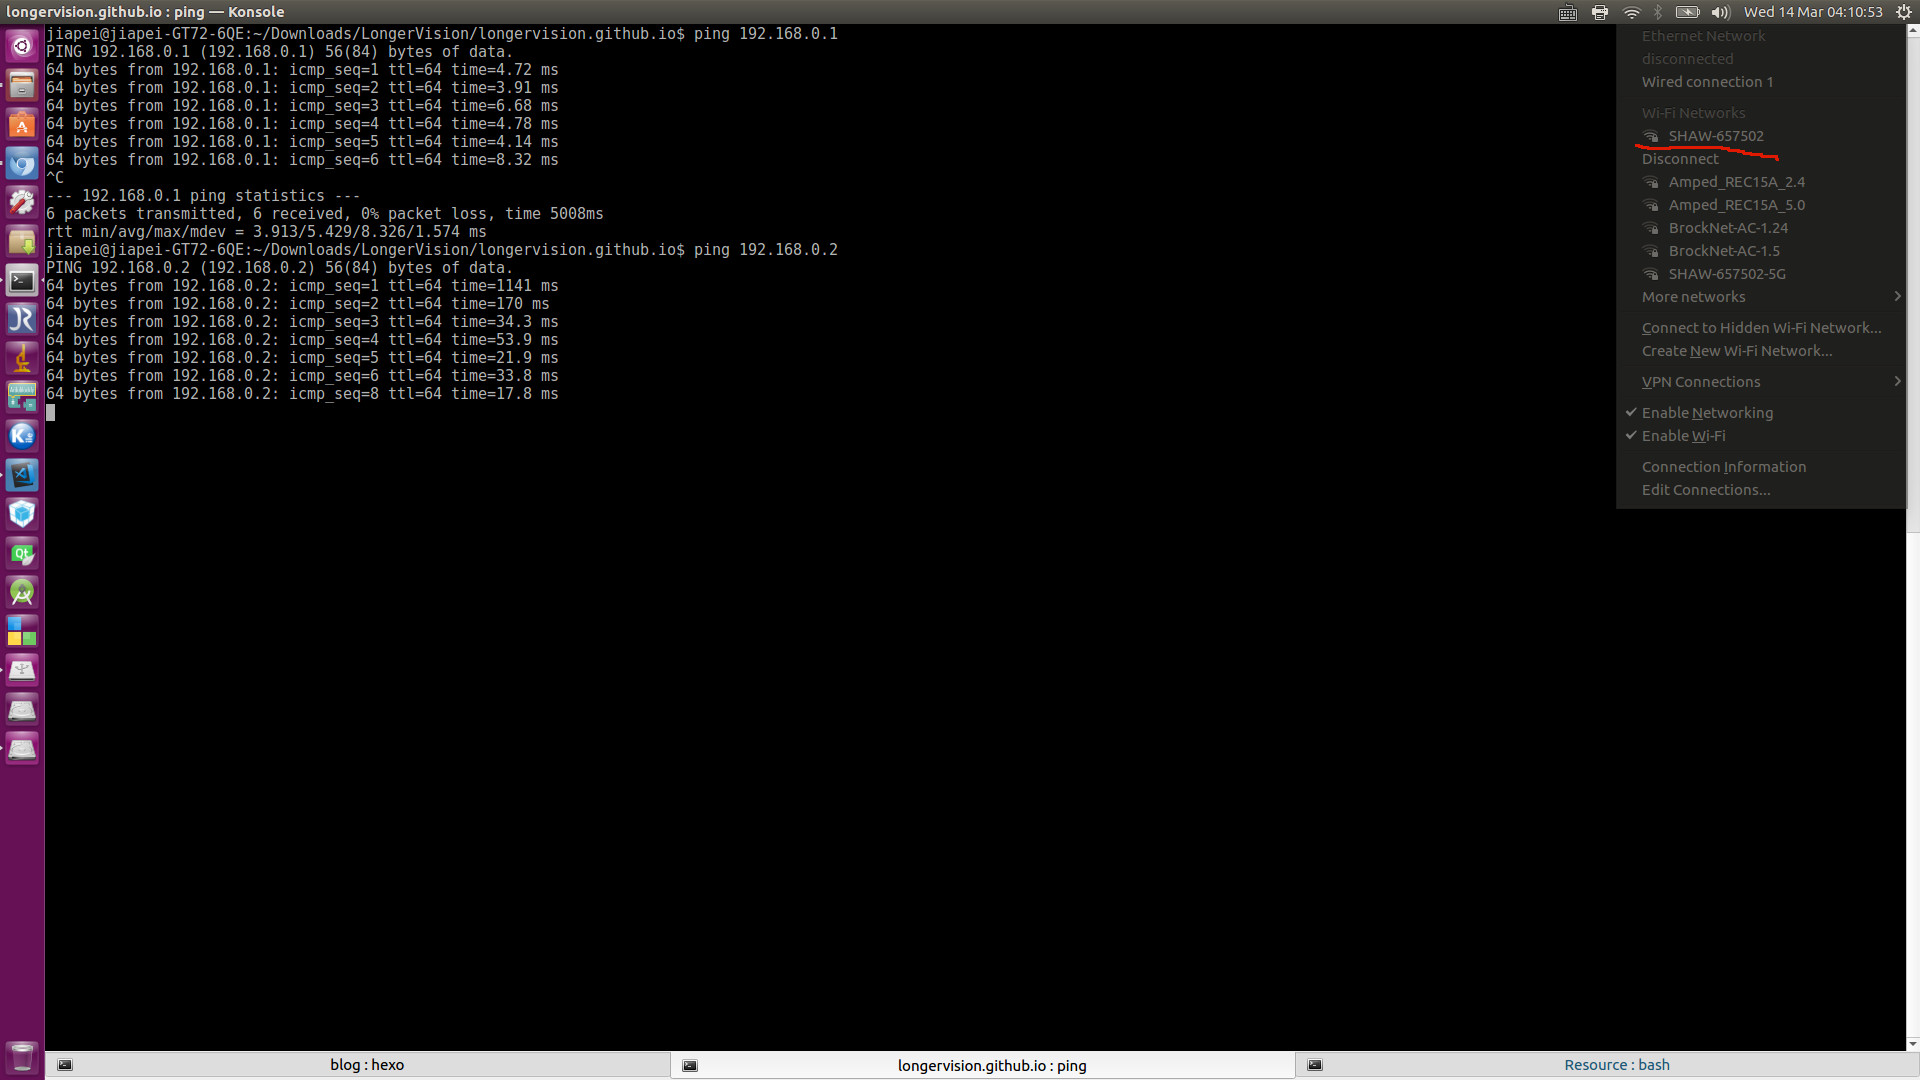
1. Ping
Let’s see the ping results directly:
1) PC Wired Connecting to DD-WRT (Router 2)
2) PC Wirelessly Connecting to Router 1 - 5G
3) PC Wirelessly Connecting to Router 1 - 2.4G
2. Visit http://192.168.0.1 and http://192.168.0.2
Most of the time, in order to get the fastest Internet speed, I use Primary Router 1’s 5G network. Therefore, for my final demonstration, my PC is wirelessly connected to the 5G network. And, I can successfully visit http://192.168.0.1 and http://192.168.0.2.
1) http://192.168.0.1

2) http://192.168.0.2