1
2
3
4
5
6
7
8
9
10
11
12
13
14
15
16
17
18
19
20
21
22
23
24
25
26
27
28
29
30
31
32
33
34
35
36
37
38
39
40
41
42
43
44
45
46
47
48
49
50
51
52
53
54
55
56
57
58
59
60
61
62
63
64
65
66
67
68
69
70
71
72
73
74
75
76
77
78
79
80
81
82
83
84
85
86
87
88
89
90
91
92
93
94
95
96
97
98
99
100
101
102
103
104
105
106
107
108
109
110
111
112
113
114
115
116
117
118
119
120
121
122
123
124
125
126
127
128
129
130
131
132
133
134
135
136
137
138
139
140
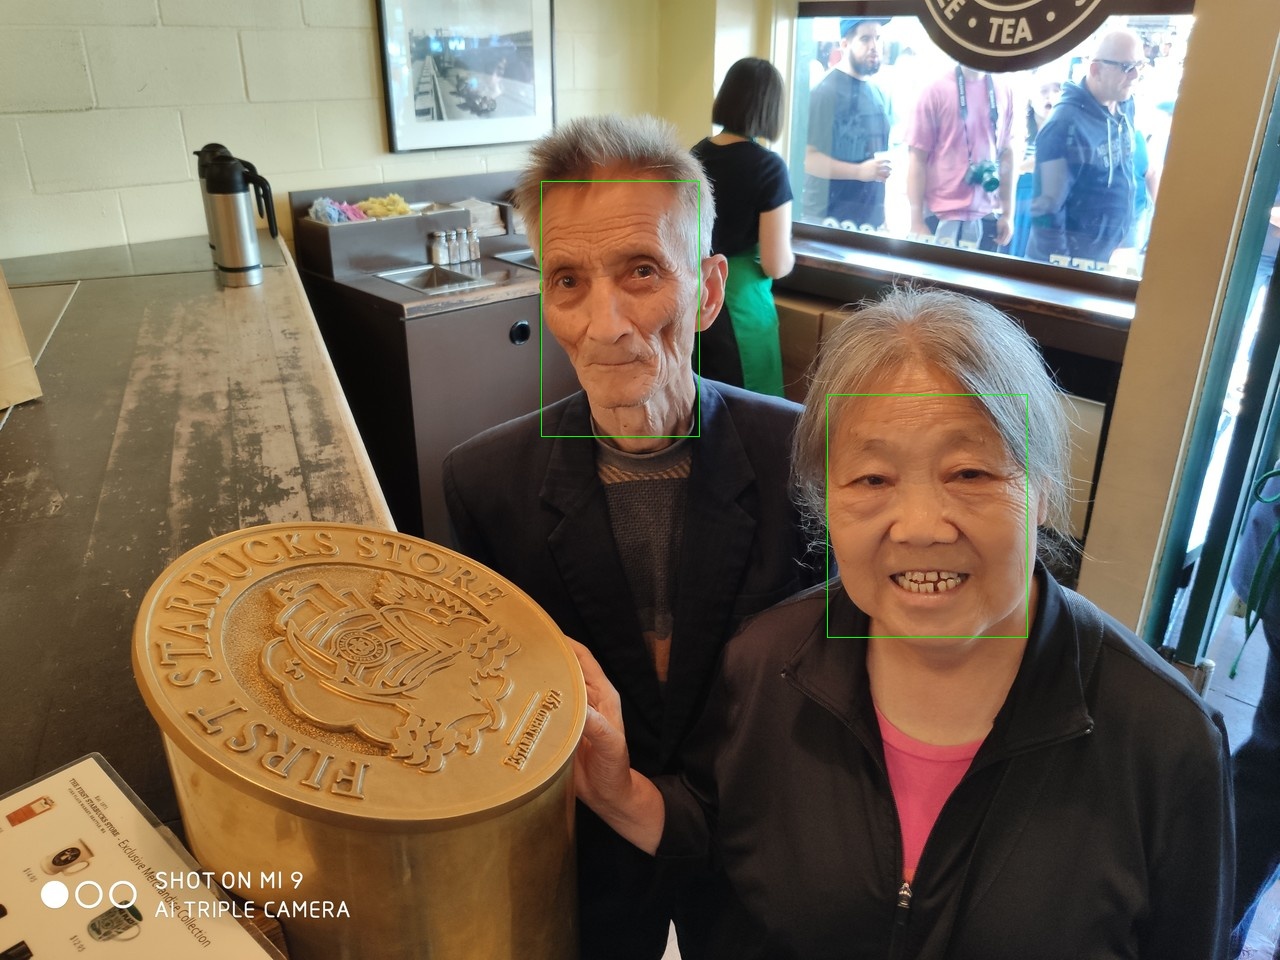
| ➜ samples python ./python/object_detection_sample_ssd/object_detection_sample_ssd.py -m face-detection-adas-0001.xml -d MYRIAD -i parents.jpg
[ INFO ] Loading Inference Engine
[ INFO ] Loading network files:
face-detection-adas-0001.xml
face-detection-adas-0001.bin
[ INFO ] Device info:
MYRIAD
MKLDNNPlugin version ......... 2.1
Build ........... 2020.3.0-3467-15f2c61a-releases/2020/3
inputs number: 1
input shape: [1, 3, 384, 672]
input key: data
[ INFO ] File was added:
[ INFO ] parents.jpg
[ WARNING ] Image parents.jpg is resized from (384, 672) to (384, 672)
[ INFO ] Preparing input blobs
[ INFO ] Batch size is 1
[ INFO ] Preparing output blobs
[ INFO ] Loading model to the device
[ INFO ] Creating infer request and starting inference
[ INFO ] Processing output blobs
[0,1] element, prob = 1.0 (826,366)-(1026,644) batch id : 0 WILL BE PRINTED!
[1,1] element, prob = 0.996582 (539,173)-(693,429) batch id : 0 WILL BE PRINTED!
[2,1] element, prob = 0.552734 (1094,47)-(1135,95) batch id : 0 WILL BE PRINTED!
[3,1] element, prob = 0.22168 (848,22)-(886,70) batch id : 0
[4,1] element, prob = 0.0537109 (8,784)-(151,956) batch id : 0
[5,1] element, prob = 0.0395508 (1033,78)-(1070,122) batch id : 0
[6,1] element, prob = 0.034668 (1123,75)-(1158,122) batch id : 0
[7,1] element, prob = 0.0322266 (1086,14)-(1138,85) batch id : 0
[8,1] element, prob = 0.03125 (1091,110)-(1130,171) batch id : 0
[9,1] element, prob = 0.0302734 (1108,43)-(1150,93) batch id : 0
[10,1] element, prob = 0.0292969 (1151,83)-(1190,131) batch id : 0
[11,1] element, prob = 0.0273438 (1091,6)-(1133,55) batch id : 0
[12,1] element, prob = 0.0273438 (1064,73)-(1098,121) batch id : 0
[13,1] element, prob = 0.0268555 (1030,2)-(1073,42) batch id : 0
[14,1] element, prob = 0.0268555 (1058,113)-(1096,168) batch id : 0
[15,1] element, prob = 0.0268555 (1047,-3)-(1110,59) batch id : 0
[16,1] element, prob = 0.0268555 (1142,75)-(1211,165) batch id : 0
[17,1] element, prob = 0.0268555 (849,14)-(1030,236) batch id : 0
[18,1] element, prob = 0.0258789 (941,22)-(981,74) batch id : 0
[19,1] element, prob = 0.0258789 (1030,36)-(1074,89) batch id : 0
[20,1] element, prob = 0.0258789 (876,73)-(915,118) batch id : 0
[21,1] element, prob = 0.0258789 (845,112)-(886,167) batch id : 0
[22,1] element, prob = 0.0258789 (1036,110)-(1076,171) batch id : 0
[23,1] element, prob = 0.0258789 (1113,-1)-(1175,59) batch id : 0
[24,1] element, prob = 0.0258789 (1003,41)-(1094,151) batch id : 0
[25,1] element, prob = 0.0249023 (1059,0)-(1098,43) batch id : 0
[26,1] element, prob = 0.0249023 (1002,69)-(1048,123) batch id : 0
[27,1] element, prob = 0.0249023 (1133,105)-(1170,164) batch id : 0
[28,1] element, prob = 0.0239258 (966,1)-(1018,45) batch id : 0
[29,1] element, prob = 0.0239258 (876,29)-(918,79) batch id : 0
[30,1] element, prob = 0.0239258 (1056,145)-(1094,208) batch id : 0
[31,1] element, prob = 0.0239258 (861,2)-(918,63) batch id : 0
[32,1] element, prob = 0.0239258 (1010,84)-(1092,204) batch id : 0
[33,1] element, prob = 0.0239258 (1022,139)-(1076,224) batch id : 0
[34,1] element, prob = 0.0239258 (942,35)-(1072,208) batch id : 0
[35,1] element, prob = 0.0229492 (811,3)-(851,48) batch id : 0
[36,1] element, prob = 0.0229492 (1098,63)-(1131,109) batch id : 0
[37,1] element, prob = 0.0229492 (983,-9)-(1141,105) batch id : 0
[38,1] element, prob = 0.0229492 (921,81)-(1087,304) batch id : 0
[39,1] element, prob = 0.0219727 (796,3)-(835,47) batch id : 0
[40,1] element, prob = 0.0219727 (911,4)-(953,55) batch id : 0
[41,1] element, prob = 0.0219727 (797,29)-(835,79) batch id : 0
[42,1] element, prob = 0.0219727 (1154,27)-(1198,79) batch id : 0
[43,1] element, prob = 0.0219727 (969,80)-(1008,128) batch id : 0
[44,1] element, prob = 0.0219727 (1000,155)-(1046,226) batch id : 0
[45,1] element, prob = 0.0219727 (1086,145)-(1125,208) batch id : 0
[46,1] element, prob = 0.0219727 (1123,186)-(1161,252) batch id : 0
[47,1] element, prob = 0.0219727 (958,20)-(1030,84) batch id : 0
[48,1] element, prob = 0.0219727 (985,28)-(1056,105) batch id : 0
[49,1] element, prob = 0.0219727 (845,56)-(898,134) batch id : 0
[50,1] element, prob = 0.0219727 (934,65)-(986,155) batch id : 0
[51,1] element, prob = 0.0219727 (1046,99)-(1107,178) batch id : 0
[52,1] element, prob = 0.0219727 (1035,116)-(1110,241) batch id : 0
[53,1] element, prob = 0.0219727 (990,166)-(1054,269) batch id : 0
[54,1] element, prob = 0.0219727 (1065,-16)-(1192,124) batch id : 0
[55,1] element, prob = 0.0219727 (971,13)-(1140,235) batch id : 0
[56,1] element, prob = 0.0219727 (980,125)-(1108,286) batch id : 0
[57,1] element, prob = 0.0209961 (991,0)-(1043,41) batch id : 0
[58,1] element, prob = 0.0209961 (1126,0)-(1165,42) batch id : 0
[59,1] element, prob = 0.0209961 (821,35)-(856,79) batch id : 0
[60,1] element, prob = 0.0209961 (910,28)-(945,78) batch id : 0
[61,1] element, prob = 0.0209961 (997,41)-(1038,86) batch id : 0
[62,1] element, prob = 0.0209961 (1068,40)-(1103,86) batch id : 0
[63,1] element, prob = 0.0209961 (754,77)-(789,125) batch id : 0
[64,1] element, prob = 0.0209961 (819,77)-(855,123) batch id : 0
[65,1] element, prob = 0.0209961 (913,79)-(949,128) batch id : 0
[66,1] element, prob = 0.0209961 (821,112)-(861,164) batch id : 0
[67,1] element, prob = 0.0209961 (938,108)-(980,173) batch id : 0
[68,1] element, prob = 0.0209961 (1149,112)-(1189,162) batch id : 0
[69,1] element, prob = 0.0209961 (870,149)-(918,215) batch id : 0
[70,1] element, prob = 0.0209961 (1033,152)-(1070,209) batch id : 0
[71,1] element, prob = 0.0209961 (1064,188)-(1099,246) batch id : 0
[72,1] element, prob = 0.0209961 (1023,63)-(1081,131) batch id : 0
[73,1] element, prob = 0.0209961 (1054,58)-(1110,126) batch id : 0
[74,1] element, prob = 0.0209961 (1041,40)-(1125,143) batch id : 0
[75,1] element, prob = 0.0209961 (1111,99)-(1190,228) batch id : 0
[76,1] element, prob = 0.0209961 (1078,169)-(1130,261) batch id : 0
[77,1] element, prob = 0.0209961 (950,189)-(1072,367) batch id : 0
[78,1] element, prob = 0.0200195 (940,6)-(987,56) batch id : 0
[79,1] element, prob = 0.0200195 (943,81)-(978,130) batch id : 0
[80,1] element, prob = 0.0200195 (878,114)-(919,175) batch id : 0
[81,1] element, prob = 0.0200195 (910,110)-(950,170) batch id : 0
[82,1] element, prob = 0.0200195 (968,104)-(1008,159) batch id : 0
[83,1] element, prob = 0.0200195 (1128,141)-(1165,204) batch id : 0
[84,1] element, prob = 0.0200195 (1147,135)-(1188,199) batch id : 0
[85,1] element, prob = 0.0200195 (1238,903)-(1279,963) batch id : 0
[86,1] element, prob = 0.0200195 (1007,-2)-(1083,55) batch id : 0
[87,1] element, prob = 0.0200195 (1052,161)-(1105,266) batch id : 0
[88,1] element, prob = 0.0200195 (1061,145)-(1140,284) batch id : 0
[89,1] element, prob = 0.0200195 (-16,860)-(79,985) batch id : 0
[90,1] element, prob = 0.0200195 (866,-10)-(1029,107) batch id : 0
[91,1] element, prob = 0.0200195 (1173,-17)-(1280,136) batch id : 0
[92,1] element, prob = 0.0200195 (1072,32)-(1197,189) batch id : 0
[93,1] element, prob = 0.0200195 (1005,179)-(1111,359) batch id : 0
[94,1] element, prob = 0.019043 (758,2)-(795,45) batch id : 0
[95,1] element, prob = 0.019043 (968,35)-(1011,82) batch id : 0
[96,1] element, prob = 0.019043 (1003,109)-(1044,169) batch id : 0
[97,1] element, prob = 0.019043 (930,148)-(973,211) batch id : 0
[98,1] element, prob = 0.019043 (1092,191)-(1128,246) batch id : 0
[99,1] element, prob = 0.019043 (1123,225)-(1161,291) batch id : 0
[100,1] element, prob = 0.019043 (1146,19)-(1208,109) batch id : 0
[101,1] element, prob = 0.019043 (897,59)-(958,143) batch id : 0
[102,1] element, prob = 0.019043 (962,65)-(1023,137) batch id : 0
[103,1] element, prob = 0.019043 (886,83)-(971,209) batch id : 0
[104,1] element, prob = 0.019043 (995,99)-(1055,192) batch id : 0
[105,1] element, prob = 0.019043 (902,135)-(963,221) batch id : 0
[106,1] element, prob = 0.019043 (1101,145)-(1183,284) batch id : 0
[107,1] element, prob = 0.019043 (821,-17)-(946,129) batch id : 0
[108,1] element, prob = 0.019043 (940,-16)-(1076,120) batch id : 0
[109,1] element, prob = 0.019043 (819,34)-(945,205) batch id : 0
[110,1] element, prob = 0.019043 (1019,342)-(1283,785) batch id : 0
[111,1] element, prob = 0.0180664 (1147,7)-(1193,54) batch id : 0
[112,1] element, prob = 0.0180664 (756,38)-(792,89) batch id : 0
[ INFO ] Image out.bmp created!
[ INFO ] Execution successful
[ INFO ] This sample is an API example, for any performance measurements please use the dedicated benchmark_app tool
corrupted double-linked list
Aborted
|