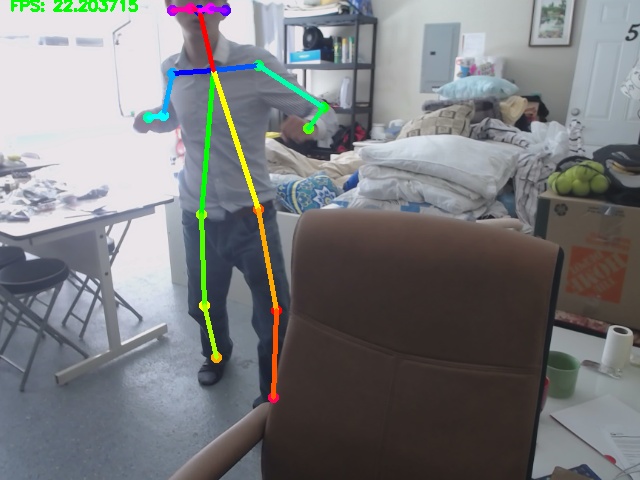
Busy again. Simple test about posture recognition. :laughing:
Yup… it is ME again, several minutes ago…
Busy again. Simple test about posture recognition. :laughing:
Yup… it is ME again, several minutes ago…
Tensorflow is always problematic, particularly, for guys like me…
Linux Kernel 4.17.3 + Ubuntu 18.04 + GCC 7.3.0 + Python
1 | $ uname -r |
1 | $ lsb_release -a |
1 | $ gcc --version |
1 | $ python --version |
From Bazel’s official website Installing Bazel on Ubuntu:
1 | $ echo "deb [arch=amd64] http://storage.googleapis.com/bazel-apt stable jdk1.8" | sudo tee /etc/apt/sources.list.d/bazel.list |
Current bazel 0.15.0 will be installed.
1 | $ ./configure |
Follow Installing TensorFlow from Sources on Tensorflow‘s official website, have all required packages prepared, and run:
1 | bazel build --config=opt --config=cuda //tensorflow/tools/pip_package:build_pip_package |
you will meet several ERROR messages, which requires you to carry out the following modifications.
1 | config_setting( |
1 | $ sudo ln -s /usr/local/cuda/include/crt/math_functions.hpp /usr/local/cuda/include/math_functions.hpp |
1 | bazel build --config=opt --config=cuda //tensorflow/tools/pip_package:build_pip_package |
It’ll take around 30 minutes to have Tensorflow successfully built.
1 | ...... |
1 | $ bazel-bin/tensorflow/tools/pip_package/build_pip_package /tmp/tensorflow_pkg |
Let’s have a look at what’s been built:
1 | $ ls /tmp/tensorflow_pkg/ |
And, let’s have tensorflow-1.9.0rc0-cp36-cp36m-linux_x86_64.whl installed.
1 | $ pip3 install /tmp/tensorflow_pkg/tensorflow-1.9.0rc0-cp36-cp36m-linux_x86_64.whl |
Let’s test if Tensorflow has been successfully installed.
1 | $ python |
After successfully check out Keras, we can easily have Keras installed by command python setup.py install.
1 | $ python setup.py install |
That’s all for today. I think Python is seriously cool, handy indeed. I myself will still recommend Pytorch, but it seems Tensorflow and Keras are also very popular in North America.
I’m quite busy today. So, I’d just post some videos to show the performance about jiu bu gao su ni :laughing:
Click on the pictures to open an uploaded Facebook video.


| 01_al_pacino | 02_alanis_morissette | 03_anderson_cooper |
|---|---|---|
 |
 |
 |
| 04_angelina_jolie | 05_bill_clinton | 06_bill_gates |
 |
 |
 |
| 07_gloria_estefan | 08_jet_li | 09_julia_roberts |
 |
 |
 |
| 10_noam_chomsky | 11_sylvester_stallone | 12_tony_blair |
 |
 |
 |
| 13_victoria_beckham | 14_vladimir_putin | |
 |
 |
Yesterday is Canada Day… ^_^ Happy Canada Day everybody…

Just notice this news about ImageAI today. So, I just had it tested for fun. I seriously don’t want to talk about ImageAI too much, you can follow the author’s github and it shouldn’t be that hard to have everything done in minutes.
As described by on ImageAI’s Github, multiple Python dependencies need to be installed:
All packages can be easily installed by command:
1 | pip3 install PackageName |
Afterwards, ImageAI can be installed by a single command:
1 | pip3 install https://github.com/OlafenwaMoses/ImageAI/releases/download/2.0.1/imageai-2.0.1-py3-none-any.whl |
Two models are adopted as in the examples prediction and detection.
Simple examples are given at https://github.com/OlafenwaMoses/ImageAI/tree/master/imageai/Prediction.
I modified FirstPrediction.py a bit as follows:
1 | from imageai.Prediction import ImagePrediction |
For the 1st image:
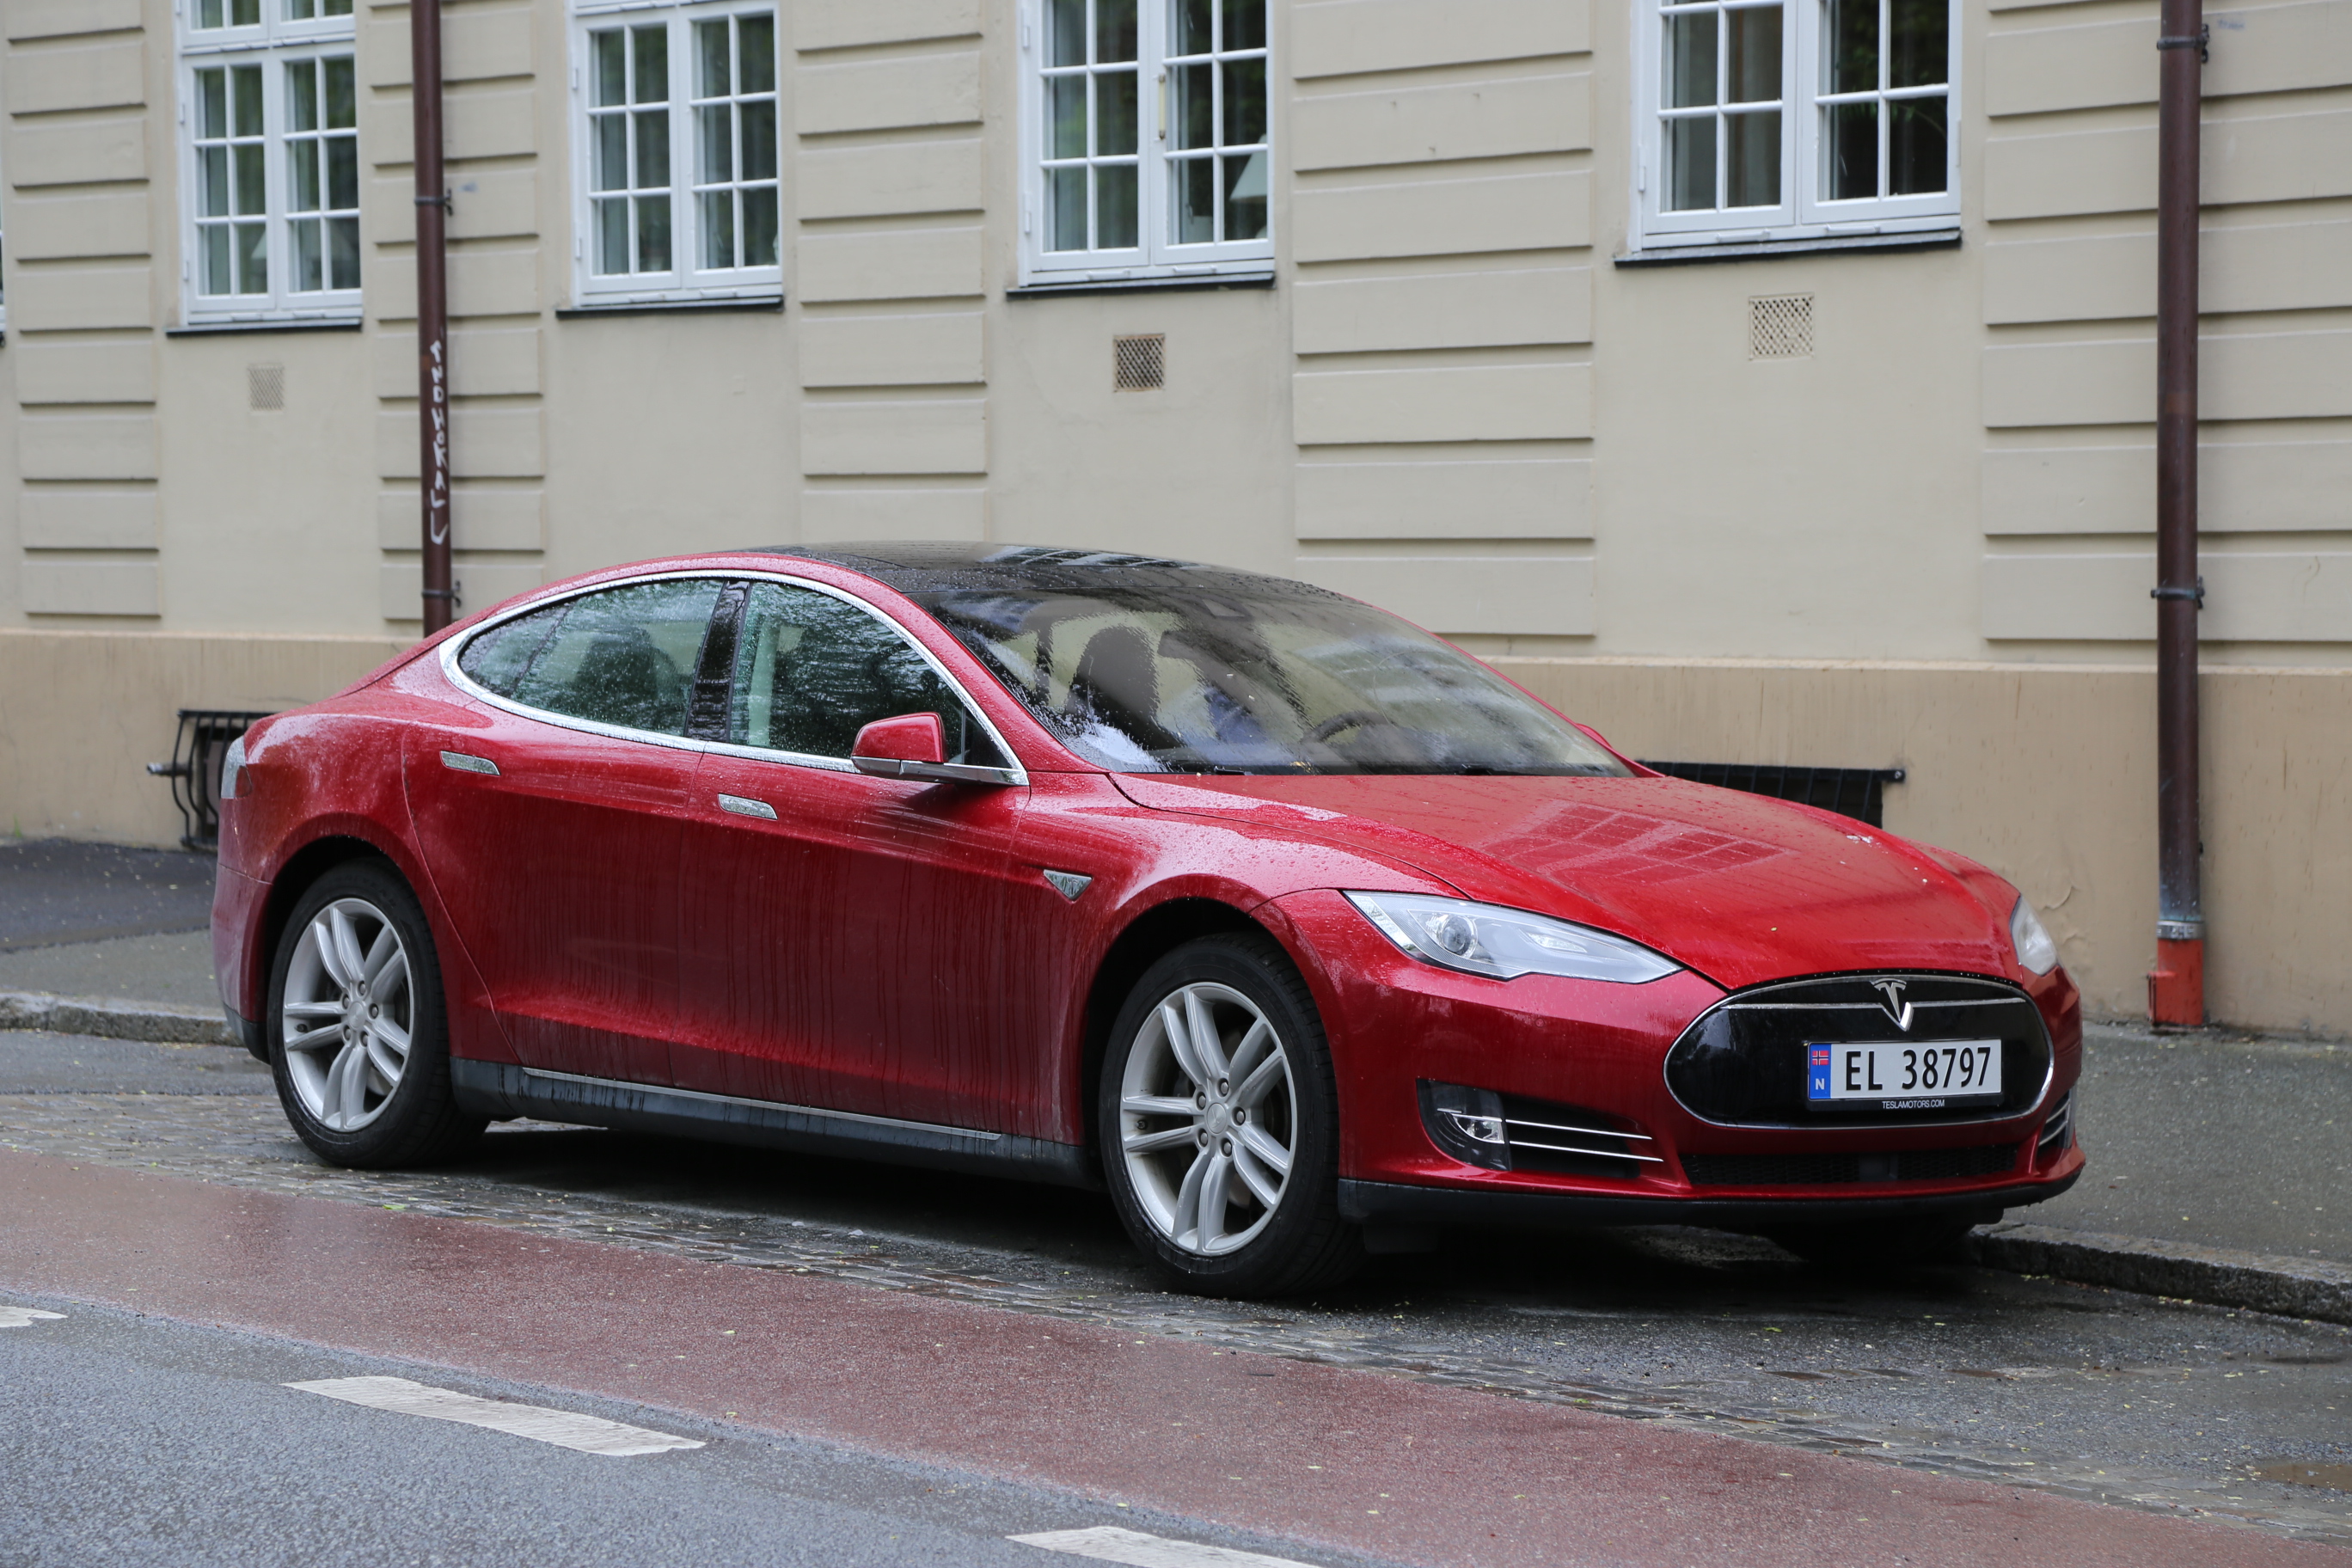
From bash, you will get:
1 | $ python FirstPrediction.py |
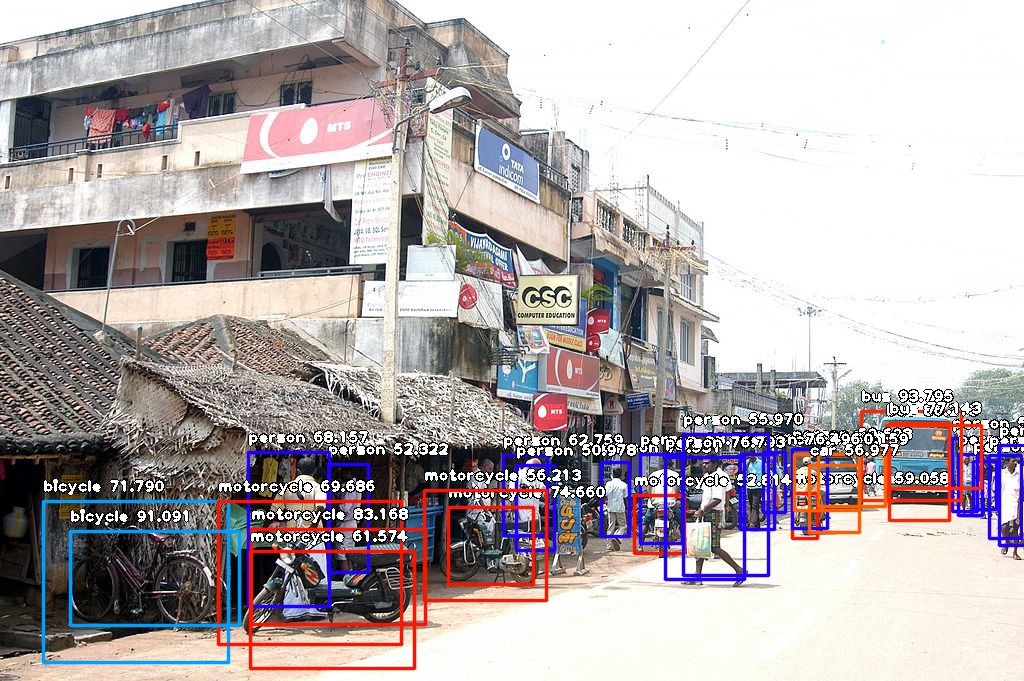
Simple examples are given at https://github.com/OlafenwaMoses/ImageAI/tree/master/imageai/Detection.
Trivial modification is also implemented upon FirstObjectDetection.py.
1 | from imageai.Detection import ObjectDetection |

From bash, you will get
1 | $ python FirstDetection.py |
And, under the program folder, you will get an output image:
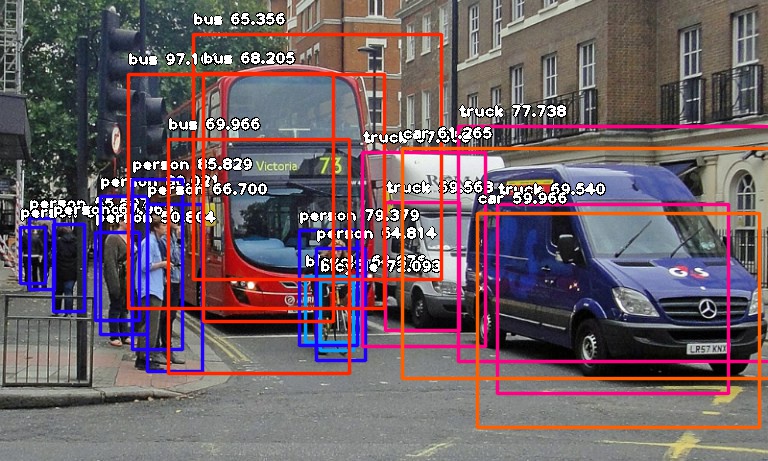

From bash, you will get
1 | $ python FirstDetection.py |
And, under the program folder, you will get an output image:
It has been quite a while that my VOSM has NOT been updated. My bad for sure. But today, I have it updated, and VOSM-0.3.5 is released. Just refer to the following 3 pages on github:
We’ll still explain a bit on How to use VOSM in the following:
Currently, there are 7 types of models to be built. Namely, there are 7 choices for the parameter “-t”:
1 | $ testsmbuilding -o "./output" -a "./annotations/training/" -i "./images/training/" -s "../VOSM/shapeinfo/IMM/ShapeInfo.txt" -d "IMM" -c 1 -t "SM" -l 4 -p 0.95 |
After these 7 commands, 9 folders will be generated:
Under folder TextureModel, 3 key images are generated:
| Reference.jpg | edges.jpg | ellipses.jpg |
|---|---|---|
 |
 |
 |
Under folder AAMICIA, another 3 key images are generated:
| m_IplImageTempFace.jpg | m_IplImageTempFaceX.jpg | m_IplImageTempFaceY.jpg |
|---|---|---|
 |
 |
 |
Current VOSM supports 5 fitting methods.
1 | $ testsmfitting -o "./output/" -t "ASM_PROFILEND" -i "./images/testing/" -a "./annotations/testing/" -d "IMM" -s true -r true |
Let’s just take ASM_PROFILEND as an example.
1 | $ testsmfitting -o "./output/" -t "ASM_PROFILEND" -i "./images/testing/" -a "./annotations/testing/" -d "IMM" -s true -r true |
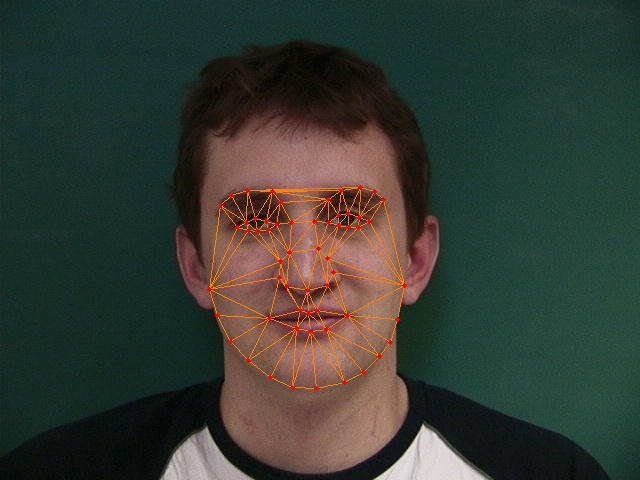
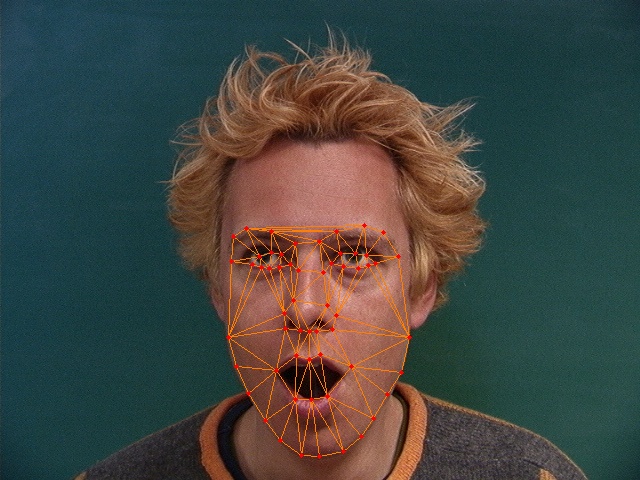
All fitted images are generated under current folder, some are well fitted:
| 11-1m.jpg | 33-4m.jpg | 40-6m.jpg |
|---|---|---|
 |
 |
 |
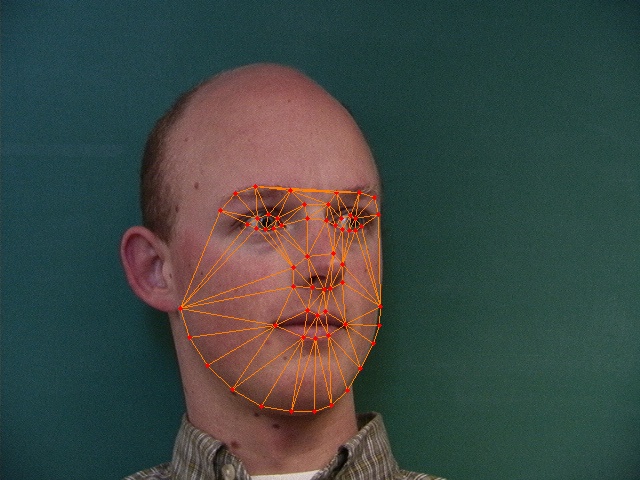
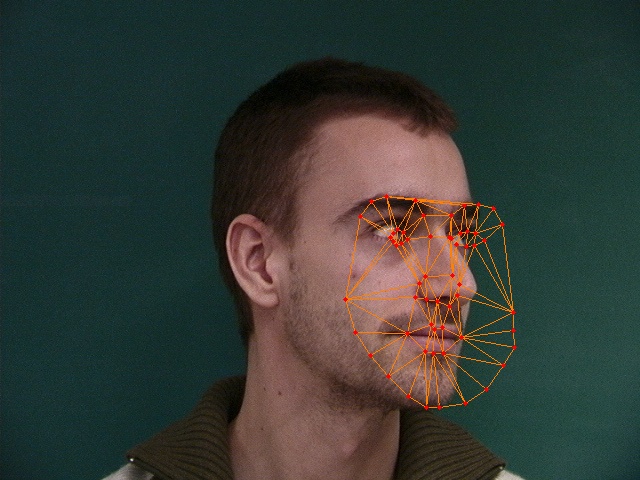
others are NOT well fitted:
| 12-3f.jpg | 20-6m.jpg | 23-4m.jpg |
|---|---|---|
 |
 |
 |
The fitting process can also be recorded for each image if the parameter “-r” is enabled by -r true. Let’s take a look at what’s in folder 40-6m.
| 00.jpg | 01.jpg | 02.jpg |
|---|---|---|
 |
 |
 |
| 03.jpg | 04.jpg | 05.jpg |
 |
 |
 |
| 06.jpg | 07.jpg | 08.jpg |
 |
 |
 |
| 09.jpg | 10.jpg | 11.jpg |
 |
 |
 |
| 09.jpg | 10.jpg | 11.jpg |
 |
 |
 |
| 15.jpg | 16.jpg | |
 |
 |
Clearly, the technology of pyramids is adopted during the fitting process.
To download videos from Youtube is sometimes required. Some Chrome plugins can be used to download Youtube videos, such as: Youtube Downloader. Other methods can also be found on various resources, such as: WikiHow.
In this blog, I’m going to cite (copy and paste) from WikiHow about How to download Youtube videos by using VLC.
Find the Youtube video that you would like to download, and copy the Youtube URL.
Paste the URL under VLC Media Player->Media->Open Network Stream->Network Tab->Please enter a network URL:, and Play:
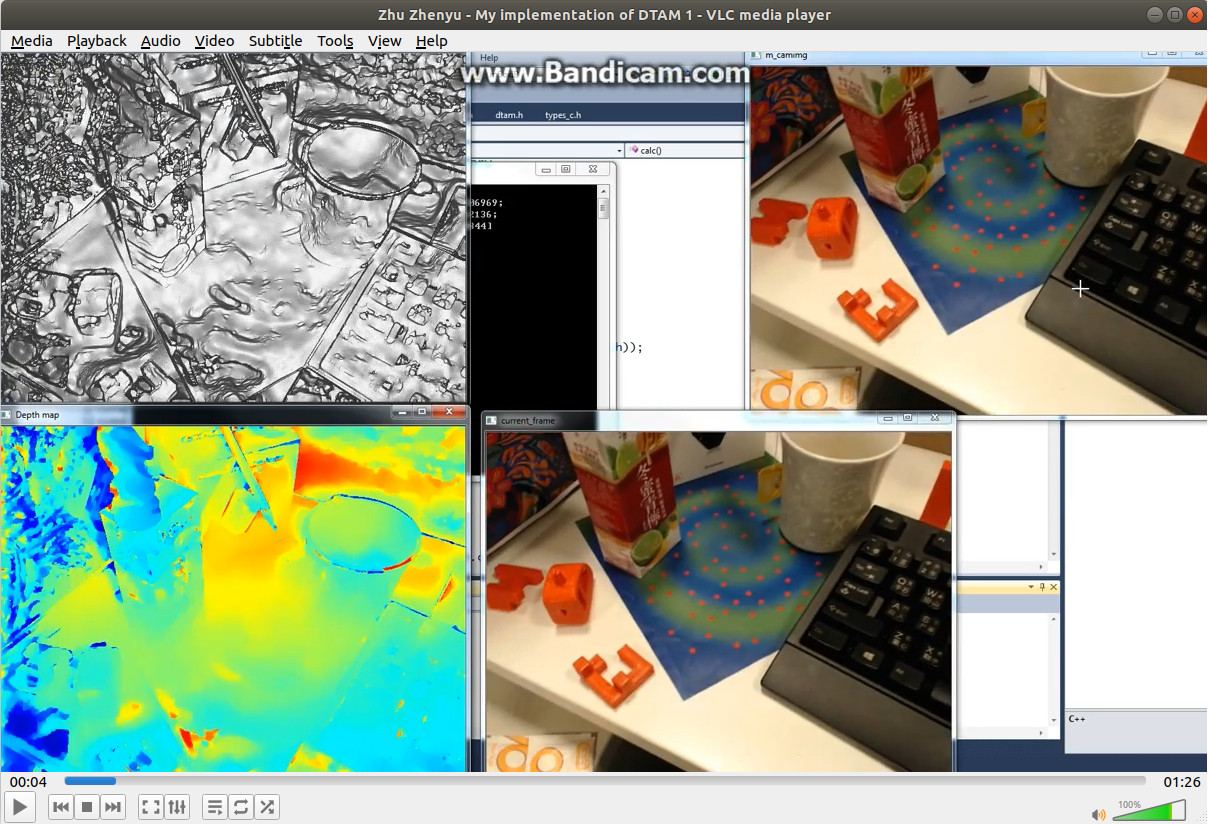
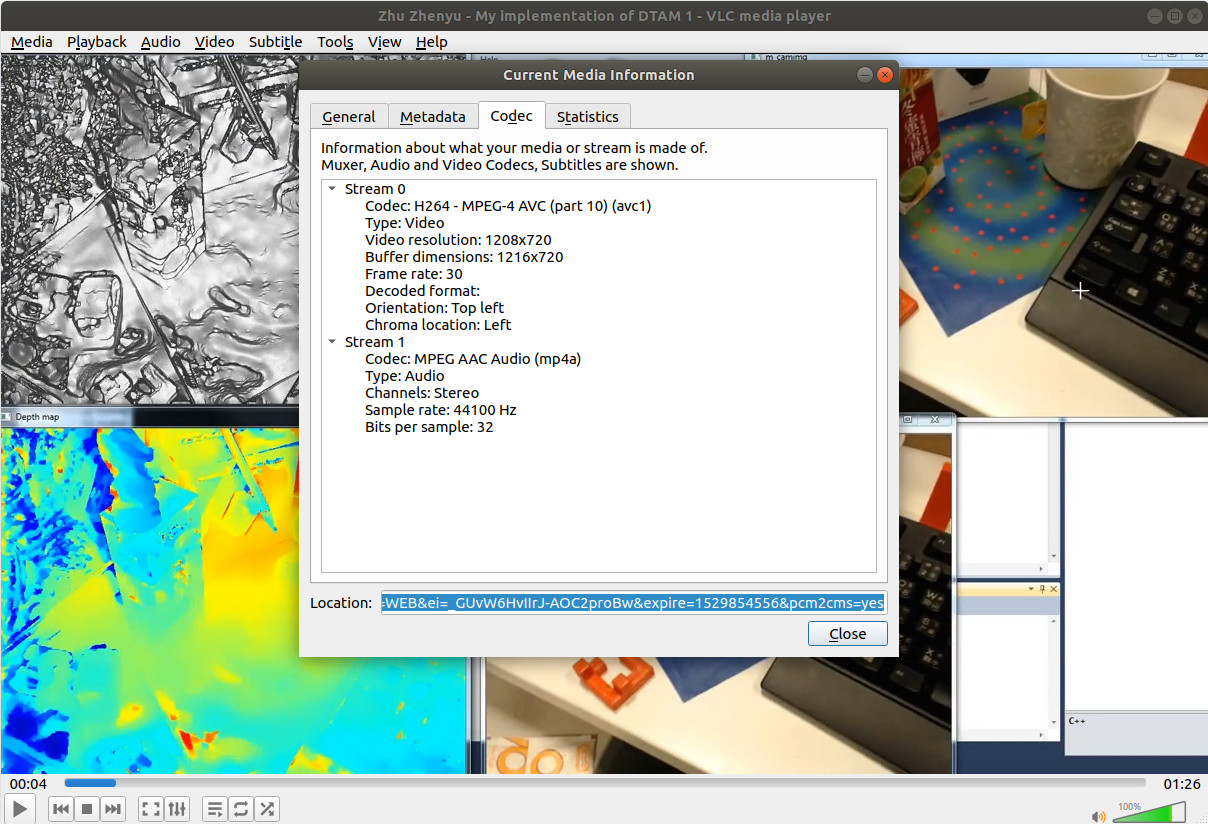
Then, copy the URL under Tools->Codec Information->Codec->Location:
Finally, paste the URL in Chrome:
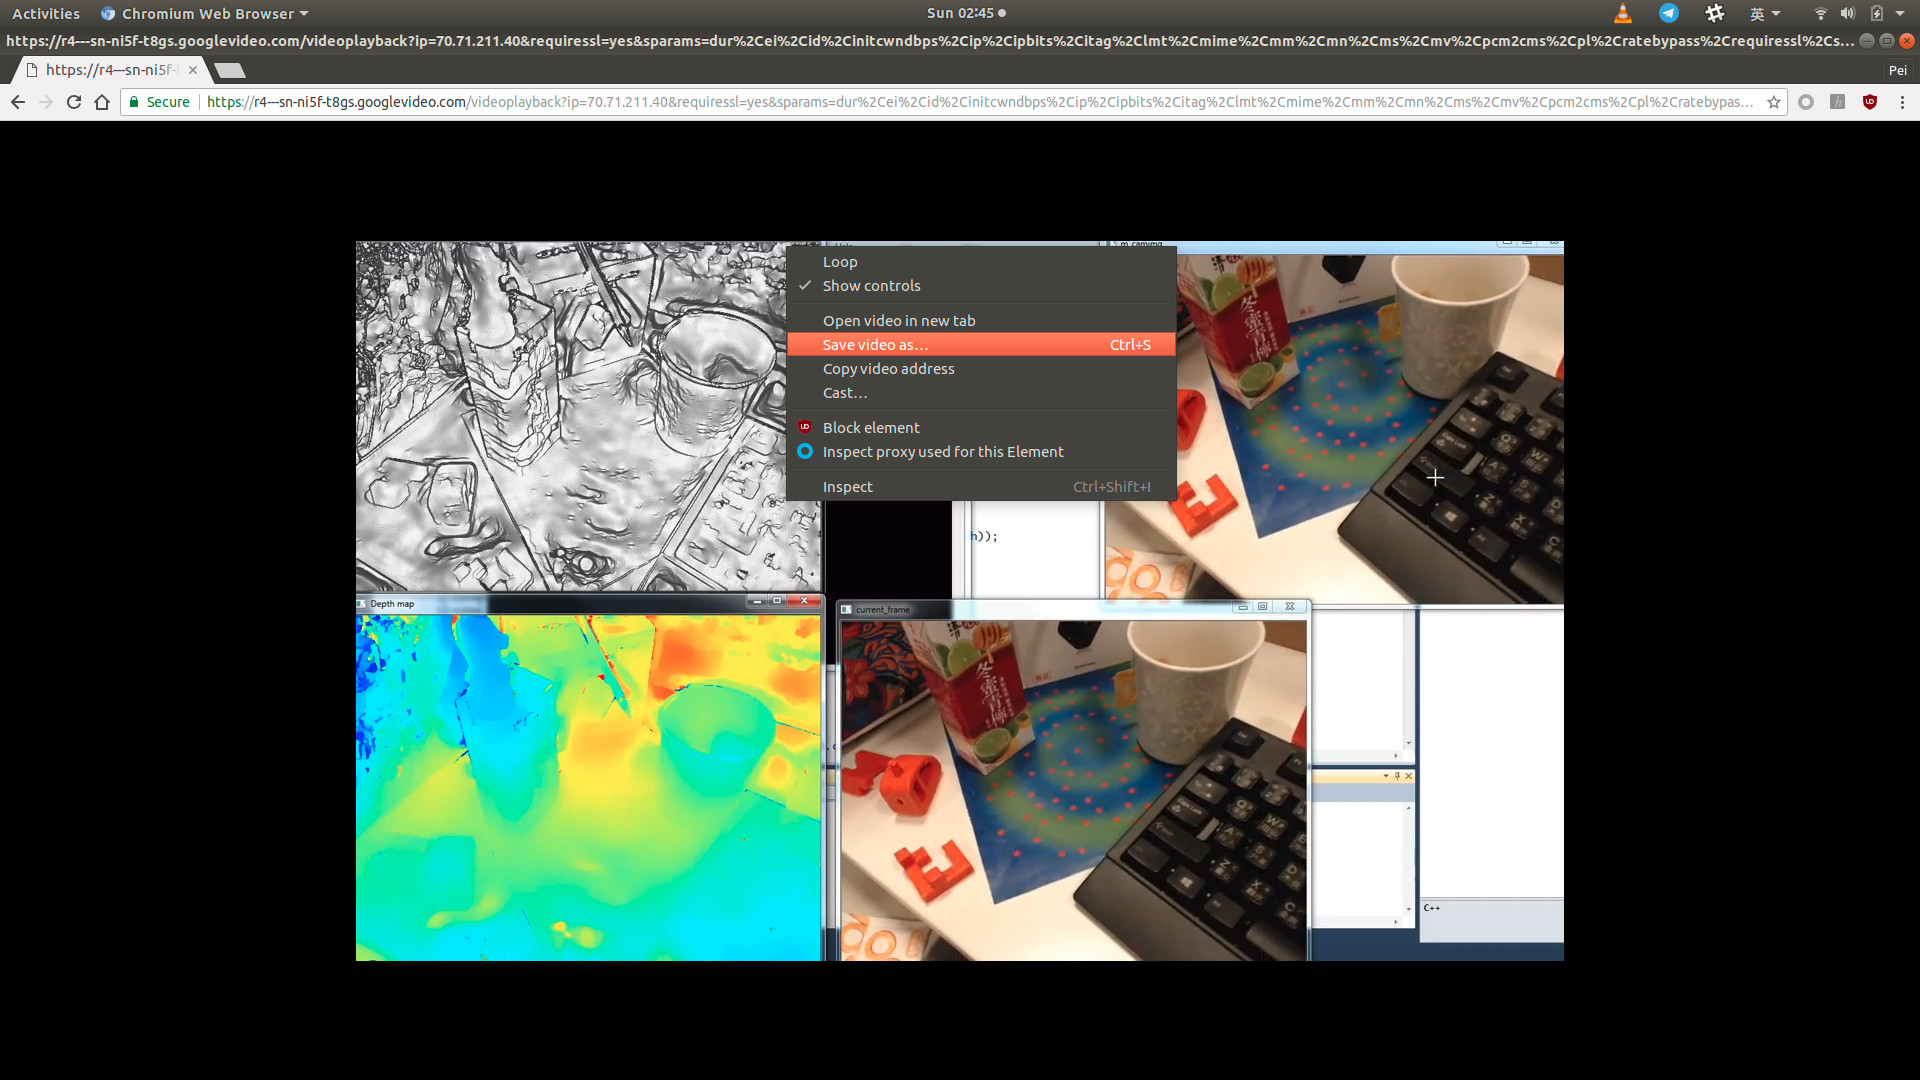
and Save video as….
People have been using IRC for decades.
Freenode is an IRC network used to discuss peer-directed projects.
cited from Wikipedia.
It’s recommended to have some background about IRC and Freenode on Wikipedia:
Lots of IRC clients can be found on Google. Here, we just summarize some from IRC Wikipedia:
Please just refer to https://www.tecmint.com/best-irc-clients-for-linux/.
We can of course directly download the package from WeeChat Download, and have it installed from source. However, installing WeeChat from repository is recommended.
1 | $ sudo sh -c 'echo "deb https://weechat.org/ubuntu $(lsb_release -cs) main" >> /etc/apt/sources.list.d/WeeChat.list' |
1 | $ sudo apt-key adv --keyserver keys.gnupg.net --recv-keys 11E9DE8848F2B65222AA75B8D1820DB22A11534E |
1 | $ sudo apt update |
Refer to WeeChat Official Documentation.
1 | $ weechat |
will display:
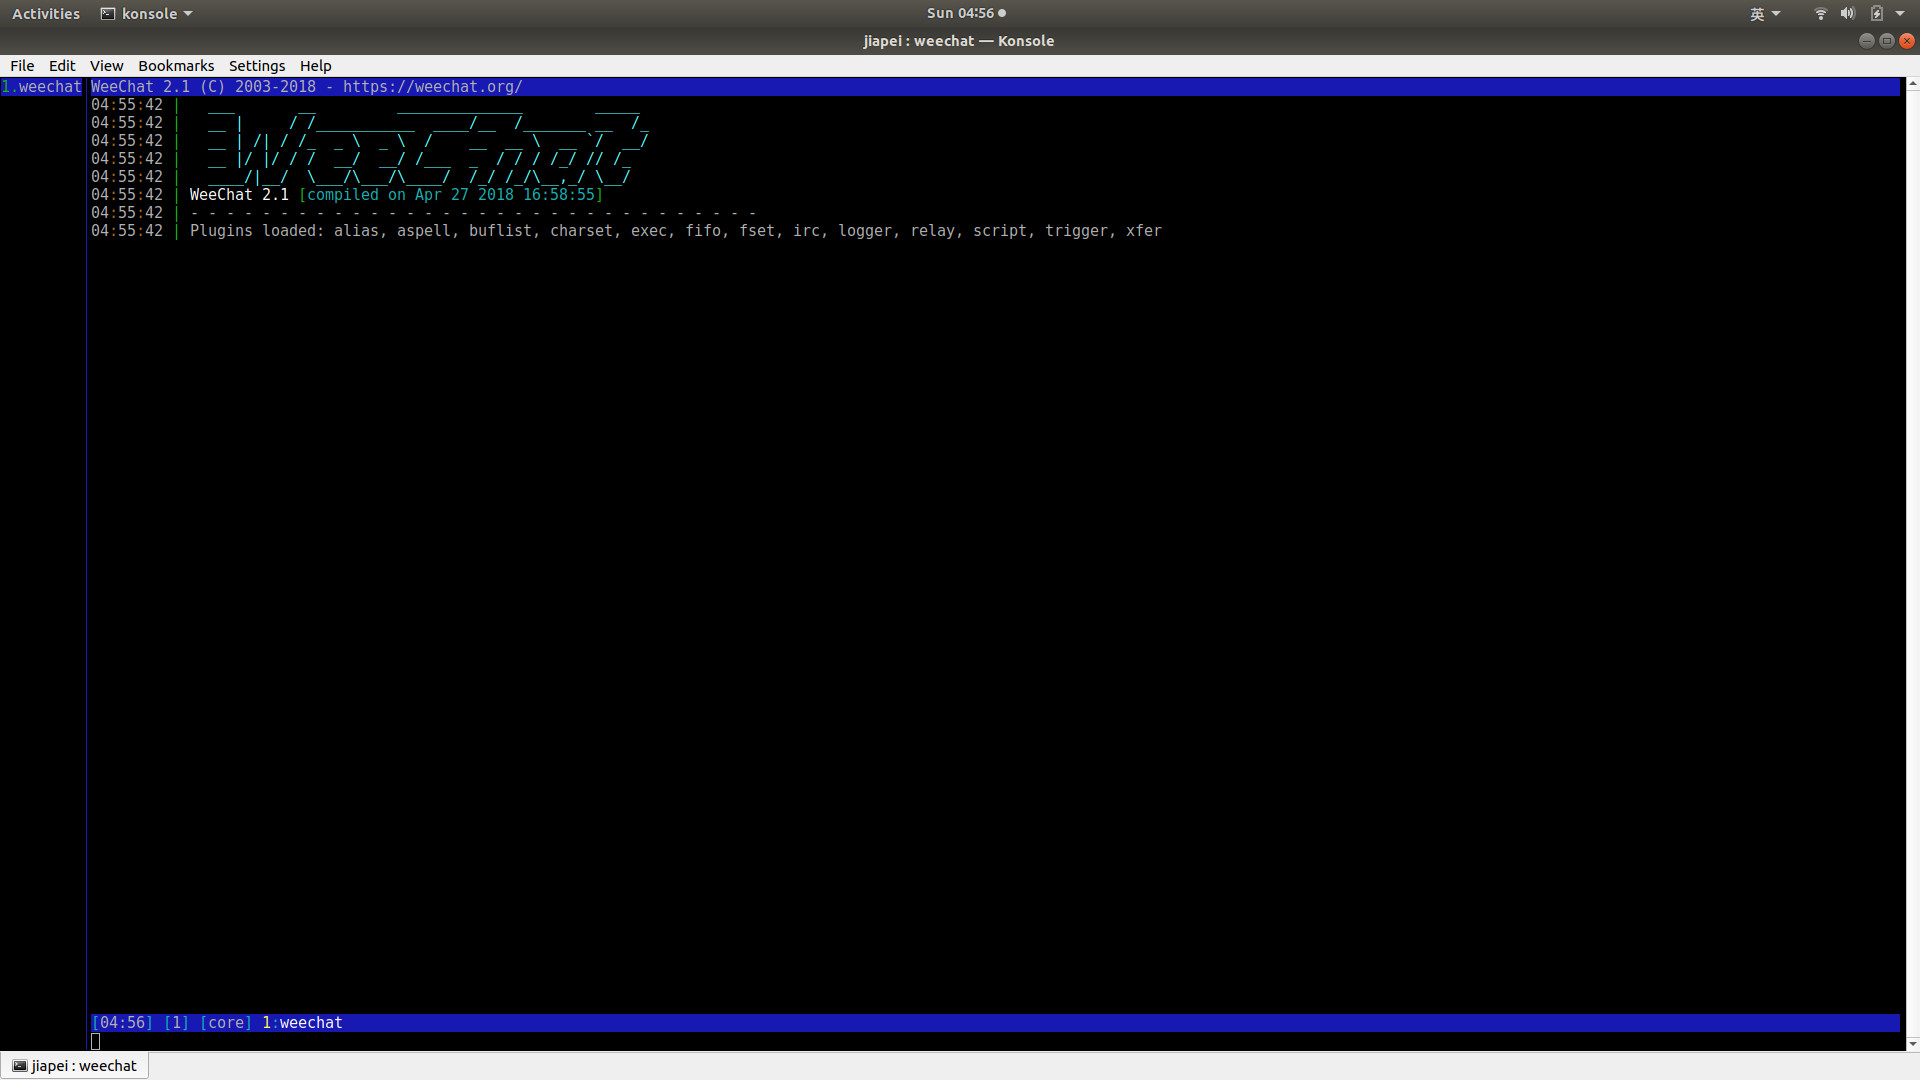
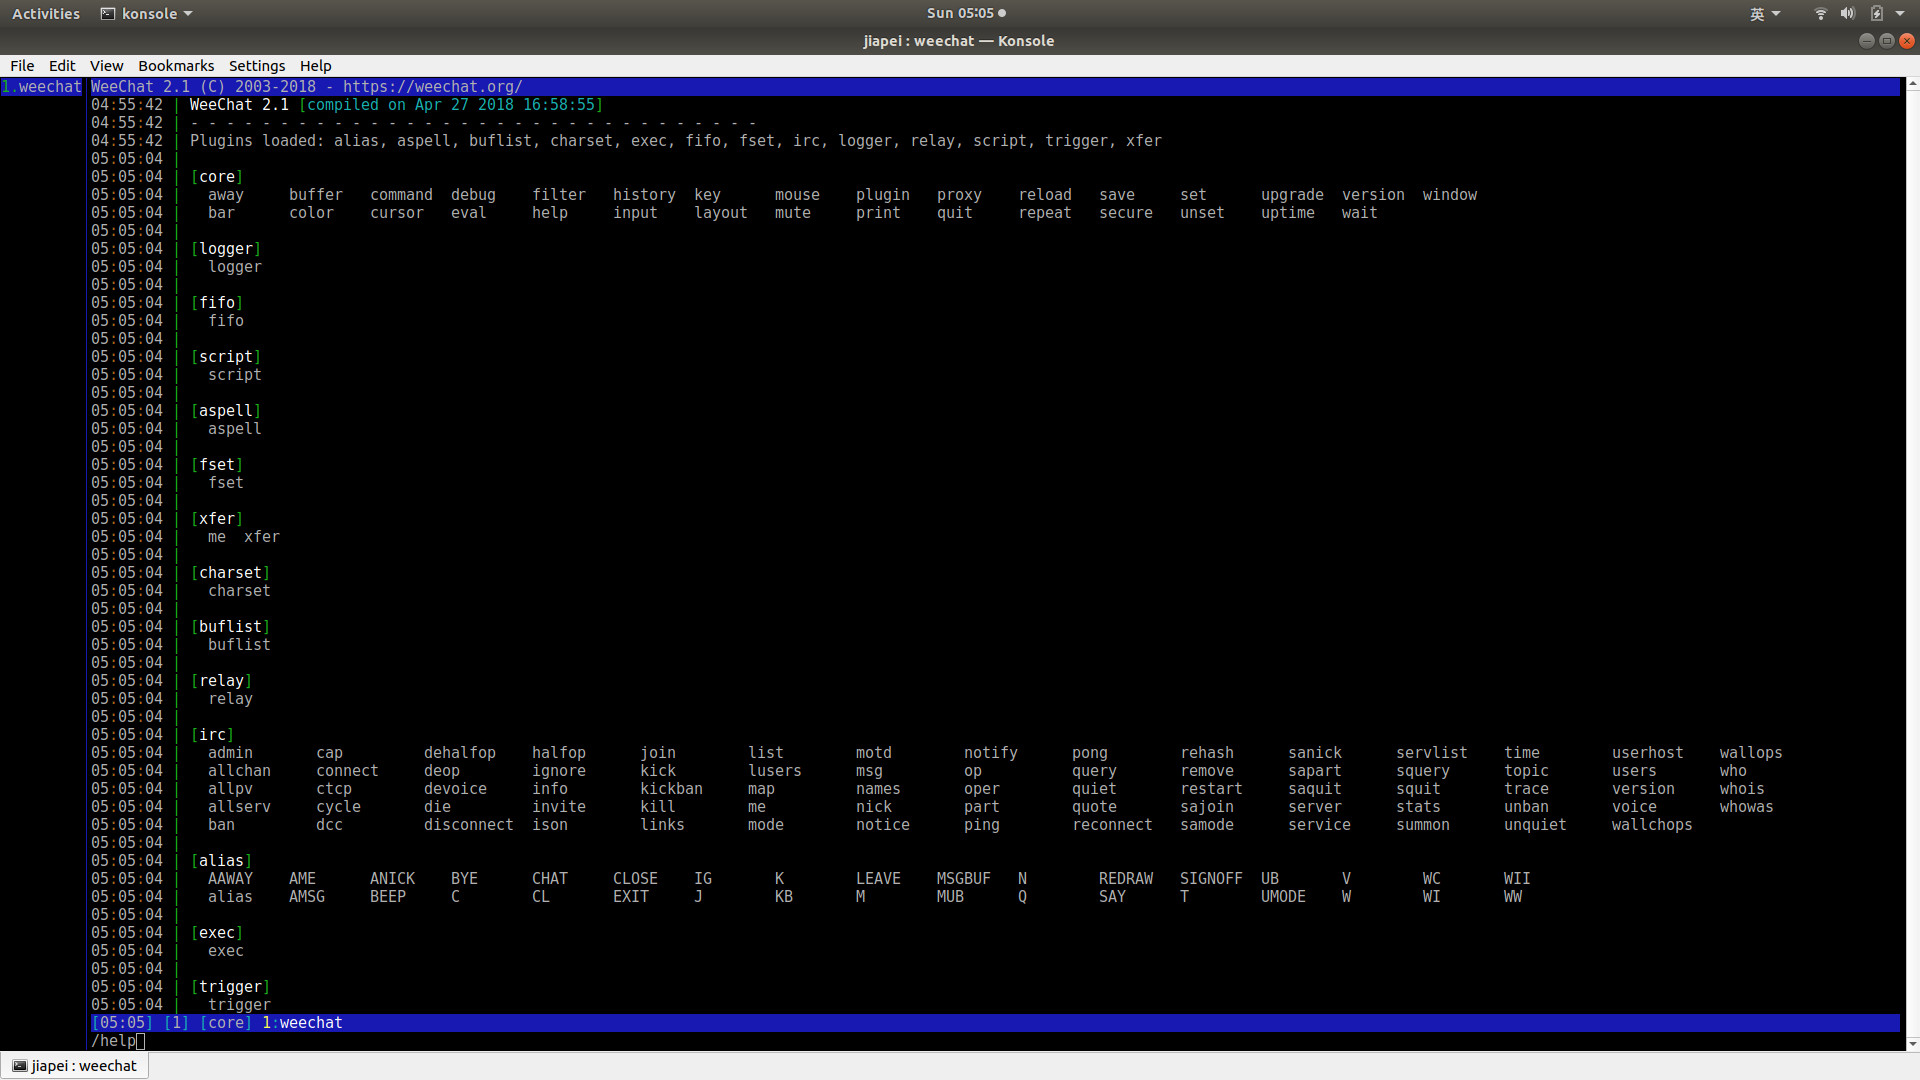
And we FIRST type in /help
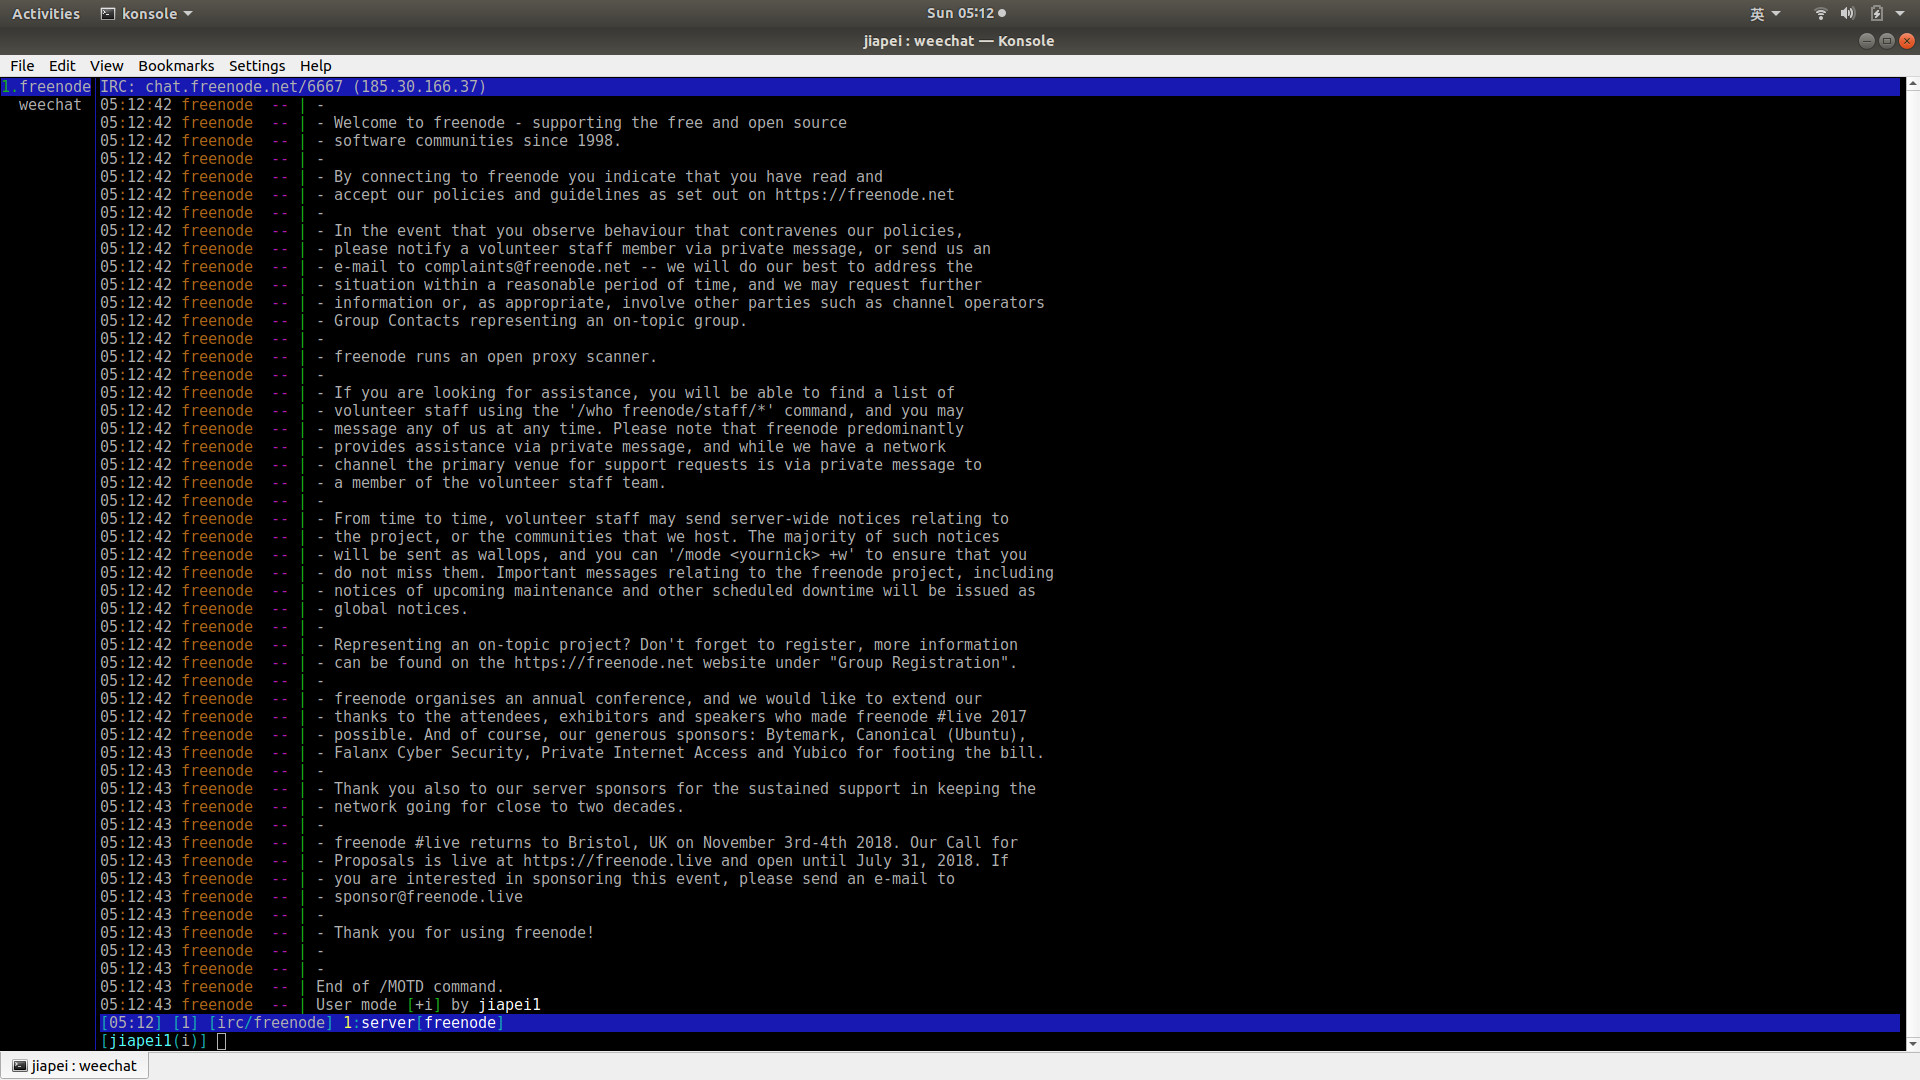
1 | /connect freenode |
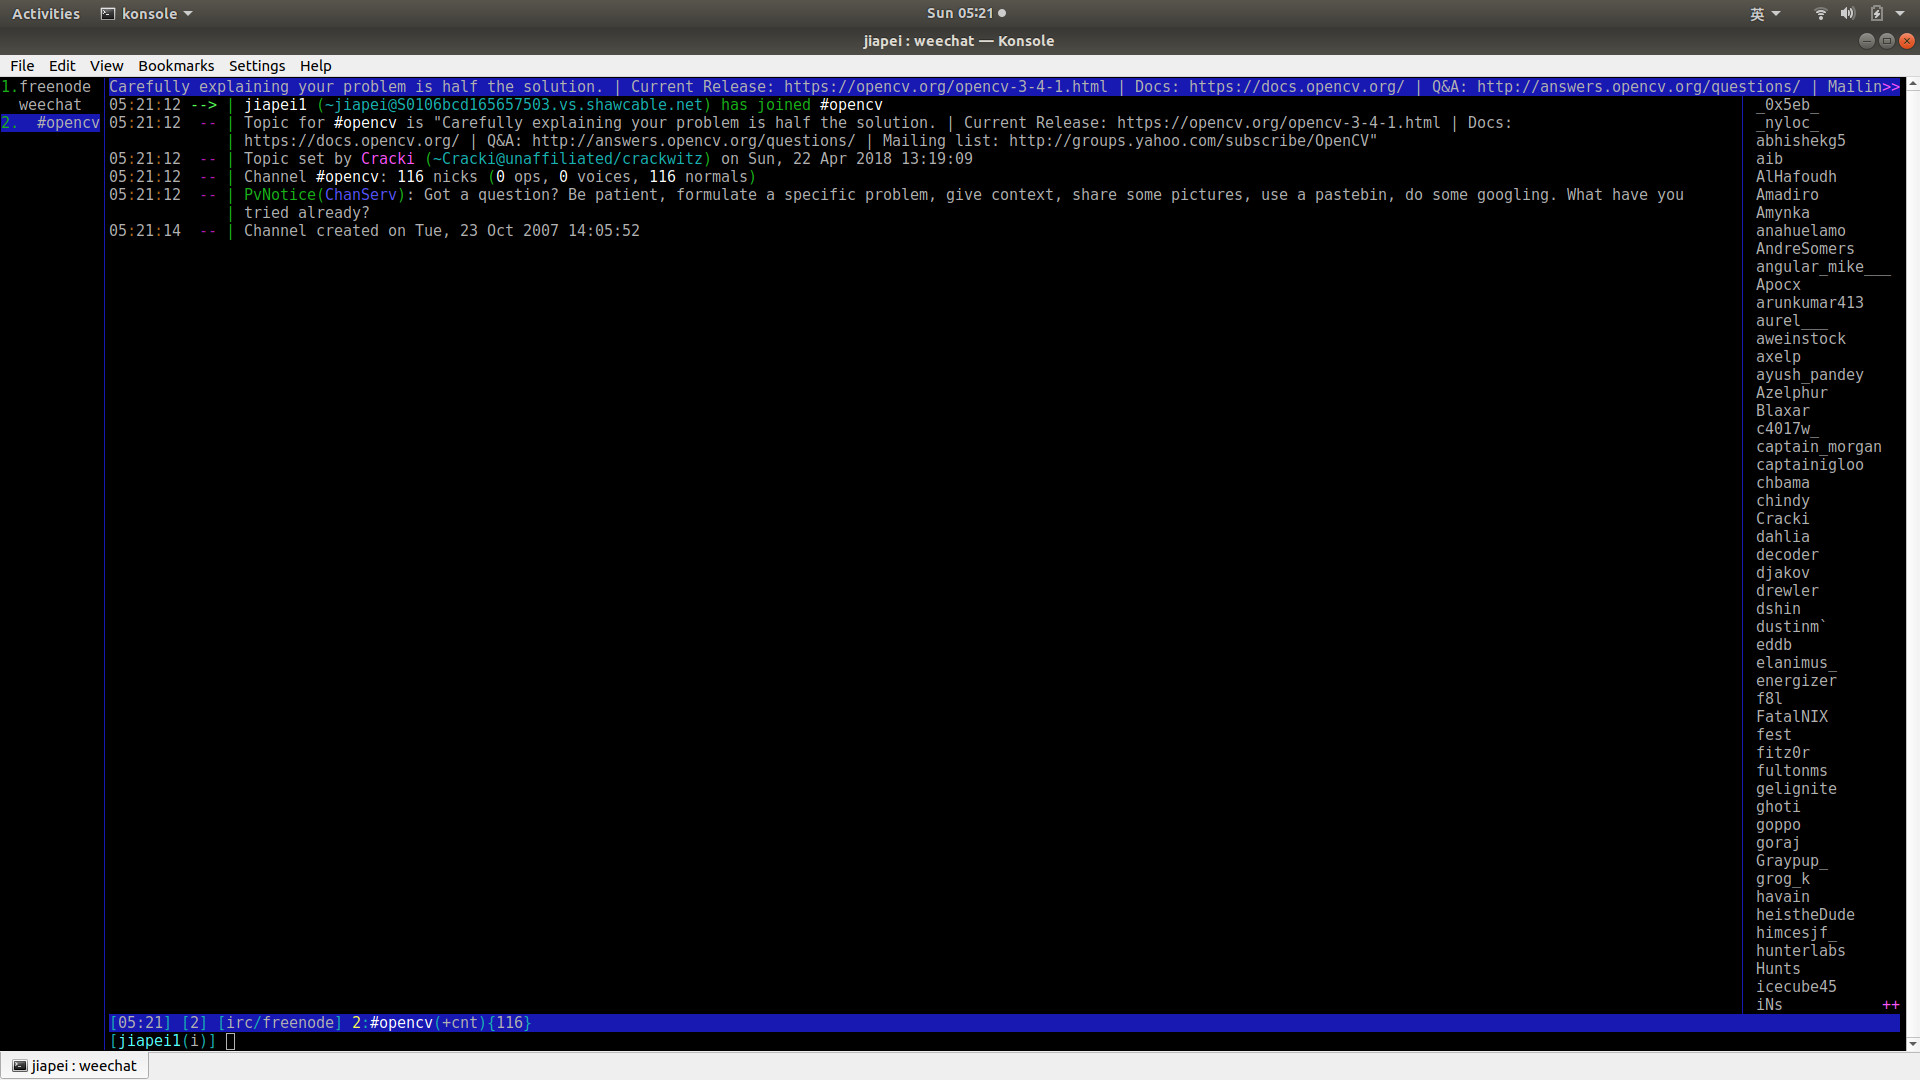
Here, we select channel OpenCV as an example:
1 | /join #opencv |
1 | /close |
We’re NOT going to talk about it in this blog.
To DIY a home security camera is comparatively simple by using a low-cost embedded board with Linux installed. There are **ONLY 3 steps ** in total.
1 | $ sudo apt install motion |
1 | $ sudo vim /etc/default/motion |
Change start_motion_daemon from no to yes.
1 | $ sudo vim /etc/motion/motion.conf |
Change stream_localhost on to stream_localhost off.
Run the following command:
1 | $ sudo /etc/init.d/motion restart |
1 | $ sudo motion |
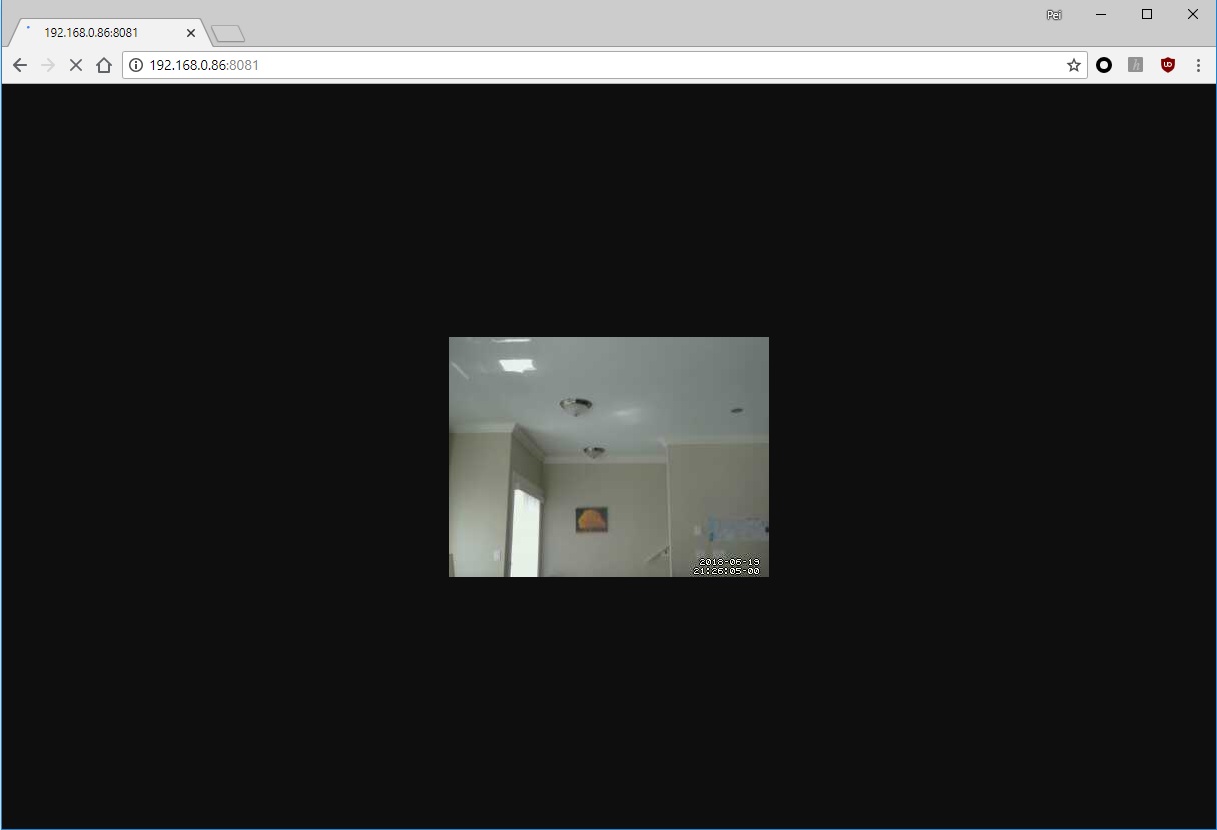
Open up Chrome and type in the IP address:8081 to show the captured video at 1FPS. In my case, 192.168.0.86:8081, and the video effect is as:
Finally, I’ve got some time to write something about PyTorch, a popular deep learning tool. We suppose you have had fundamental understanding of Anaconda Python, created Anaconda virtual environment (in my case, it’s named condaenv), and had PyTorch installed successfully under this Anaconda virtual environment condaenv.
Since I’m using Visual Studio Code to test my Python code (of course, you can use whichever coding tool you like), I suppose you’ve already had your own coding tool configured. Now, you are ready to go!
In my case, I’m giving a tutorial, instead of coding by myself. Therefore, Jupyter Notebook is selected as my presentation tool. So, I’ll demonstrate everything both in .py files, as well as .ipynb files. All codes can be found at Longer Vision PyTorch_Examples. However, ONLY Jupyter Notebook presentation is given in my blogs. Therefore, I suppose you’ve already successfully installed Jupyter Notebook, as well as any other required packages under your Anaconda virtual environment condaenv.
Now, let’s pop up Jupyter Notebook server.
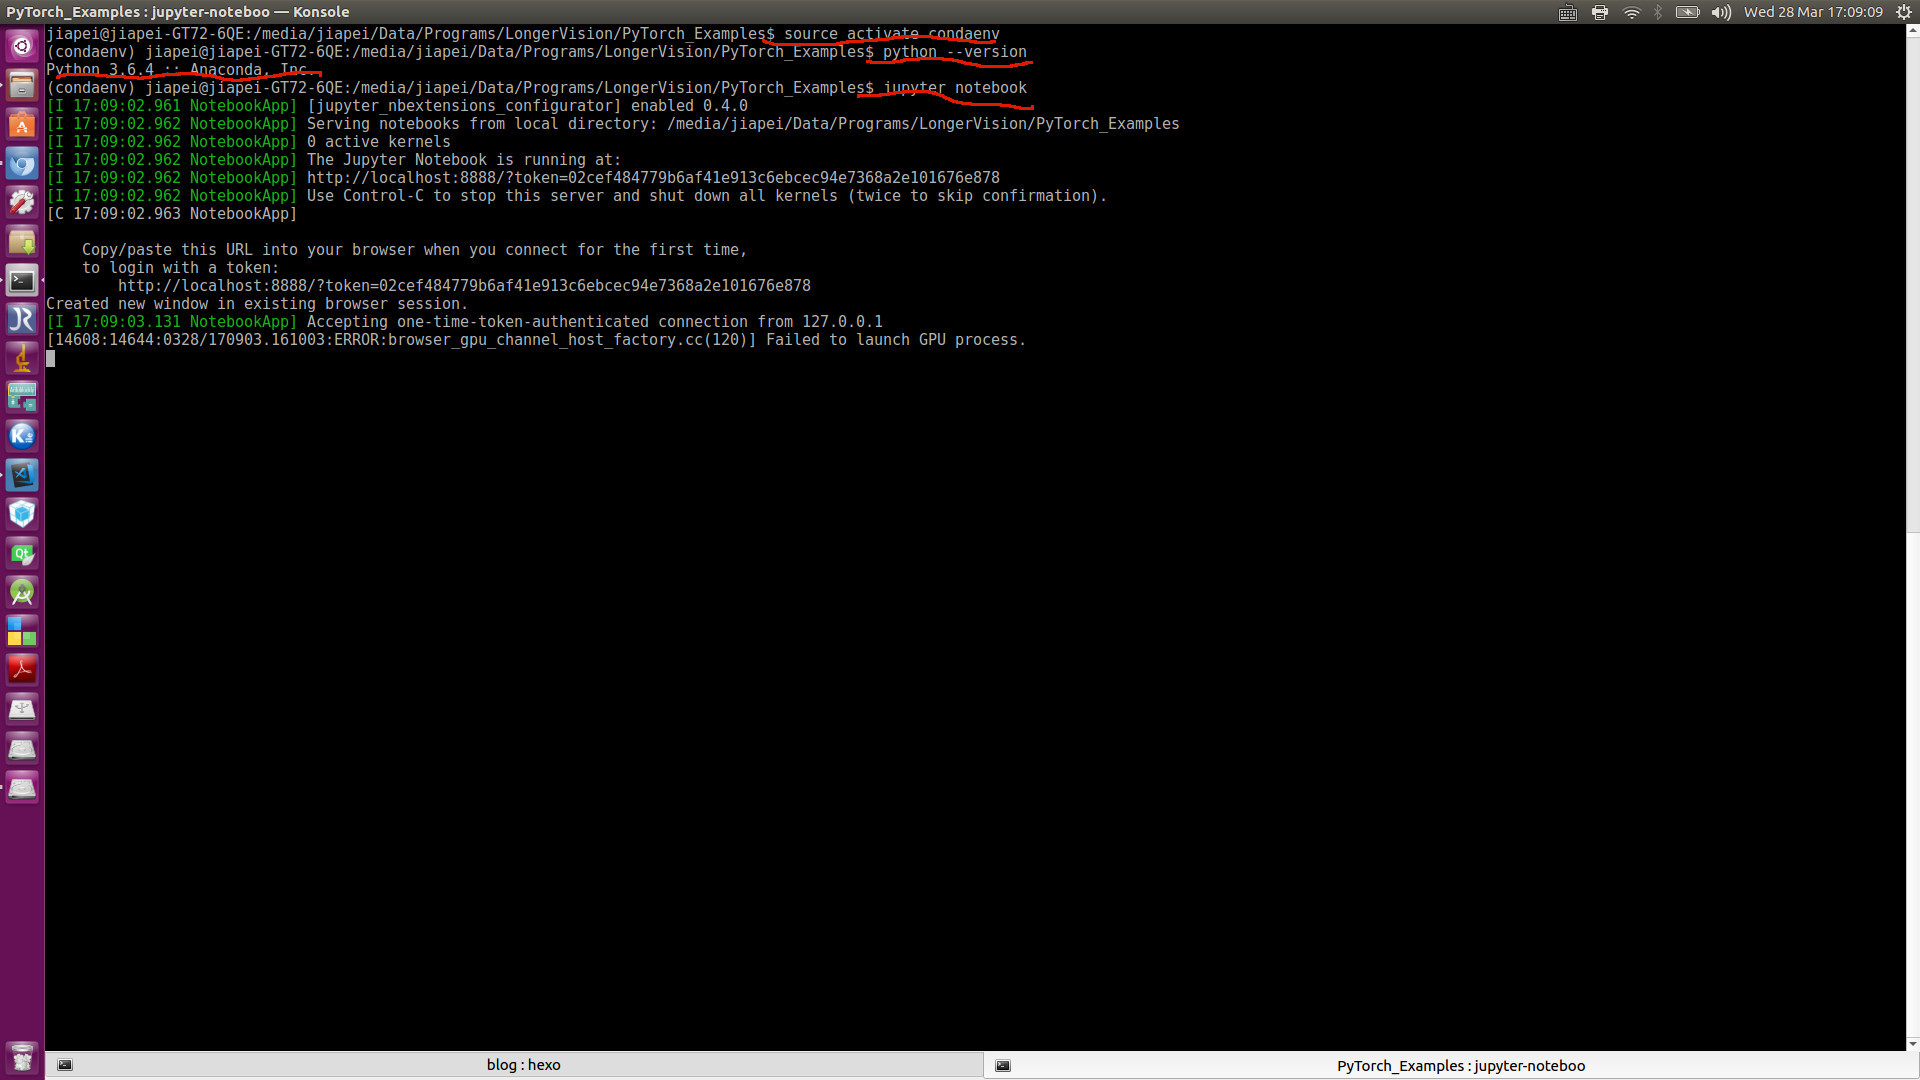
Clearly, Anaconda comes with the NEWEST version. So far, it is Python 3.6.4.
Our very FIRST test code is of only 6 lines including an empty line:
After popping up Jupyter Notebook server, and click Run, you will see this view:
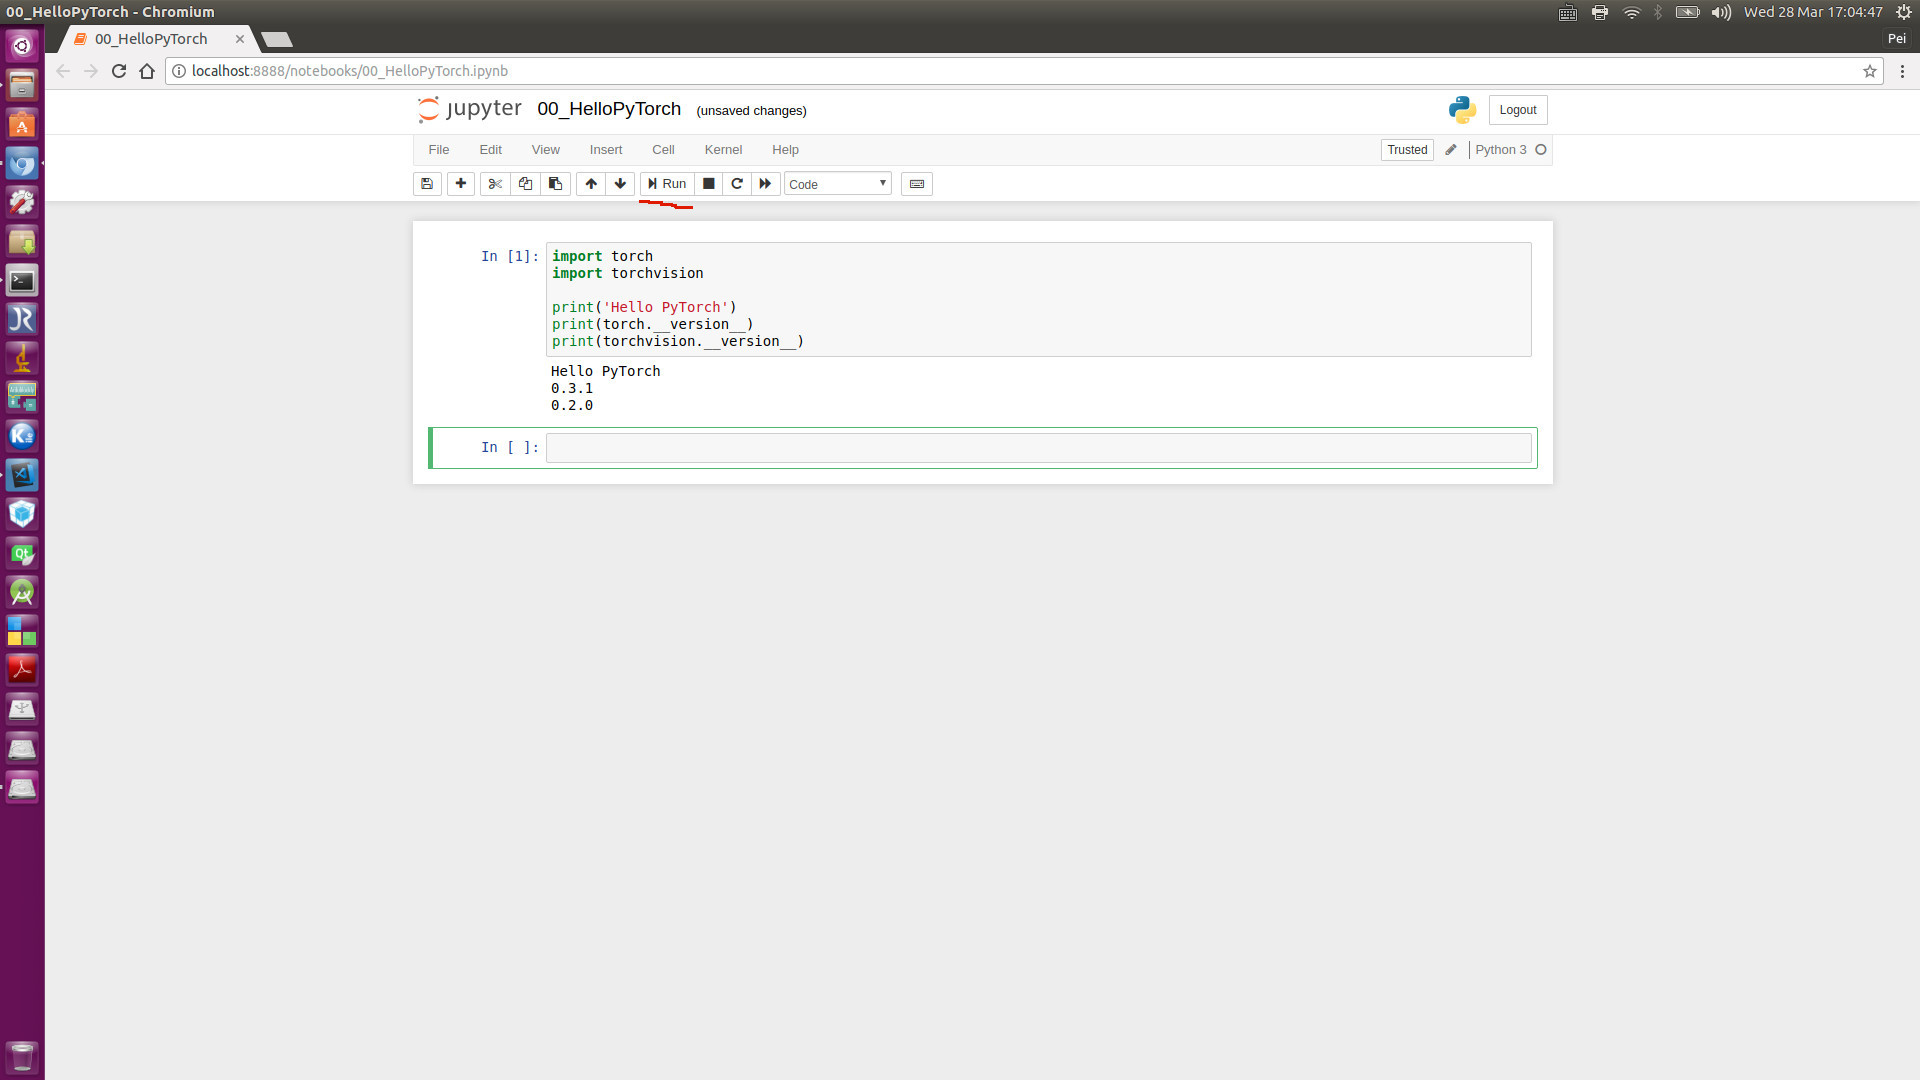
Clearly, the current torch is of version 0.3.1, and torchvision is of version 0.2.0.
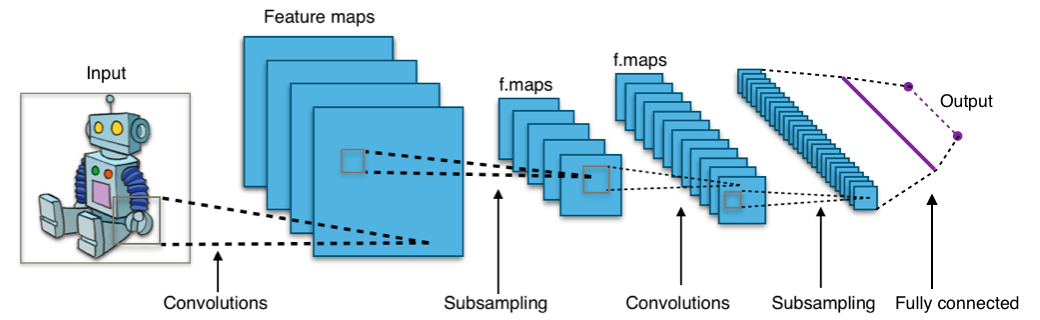
We are NOT going to discuss the background details of Convolutional Neural Network. A lot online frameworks/courses are available for you to catch up:
Several fabulous blogs are strongly recommended, including:
One picture for all (cited from Convolutional Neural Network )
The ONLY concept in CNN we want to emphasize here is Back Propagation, which has been widely used in traditional neural networks, which takes the solution similar to the final Fully Connected Layer of CNN. You are welcome to get some more details from https://brilliant.org/wiki/backpropagation/.
Particularly, for binary classification, logistic regression is often adopted. A logistic function is defined as:
$$f(x)=\frac{1}{(1+e^{-x})}$$
In such a case, the loss function can easily be deducted as:
$$E(X,W) = - \frac{1}{N} \sum_{i=1}^N [y_i log({\hat{y_i} })+(1-y_i)log(1-\hat{y_i})]$$
where
$$y_i=0/1$$
$$\hat{y_i} \equiv g(\vec{w} \cdot \vec{x_i}) = \frac{1}{(1+e^{-\vec{w} \cdot \vec{x_i} })}$$
Some PyTorch explaination can be found at torch.nn.CrossEntropyLoss.
Only MSE is considered here (Please refer to https://brilliant.org/wiki/backpropagation/):
$$
\frac {\partial {E(X,\theta)} } {\partial w_{ij}^k} = \frac {1}{N} \sum_{d=1}^N \frac {\partial}{\partial w_{ij}^k} \Big( {\frac{1}{2} (\vec{y_d}-y_d)^2 } \Big) = \frac{1}{N} \sum_{d=1}^N {\frac{\partial E_d}{\partial w_{ij}^k} }
$$
The updating weights is also determined as:
$$
\Delta w_{ij}^k = - \alpha \frac {\partial {E(X,\theta)} } {\partial w_{ij}^k}
$$
Hi, today, I’m going to revisit a very old topic, Setup Repeater Bridge Using A dd-wrt Router. This reminds me of my FIRST startup Misc Vision that used to resell Foscam home security IP cameras. That is a long story. Anyway, this blog is going to heavily cite the contents on this page.
Before we start to tackle the problem, the open source firmware DD-WRT is strongly recommended to flash your router.
Two widely used open source router firmware have been published online for quite a bit of time: DD-WRT, OpenWRT In fact, each of these two are OK for router firmware flashing.
To check if your router is supported by DD-WRT, you need to check this page.
In my case, I got a lot of such routers in hand and am selling them on Craigslist (if anybody is interested in it, please let me know). You can also find some either continued or discontinued such products on the market, such as Gearbest.
DD-WRT SL-R7202 looks good:

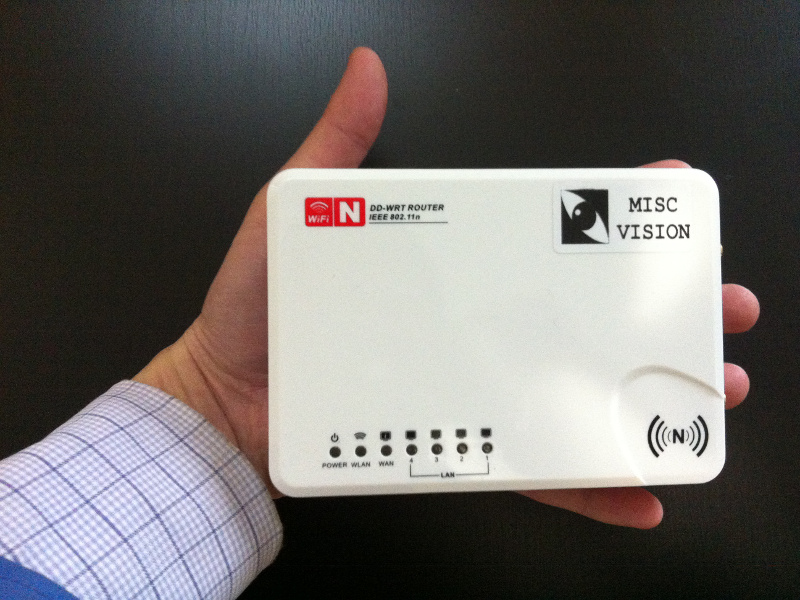
In one word, find some DD-WRT supported router, and have it successfully flashed FIRST. As a lazy man, I’m NOT going to flash anything but just use a router coming with an existing DD-WRT firmware, namely, DD-WRT SL-R7202.
The problem that we are going to deal with is how to connect multiple routers, so that the Internet range can be expanded. For routers with dd-wrt firmware, there are mulitple ways to connect routers, please refer to https://www.dd-wrt.com/wiki/index.php/Linking_Routers.
In the following, most contents are CITED directly from Linking Routers and its extended webpages.
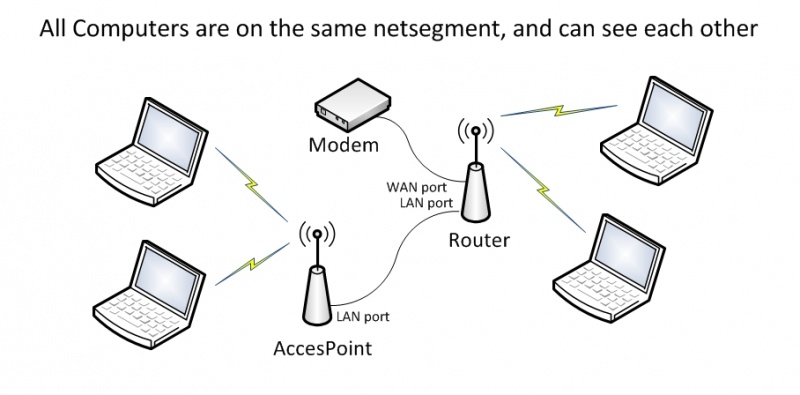
Access Point / Switch - Extend the Wireless access area using more routers, with WIRED connections between routers, or turn a WIRED port on an existing network into a Wireless Access Point. All computers will be on the same network segment, and will be able to see one another in Windows Network. This works with all devices with LAN ports, and does not require dd-wrt to be installed. “
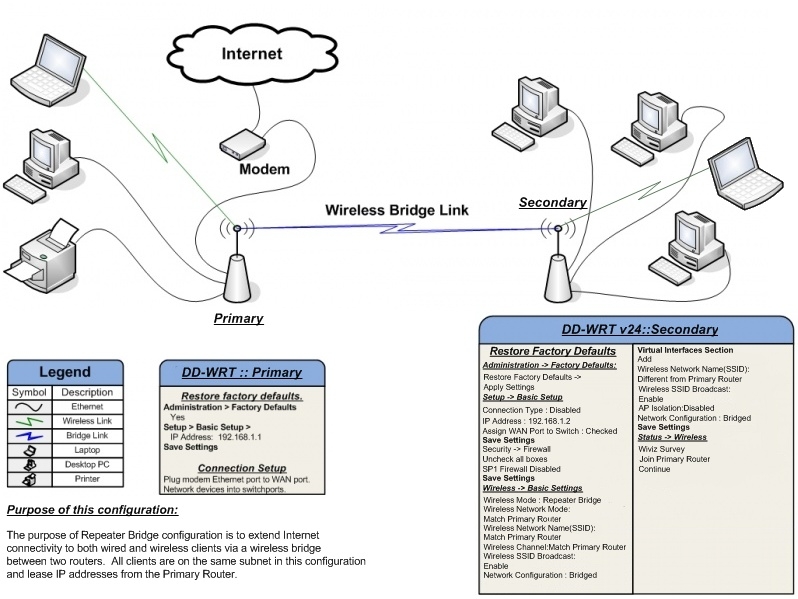
Repeater / Repeater Bridge - Extend the Wireless access area using a second router WIRELESSLY connected to the primary. The secondary router must have dd-wrt installed; the primary does not need dd-wrt.
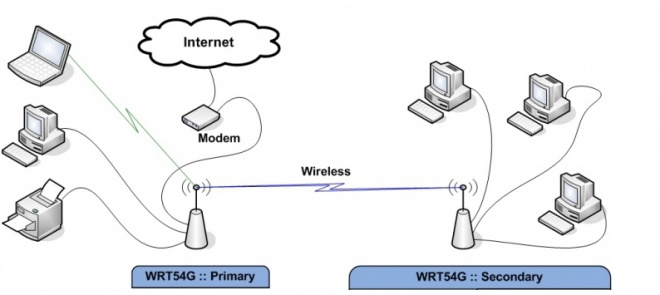
Client / Client Bridge - Connect two wired networks using a WiFi link (WIRELESS connection between two routers). The secondary router must have dd-wrt installed; the primary router does not need to have dd-wrt.
WDS - Extend the Wireless access area using more routers connected WIRELESSLY. WDS is a mesh network. Routers must almost always have the SAME chipset type for WDS to work, and any non dd-wrt routers must be WDS compatible. Using identical routers is best, but not always necessary if all devices have the same chipset types. (All Broadcom or all Atheros etc)
OLSR - Extend the Wireless access area using more routers. Extra routers do not need any wired connections to each other. Use several ISP (Internet) connections. OLSR is a mesh network.
In my case, my laptop and some of my IoT devices can be easily connected to the ShawCable Modem/Router combo, which is on the 2nd floor in my living room and directly connected to the Internet. However, my R&D office is located in my garage on the 1st floor, where dd-wrt router is put in. In such a case, my dd-wrt router must be connected to my ShawCable Modem/Router WIRELESSLY.
Due to the reason explained in the section Difference between Client Bridge and Repeater Bridge. A standard wireless bridge (Client Bridge) connects wired clients to a secondary router as if they were connected to your main router with a cable. Secondary clients share the bandwidth of a wireless connection back to your main router. Of course, you can still connect clients to your main router using either a cable connection or a wireless connection.
The limitation with standard bridging is that it only allows WIRED clients to connect to your secondary router. WIRELESS clients cannot connect to your secondary router configured as a standard bridge. Repeater Bridge allows both WIRELESS AND WIRED clients to connect to a the Repeater Bridge router, and through that device WIRELESSLY to a primary router. You can still use this mode if you only need to bridge wired clients; the extra wireless repeater capability comes along for free; however, you are not required to use it.
Therefore, we select Repeater Bridge as our solution. Here, DD-WRT SL-R7202 is selected as the Repeater Bridge. The difficulty is how to setup DD-WRT SL-R7202 to make it work as a wireless Repeater Bridge?
Actually, before I come to this step, I’ve already:
It seems to me that a firmware upgrading is a must before we setup the Wireless Repeater Bridge Mode. But, How?
First of all, we need to reset DD-WRT. There is a black button on my DD-WRT SL-R7202, as shown:
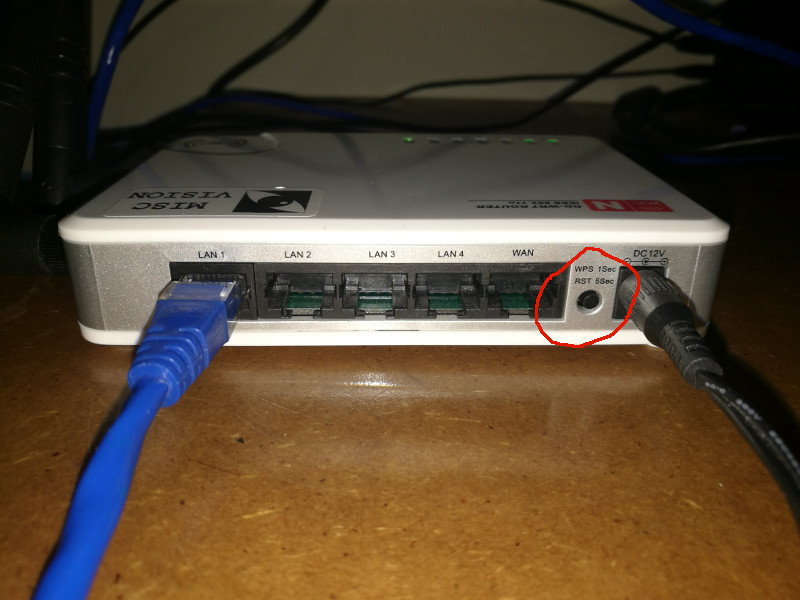
In fact, how to reset DD-WRT needs to be paid attention to. > Hold the reset button until lights flash (10-30sec) or 30-30-30 if appropriate for your router. (DO NOT 30-30-30 ARM routers.)
After successfully reset DD-WRT router to factory default, connect it with your host computer via a WIRED cable, for better stablity. Then, we change our network connection from our FIRST router to SECOND router: dd-wrt router. Afterwards, let’s visit http://192.168.1.1.
DD-WRT home page looks like:
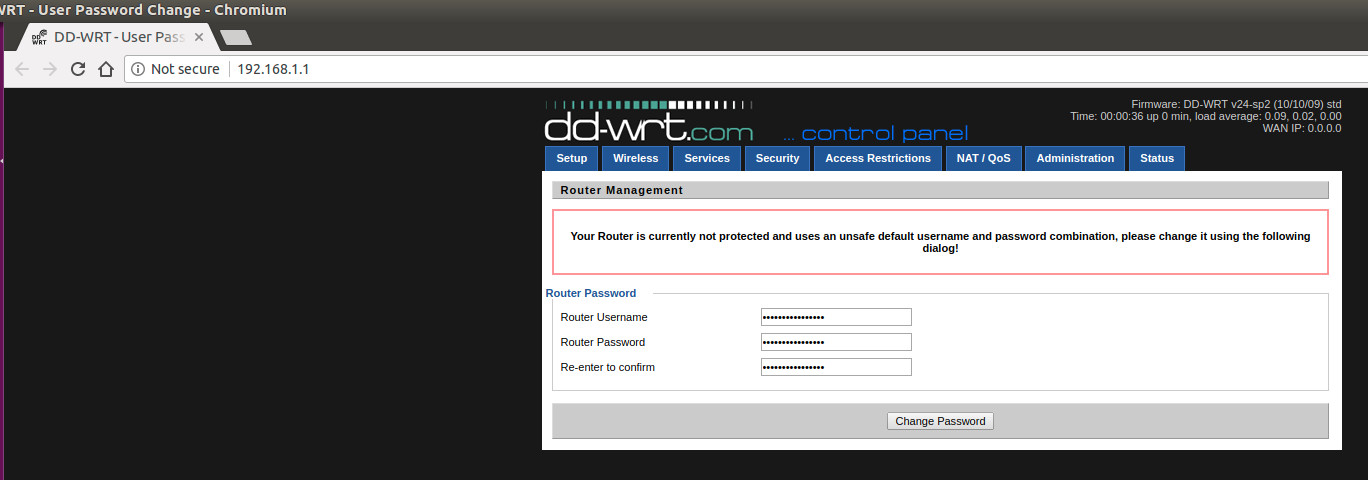
And it’s suggested we input a new router username root and password admin. After the button Change Password is clicked, we are entering the very first page of DD-WRT Web GUI.
1 | Firmware: DD-WRT v24-sp2 (10/10/09) std |
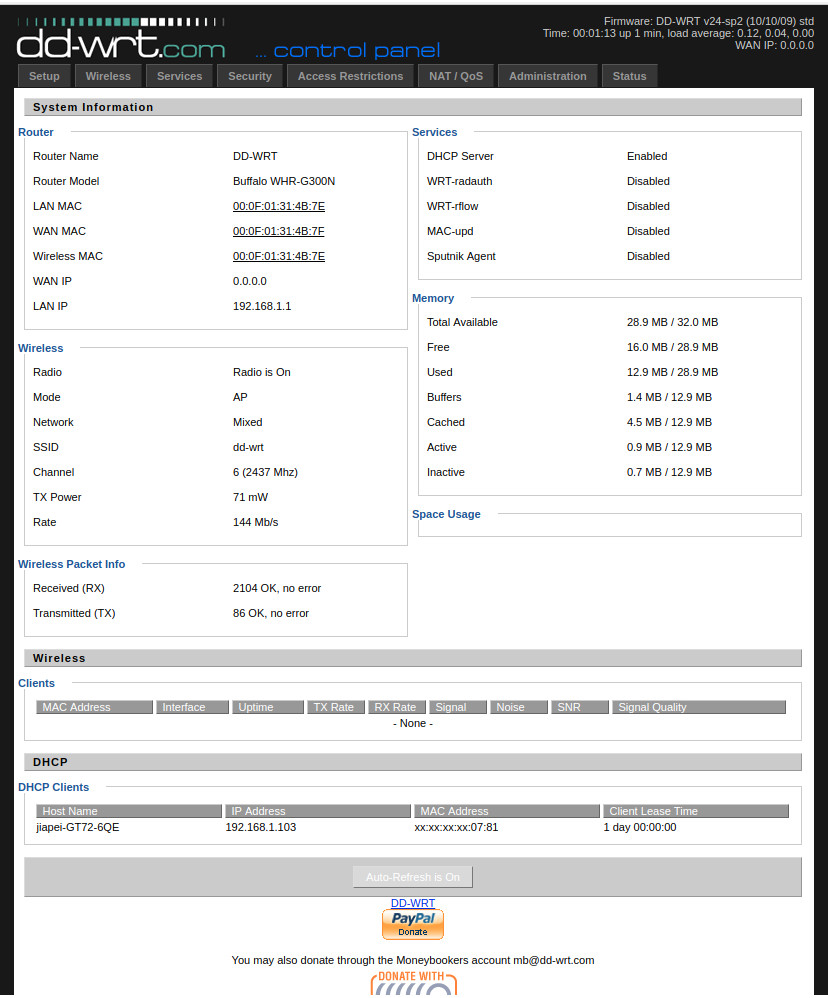
DD-WRT Status page tells a lot about what’s in this router:
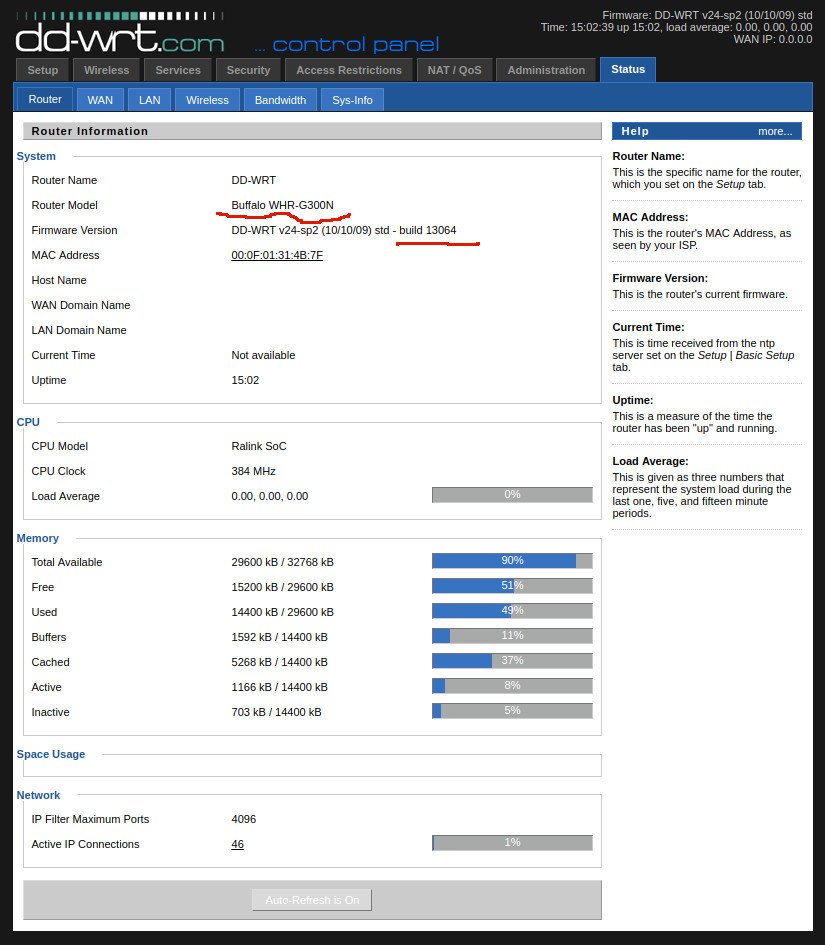
Clearly, our router model is Buffalo WHR-G300N, and our firmware build version is 13064.
We then visit https://www.dd-wrt.com/site/support/router-database, and input WHR-G300N, two routers will be listed as:
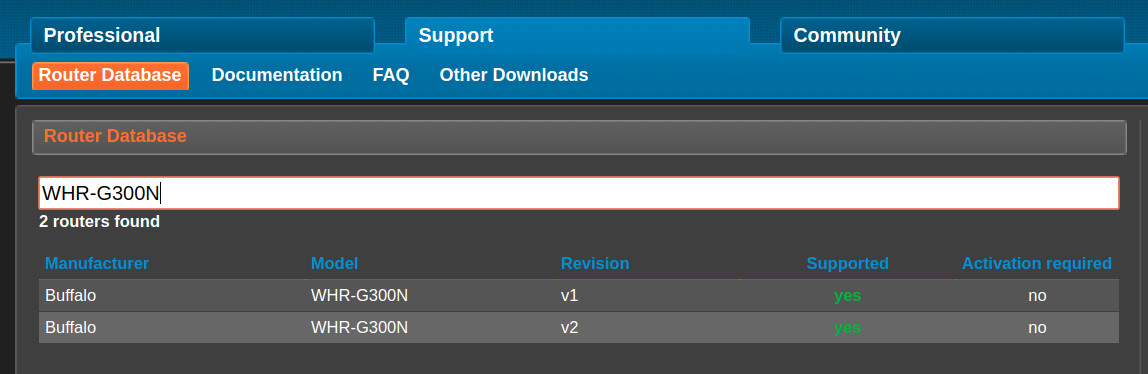
By click the FIRST one, namely v1, we get:
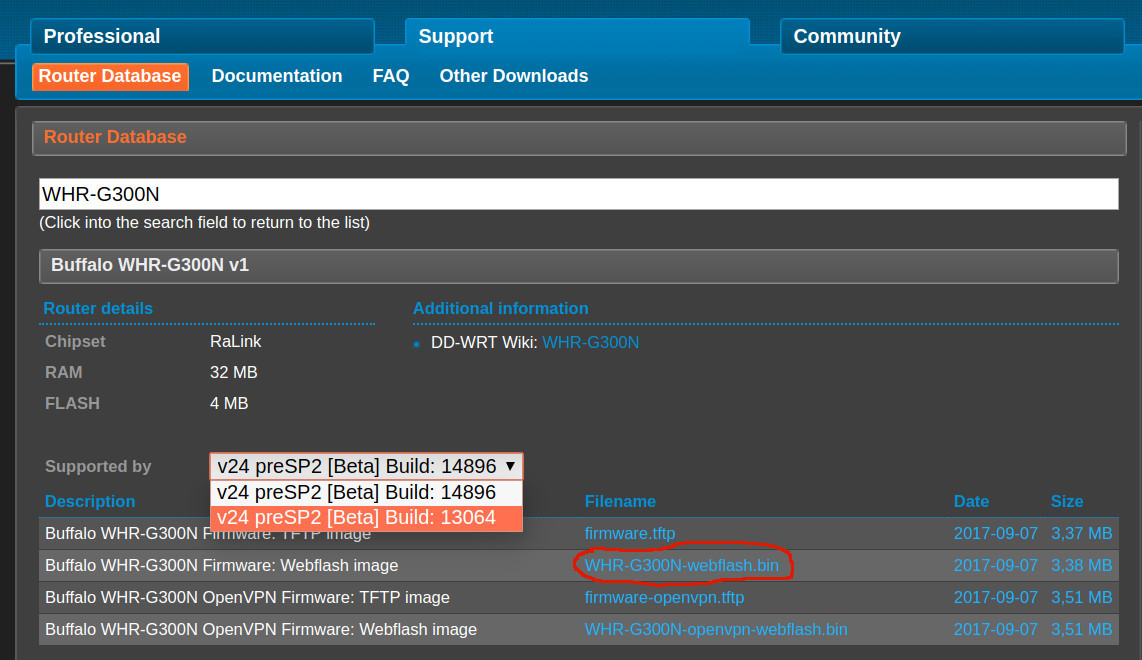
Clearly, we should be able to upgrade from our current firmware version 13064 to the newer one 14896.
With the existing firmware version 13064 installed on the router SL-R7202, we can directly upgrade the firmware through web flash by downloading the firmware WHR-G300N-webflash.bin, but ignoring downloading all TFTP and openvpn files.
Just click Administration -> Firmware Upgrade, and then choose WHR-G300N-webflash.bin.
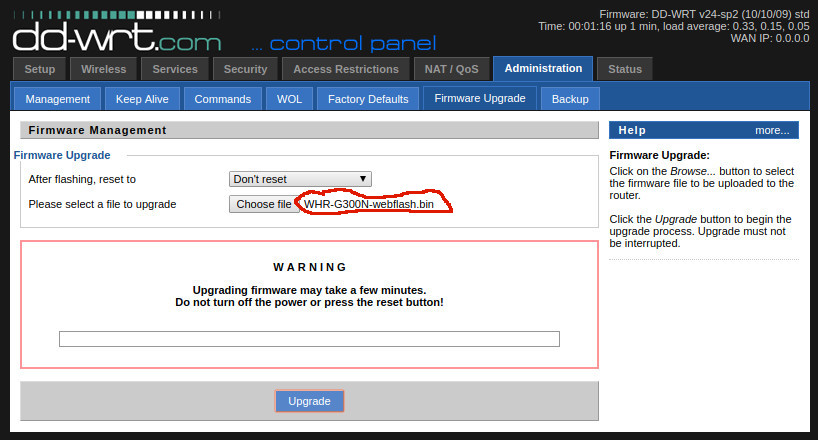
After clicking Choose file, the system is automatically upgraded after several minutes.
NOTE: Do NOT touch anything during the upgrading process.

After firmware upgrading, we can easily tell some difference: From Setup Page, on the left-top corner, we can see the builder version is now 14896. And from the right-top corner, the current firmware info is:
1 | Firmware: DD-WRT v24-sp2 (08/07/10) std |
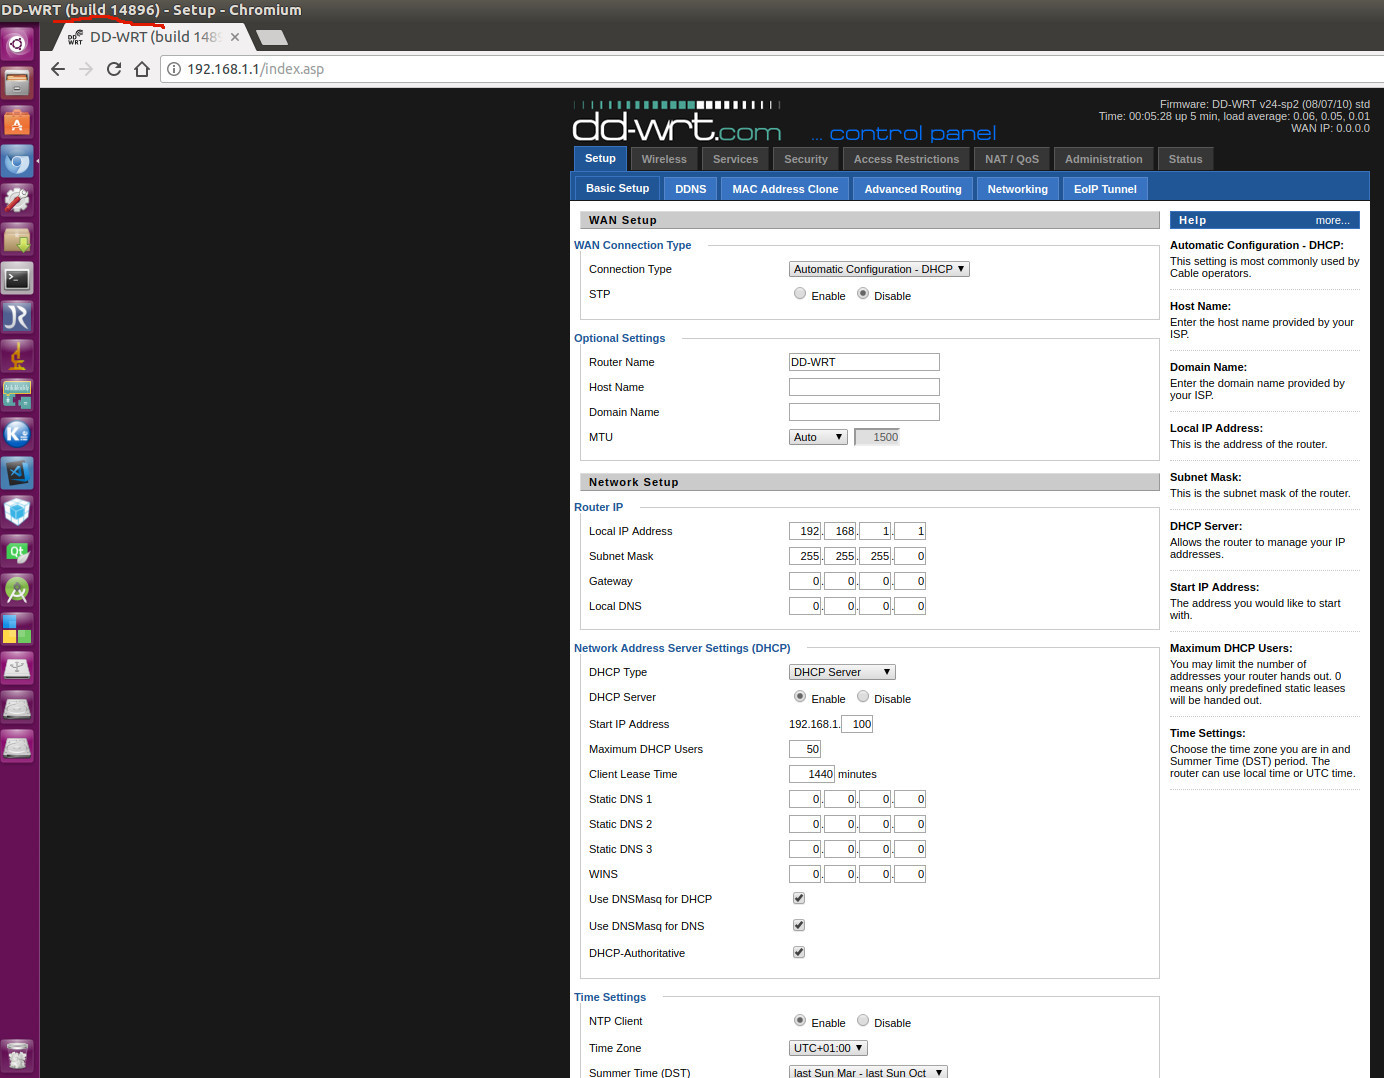
From the Status Page, we can doublecheck the firmware version is now 14896.

However, upgrading the firmware version from 13064 to the newer one 14896 is problematic, please refer to https://jgiam.com/2012/07/06/setting-up-a-repeater-bridge-with-dd-wrt-and-d-link-dir-600. After carefully reading this article, and due to my practical try later on, I summarized the conclusion here first:
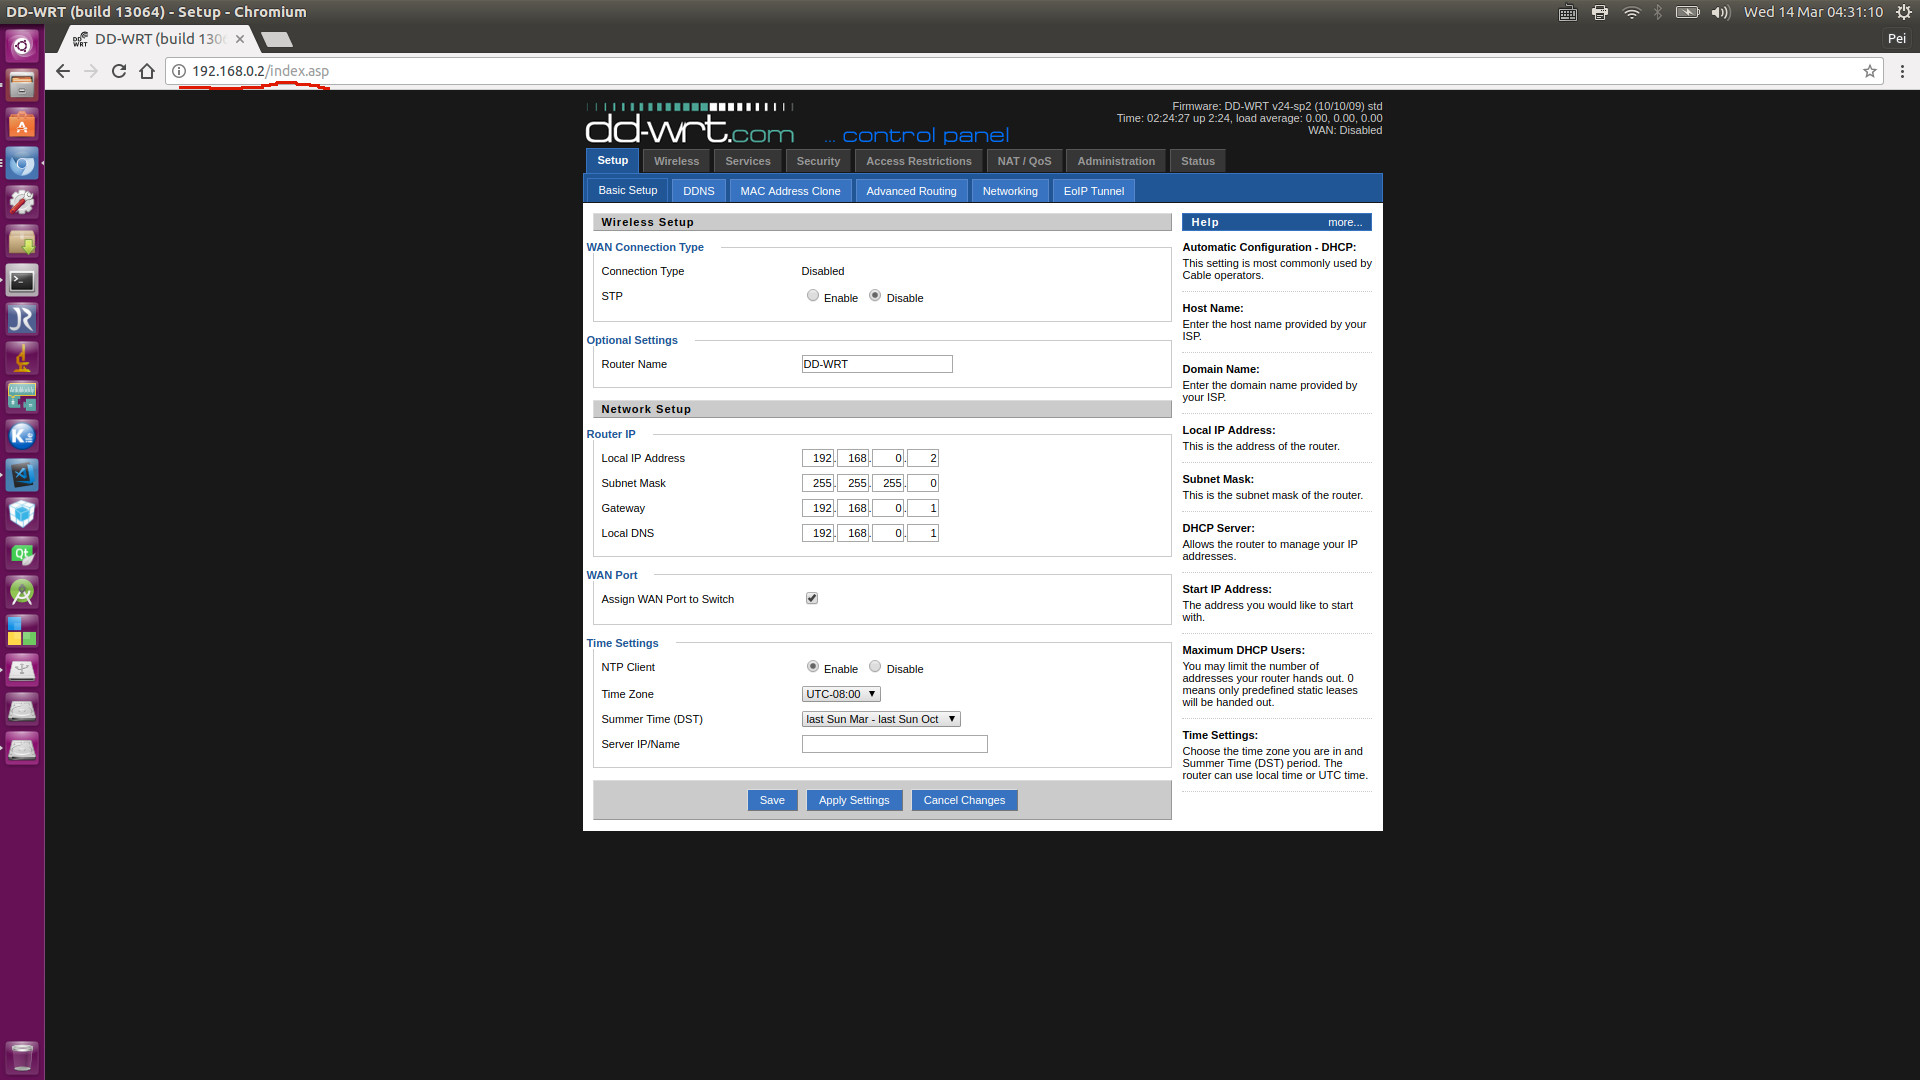
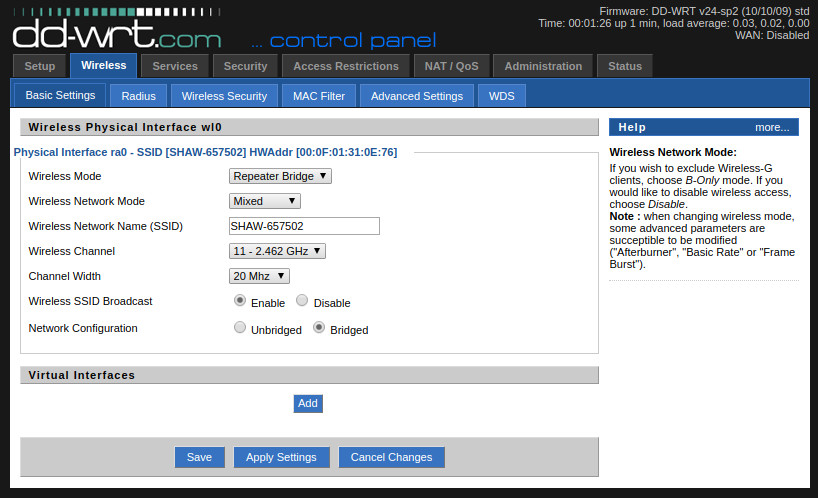
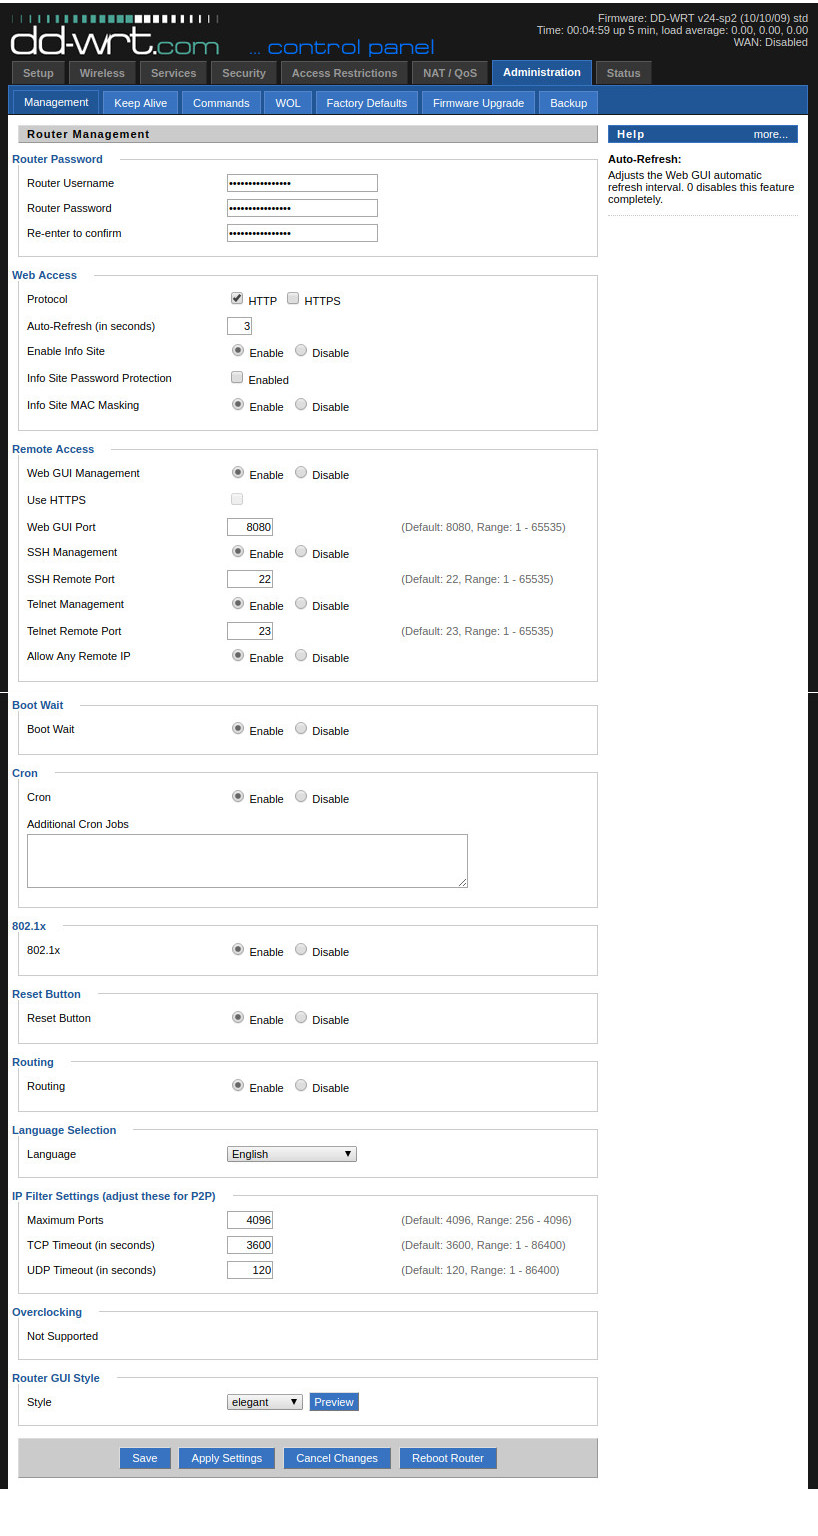
We modify the parameters accordingly (Cited from the blog Setting up a repeater bridge with DD-WRT and D-Link DIR-600 ):
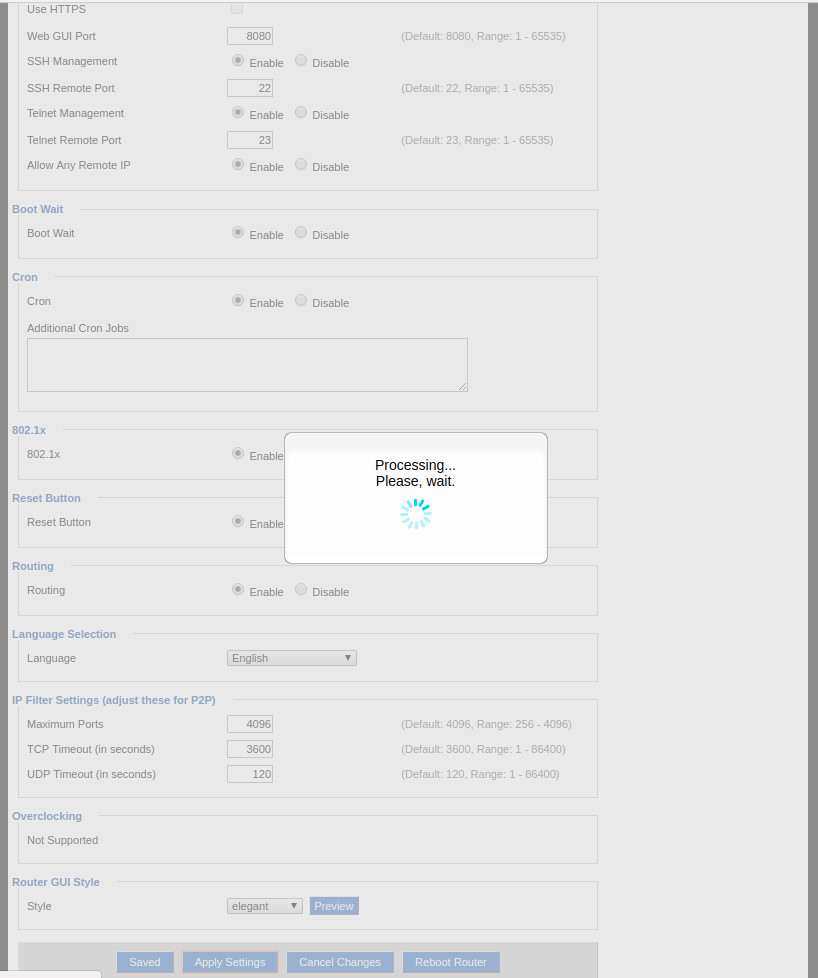
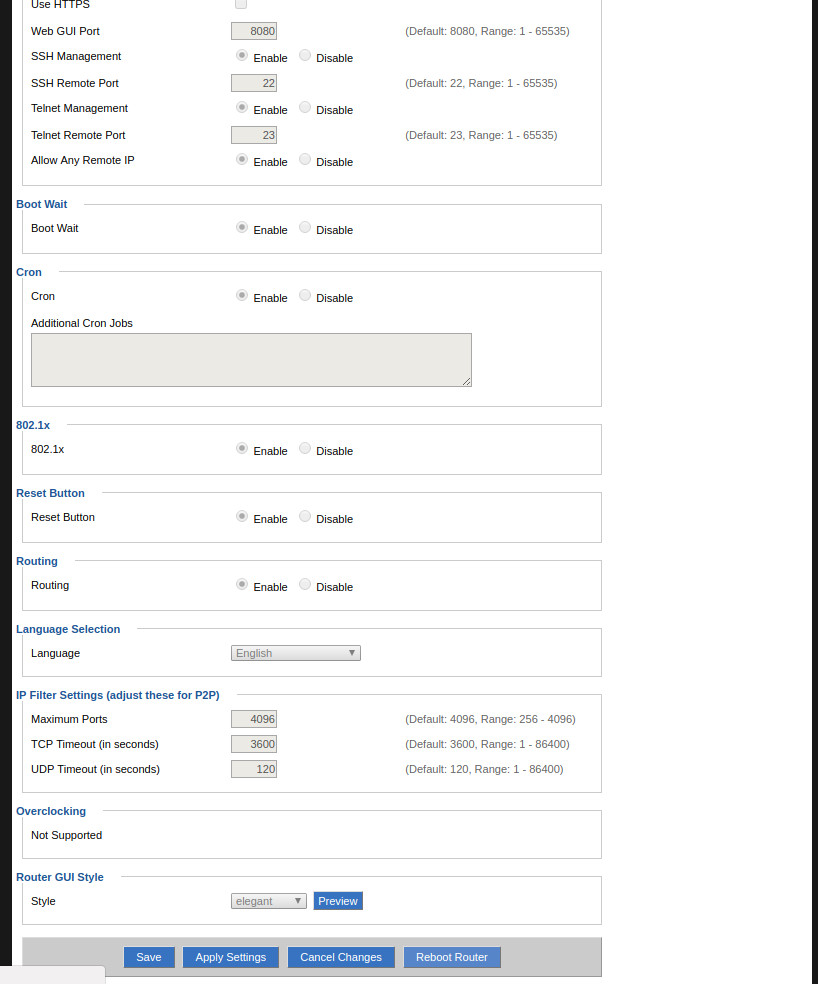
Then, click Save without Apply, we get:
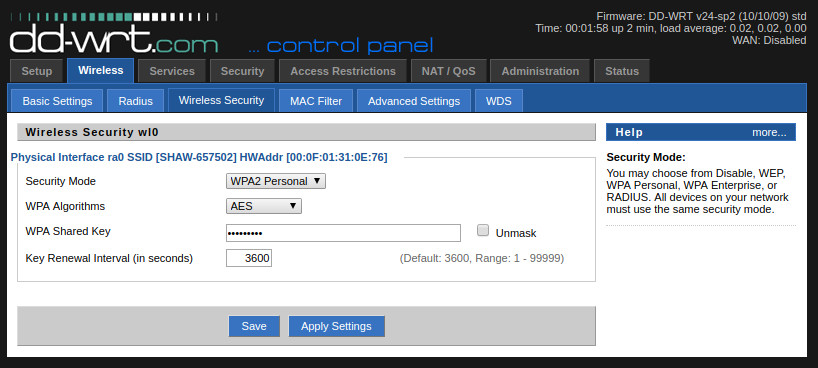
Then, click Save without Apply, we get:
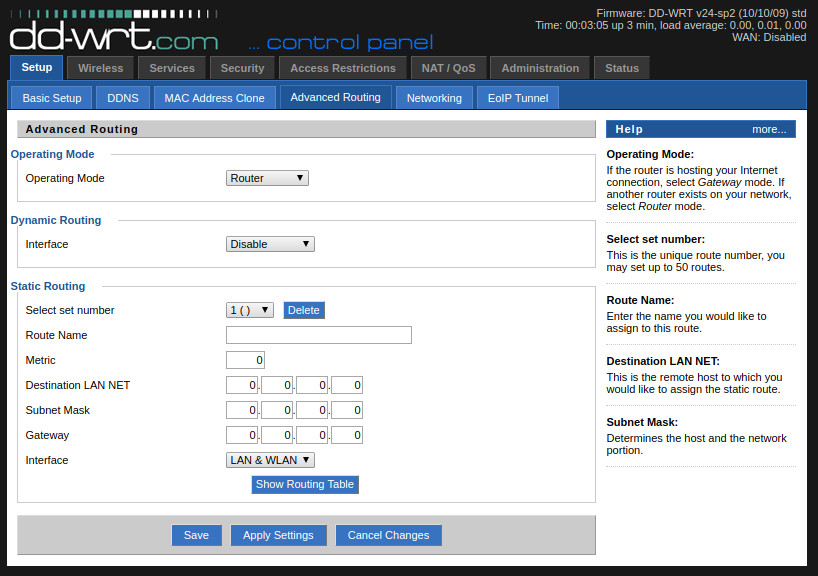
Then, click Save without Apply, we get:

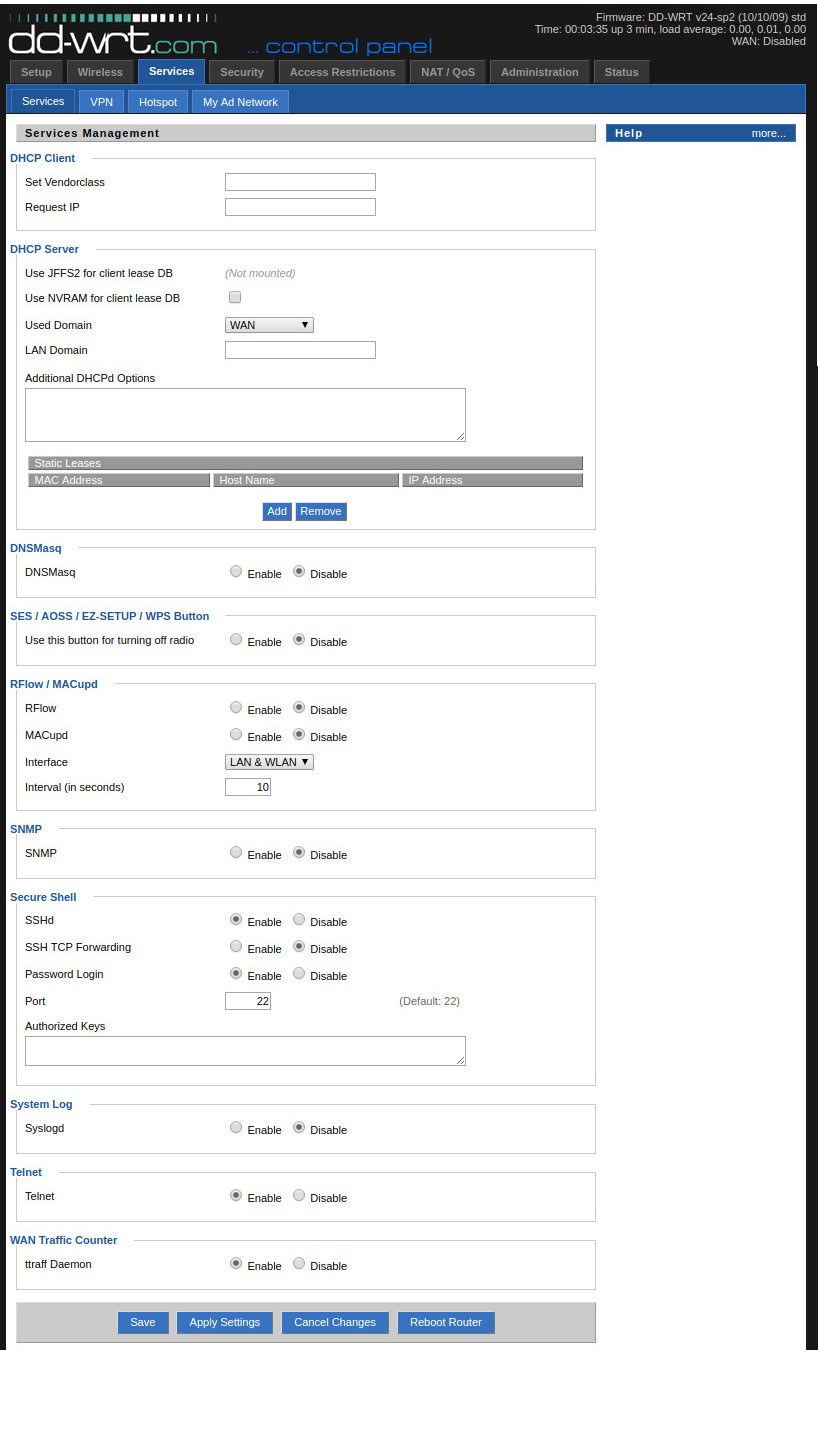
Then, click Save without Apply, we get:
Then, click Save without Apply, we get:
Note: Process in Sequence.
Then, click Save without Apply, we get:

Then, click Save without Apply, we get:
Now, it’s the time to Apply Settings
And finally, click Reboot Router
Let’s see the ping results directly:
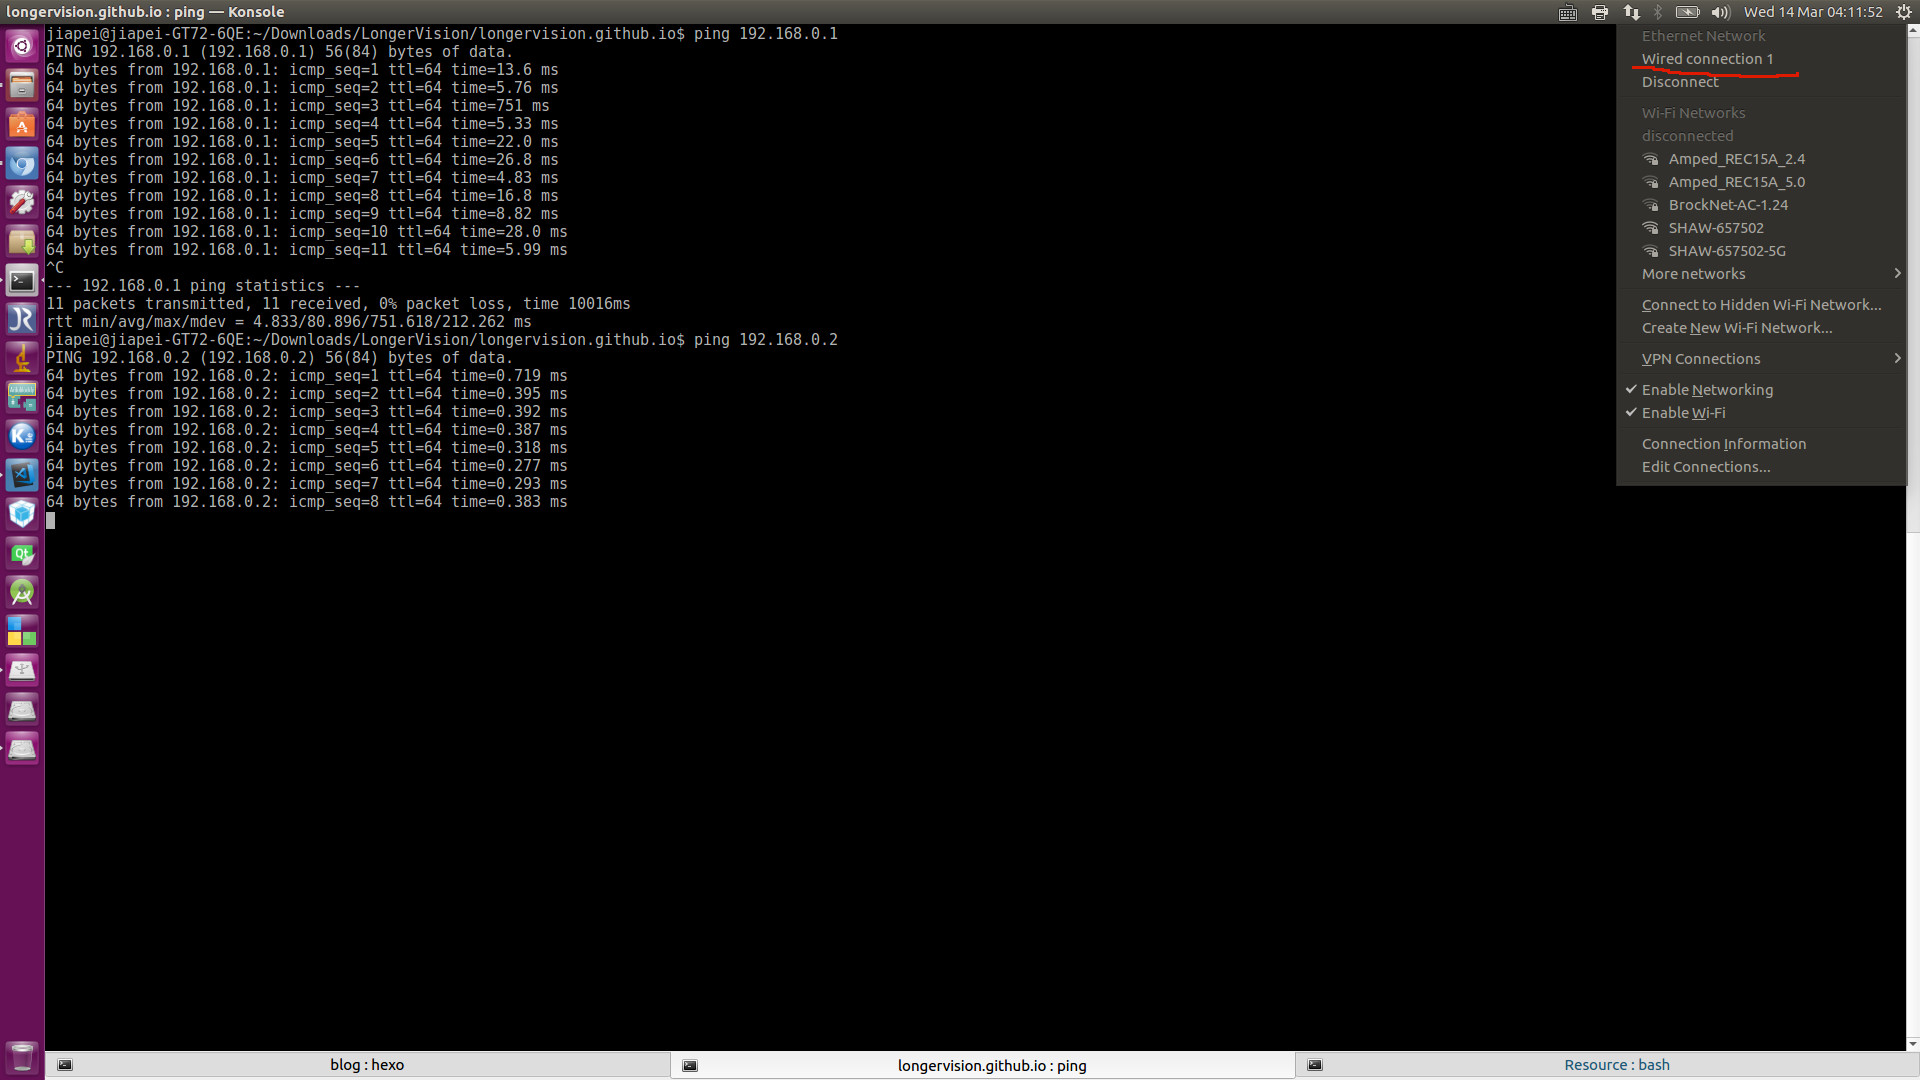
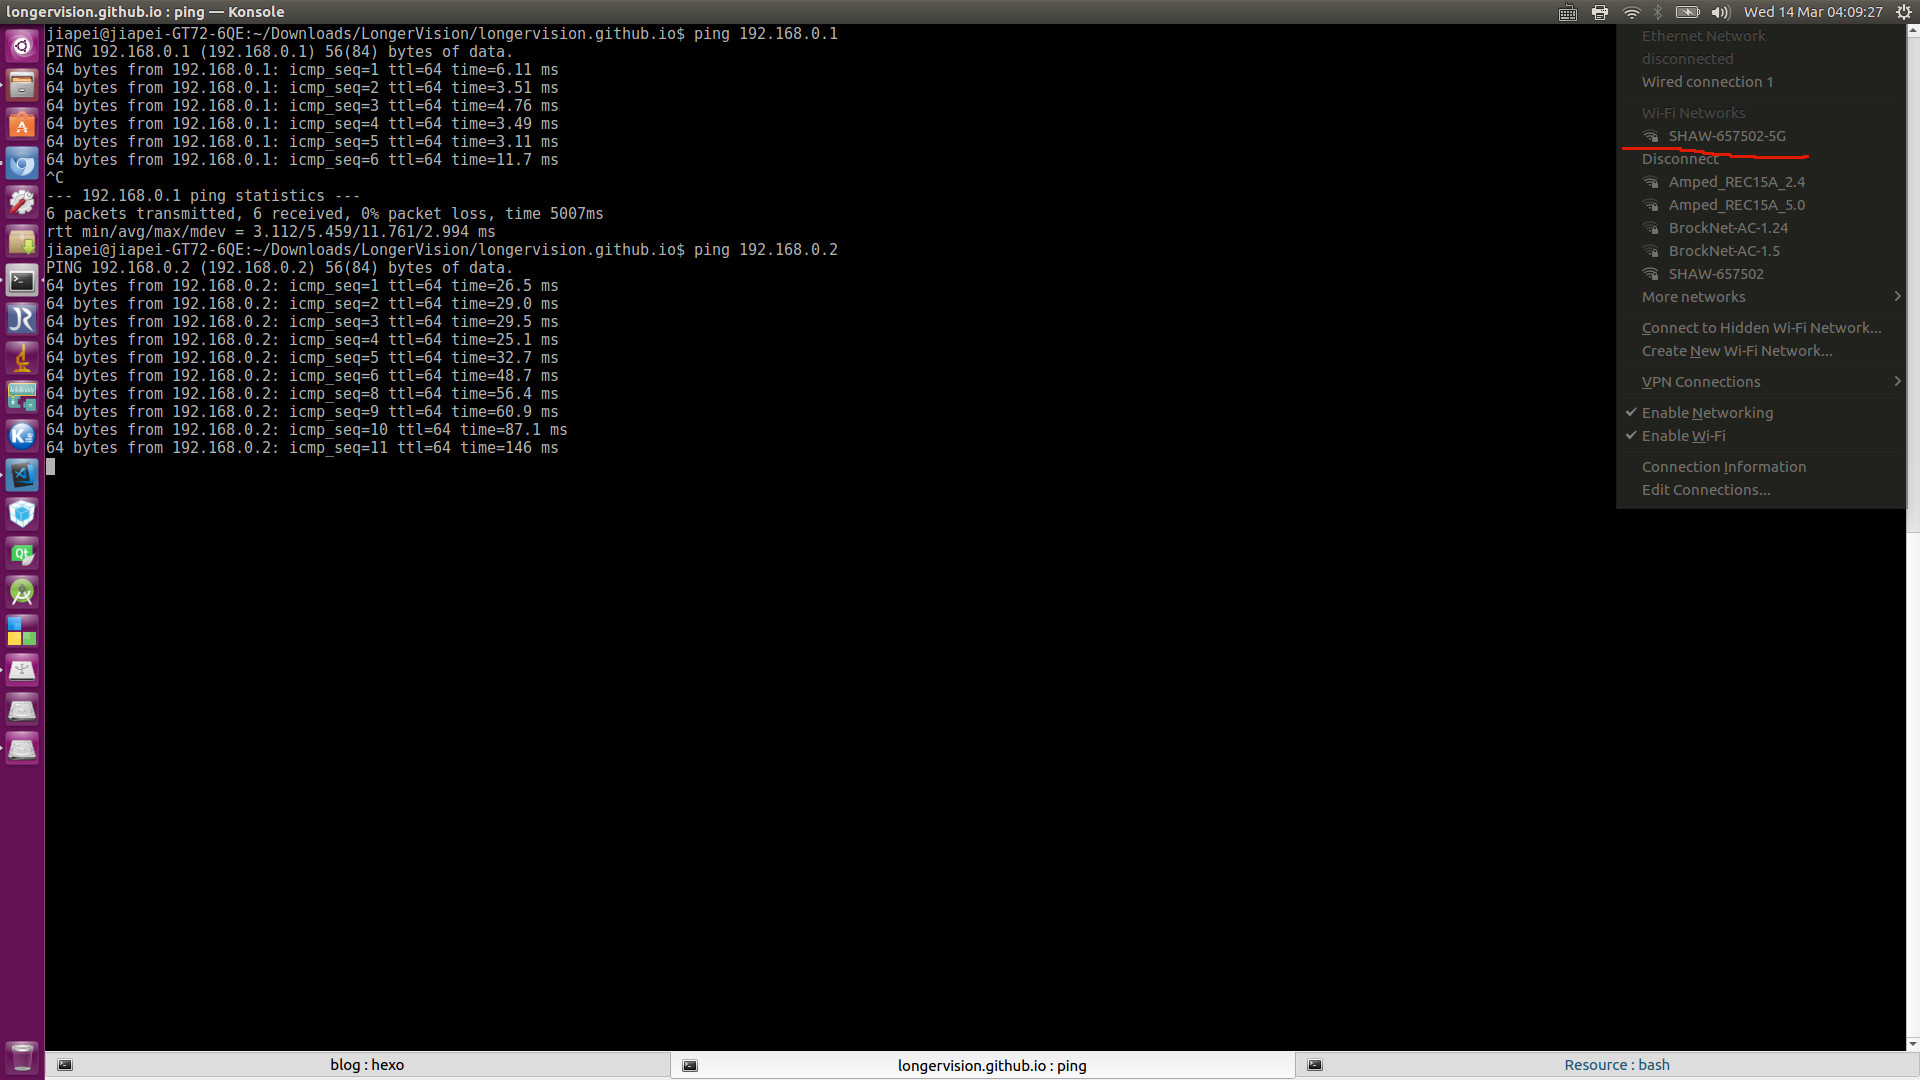
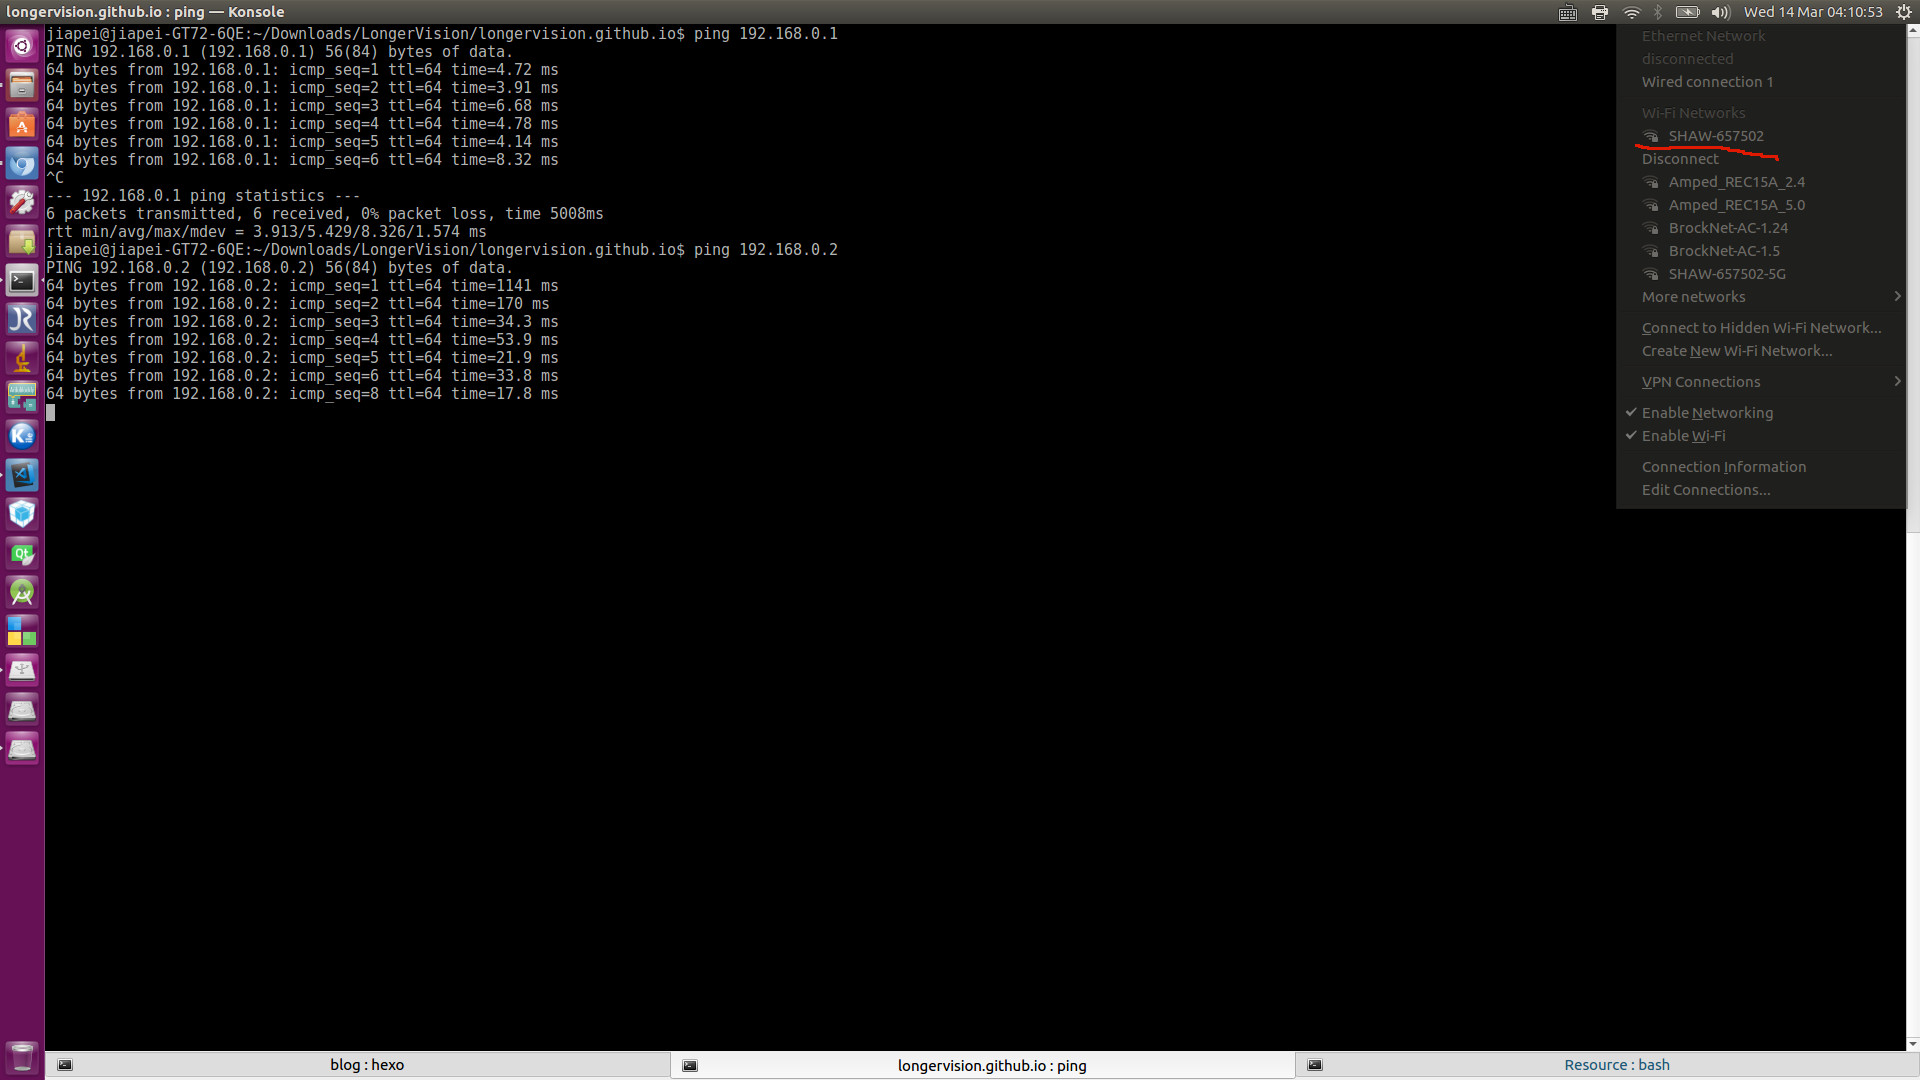
Most of the time, in order to get the fastest Internet speed, I use Primary Router 1’s 5G network. Therefore, for my final demonstration, my PC is wirelessly connected to the 5G network. And, I can successfully visit http://192.168.0.1 and http://192.168.0.2.