0%

Back to Vancouver, Canada now. Start writing something again. Just wanna write down some very useful bash scripts.

Skill 1 - How to upgrade all Python packages with pip?

Solution

Please refer to https://stackoverflow.com/questions/2720014/how-to-upgrade-all-python-packages-with-pip. Bash script is:

1
2
3
nice python3 -m pip list --outdated --format=json | \
jq -r '.[] | "\(.name)==\(.latest_version)"' | \
xargs --no-run-if-empty -n1 pip3 install -U --user

Test

1
2
3
4
5
6
7
8
9
10
11
12
13
14
15
16
17
18
19
20
21
22
23
24
25
26
27
28
29
30
31
32
33
34
35
36
37
38
39
40
41
42
43
44
45
46
47
48
49
50
51
52
53
54
55
56
57
58
59
60
61
62
63
64
65
66
67
68
69
70
71
72
73
74
75
76
77
78
79
80
81
82
83
84
85
86
87
88
89
90
91
92
➜  ~ pip list --outdated --format=freeze | grep -v '^\-e' | cut -d = -f 1  | xargs -n1 pip install -U --user
Collecting distro-info
Installing collected packages: distro-info
Found existing installation: distro-info 0.0.0
Uninstalling distro-info-0.0.0:
Successfully uninstalled distro-info-0.0.0
Successfully installed distro-info-0.0.0
Collecting Markdown
Downloading https://files.pythonhosted.org/packages/c0/4e/fd492e91abdc2d2fcb70ef453064d980688762079397f779758e055f6575/Markdown-3.1.1-py2.py3-none-any.whl (87kB)
|████████████████████████████████| 92kB 4.5MB/s
Requirement already satisfied, skipping upgrade: setuptools>=36 in ./.local/lib/python3.7/site-packages (from Markdown) (41.0.1)
Installing collected packages: Markdown
WARNING: The script markdown_py is installed in '/home/lvision/.local/bin' which is not on PATH.
Consider adding this directory to PATH or, if you prefer to suppress this warning, use --no-warn-script-location.
Successfully installed Markdown-3.1.1
Collecting pycups
Using cached https://files.pythonhosted.org/packages/00/ce/836a0deb8b24bcd5f850f8fb97f99fb4abd7374e078b9e6df5a0838f8eb5/pycups-1.9.74.tar.bz2
Building wheels for collected packages: pycups
Building wheel for pycups (setup.py) ... error
ERROR: Complete output from command /usr/bin/python3 -u -c 'import setuptools, tokenize;__file__='"'"'/tmp/pip-install-9jc5iw0k/pycups/setup.py'"'"';f=getattr(tokenize, '"'"'open'"'"', open)(__file__);code=f.read().replace('"'"'\r\n'"'"', '"'"'\n'"'"');f.close();exec(compile(code, __file__, '"'"'exec'"'"'))' bdist_wheel -d /tmp/pip-wheel-k2dtuswe --python-tag cp37:
ERROR: running bdist_wheel
running build
running build_ext
building 'cups' extension
creating build
creating build/temp.linux-x86_64-3.7
x86_64-linux-gnu-gcc -pthread -DNDEBUG -g -fwrapv -O2 -Wall -g -fstack-protector-strong -Wformat -Werror=format-security -Wdate-time -D_FORTIFY_SOURCE=2 -fPIC -DVERSION="1.9.74" -I/usr/include/python3.7m -c cupsmodule.c -o build/temp.linux-x86_64-3.7/cupsmodule.o
cupsmodule.c:23:10: fatal error: cups/cups.h: No such file or directory
#include <cups/cups.h>
^~~~~~~~~~~~~
compilation terminated.
error: command 'x86_64-linux-gnu-gcc' failed with exit status 1
----------------------------------------
ERROR: Failed building wheel for pycups
Running setup.py clean for pycups
Failed to build pycups
Installing collected packages: pycups
Running setup.py install for pycups ... error
ERROR: Complete output from command /usr/bin/python3 -u -c 'import setuptools, tokenize;__file__='"'"'/tmp/pip-install-9jc5iw0k/pycups/setup.py'"'"';f=getattr(tokenize, '"'"'open'"'"', open)(__file__);code=f.read().replace('"'"'\r\n'"'"', '"'"'\n'"'"');f.close();exec(compile(code, __file__, '"'"'exec'"'"'))' install --record /tmp/pip-record-imbt0ikc/install-record.txt --single-version-externally-managed --compile --user --prefix=:
ERROR: running install
running build
running build_ext
building 'cups' extension
creating build
creating build/temp.linux-x86_64-3.7
x86_64-linux-gnu-gcc -pthread -DNDEBUG -g -fwrapv -O2 -Wall -g -fstack-protector-strong -Wformat -Werror=format-security -Wdate-time -D_FORTIFY_SOURCE=2 -fPIC -DVERSION="1.9.74" -I/usr/include/python3.7m -c cupsmodule.c -o build/temp.linux-x86_64-3.7/cupsmodule.o
cupsmodule.c:23:10: fatal error: cups/cups.h: No such file or directory
#include <cups/cups.h>
^~~~~~~~~~~~~
compilation terminated.
error: command 'x86_64-linux-gnu-gcc' failed with exit status 1
----------------------------------------
ERROR: Command "/usr/bin/python3 -u -c 'import setuptools, tokenize;__file__='"'"'/tmp/pip-install-9jc5iw0k/pycups/setup.py'"'"';f=getattr(tokenize, '"'"'open'"'"', open)(__file__);code=f.read().replace('"'"'\r\n'"'"', '"'"'\n'"'"');f.close();exec(compile(code, __file__, '"'"'exec'"'"'))' install --record /tmp/pip-record-imbt0ikc/install-record.txt --single-version-externally-managed --compile --user --prefix=" failed with error code 1 in /tmp/pip-install-9jc5iw0k/pycups/
Collecting Pygments
Downloading https://files.pythonhosted.org/packages/5c/73/1dfa428150e3ccb0fa3e68db406e5be48698f2a979ccbcec795f28f44048/Pygments-2.4.2-py2.py3-none-any.whl (883kB)
|████████████████████████████████| 890kB 3.8MB/s
Installing collected packages: Pygments
WARNING: The script pygmentize is installed in '/home/lvision/.local/bin' which is not on PATH.
Consider adding this directory to PATH or, if you prefer to suppress this warning, use --no-warn-script-location.
Successfully installed Pygments-2.4.2
Collecting PyGObject
Using cached https://files.pythonhosted.org/packages/c1/36/c31a6ce9411b22a8ac0759c9b5ffda09368d5e0643450bb8ed83c271588c/PyGObject-3.32.1.tar.gz
Installing build dependencies ... done
Getting requirements to build wheel ... done
Preparing wheel metadata ... done
Requirement already satisfied, skipping upgrade: pycairo>=1.11.1 in ./.local/lib/python3.7/site-packages (from PyGObject) (1.18.1)
Building wheels for collected packages: PyGObject
Building wheel for PyGObject (PEP 517) ... done
Stored in directory: /home/lvision/.cache/pip/wheels/30/7a/00/cdefec8644e21ce0d5a438f96ce0ba65b51eb648c4e4614d62
Successfully built PyGObject
Installing collected packages: PyGObject
Successfully installed PyGObject-3.32.1
➜ ~ pip list --outdated --format=freeze | grep -v '^\-e' | cut -d = -f 1 | xargs -n1 pip install -U --user
Collecting distro-info
Installing collected packages: distro-info
Found existing installation: distro-info 0.0.0
Uninstalling distro-info-0.0.0:
Successfully uninstalled distro-info-0.0.0
Successfully installed distro-info-0.0.0
Collecting pycups
Using cached https://files.pythonhosted.org/packages/00/ce/836a0deb8b24bcd5f850f8fb97f99fb4abd7374e078b9e6df5a0838f8eb5/pycups-1.9.74.tar.bz2
Building wheels for collected packages: pycups
Building wheel for pycups (setup.py) ... done
Stored in directory: /home/lvision/.cache/pip/wheels/bb/4a/db/d9ea6edeead55ff1b909f3e7aa4384db28ff6ce3ecef0c94f7
Successfully built pycups
Installing collected packages: pycups
Successfully installed pycups-1.9.74
➜ ~ pip list --outdated
Package Version Latest Type
----------- ------- ------ -----
distro-info 0.0.0 0.10 sdist
➜ ~

In the above test, clearly, we ran the following bash script twice:

1
➜  ~ pip list --outdated --format=freeze | grep -v '^\-e' | cut -d = -f 1  | xargs -n1 pip install -U --user

For the 1st time, we successfully had distro-info, Markdown, Pygments, PyGObject installed, but failed to install pycups.
For the 2nd time, after libcups2-dev had been installed from Ubuntu repository, we had pycups installed successfully.

However, we still have one LAST issue: why distro-info is still oudated? ^_^ Can anybody give me an explanation?

Skill 2 - How to list all auto-removable packages?

1
apt-get --dry-run autoremove | grep -Po '^Remv \K[^ ]+'

Skill 3 - How to deal with the bug “Error: ENOSPC: System limit for number of file watchers reached”?

1
echo fs.inotify.max_user_watches=524288 | sudo tee -a /etc/sysctl.conf && sudo sysctl -p

Skill 4 - How to find all connected devices with nmap?

Solution

Please refer to https://vitux.com/find-devices-connected-to-your-network-with-nmap/. Bash script is:

1
nmap -sP 192.168.1.254/24

Test

1
2
3
4
5
6
7
8
9
10
11
12
13
14
15
16
17
18
19
20
21
22
23
24
25
26
➜  ~ nmap -sP 192.168.1.254/24
Starting Nmap 7.70 ( https://nmap.org ) at 2019-06-03 08:03 PDT
Nmap scan report for 192.168.1.64
Host is up (0.082s latency).
Nmap scan report for 192.168.1.65
Host is up (0.0092s latency).
Nmap scan report for 192.168.1.66
Host is up (0.010s latency).
Nmap scan report for 192.168.1.67
Host is up (0.037s latency).
Nmap scan report for 192.168.1.71
Host is up (0.032s latency).
Nmap scan report for 192.168.1.73
Host is up (0.032s latency).
Nmap scan report for 192.168.1.74
Host is up (0.061s latency).
Nmap scan report for 192.168.1.98
Host is up (0.044s latency).
Nmap scan report for 192.168.1.103
Host is up (0.15s latency).
Nmap scan report for lvision-GT72-6QE (192.168.1.200)
Host is up (0.00047s latency).
Nmap scan report for _gateway (192.168.1.254)
Host is up (0.015s latency).
Nmap done: 256 IP addresses (11 hosts up) scanned in 8.21 seconds
➜ ~

Skill 5 - How to install OS img with dd?

Solution

Please refer to Installing operating system images on Linux for Raspberry Pi . Bash script is:

1
sudo dd bs=4M if=Armbian_5.83_Nanopineo_Ubuntu_bionic_next_4.19.38.img of=/dev/mmcblk0 conv=fsync

Test

1
2
3
4
5
➜  ~ sudo dd bs=4M if=Armbian_5.83_Nanopineo_Ubuntu_bionic_next_4.19.38.img of=/dev/mmcblk0 conv=fsync
[sudo] password for lvision:
223+0 records in
223+0 records out
935329792 bytes (935 MB, 892 MiB) copied, 89.9065 s, 10.4 MB/s

Skill 6 - How to add NVidia GPG Public Key?

Talked NVidia Issues:

1
➜  ~ wget -qO - https://developer.download.nvidia.com/compute/cuda/repos/ubuntu1804/x86_64/7fa2af80.pub | sudo apt-key add -

Skill 7 - How to change username and it’s home directory?

Now, let’s try to change from longervision to lvision. Two commands after login with root:

1
2
➜  ~ sudo usermod -l lvision longervision
➜ ~ sudo usermod -d /home/lvision -m lvision

Skill 8 - How to fuse video and audio using FFmpeg?

1
❯ ffmpeg -i video.mp4 -i audio.mp3 -c:v copy -c:a aac -map 0:v:0 -map 1:a:0 -shortest output.mp4

Skill 9 - How to install Python packages from source?

  • Traditional Way
1
2
$ python setup.py build
$ python setup.py install --user
  • Preferred Way
1
$ pip install --no-deps --prefix=~/.local/ . 

Skill 10 - Obtain System Info in Graphs.

1
2
3
4
5
6
7
8
9
10
11
12
13
14
15
16
17
18
19
20
21
   ✔  neofetch
.-/+oossssoo+/-. longervision@longervision-GT72-6QE
`:+ssssssssssssssssss+:` ----------------------------------
-+ssssssssssssssssssyyssss+- OS: Ubuntu 18.04.4 LTS x86_64
.ossssssssssssssssssdMMMNysssso. Host: GT72 6QE REV:1.0
/ssssssssssshdmmNNmmyNMMMMhssssss/ Kernel: 5.3.0-53-generic
+ssssssssshmydMMMMMMMNddddyssssssss+ Uptime: 20 hours, 45 mins
/sssssssshNMMMyhhyyyyhmNMMMNhssssssss/ Packages: 4115
.ssssssssdMMMNhsssssssssshNMMMdssssssss. Shell: fish 3.1.2-630-gad020e84d
+sssshhhyNMMNyssssssssssssyNMMMysssssss+ Resolution: 1920x1080
ossyNMMMNyMMhsssssssssssssshmmmhssssssso DE: GNOME 3.28.4
ossyNMMMNyMMhsssssssssssssshmmmhssssssso WM: GNOME Shell
+sssshhhyNMMNyssssssssssssyNMMMysssssss+ WM Theme: Adwaita
.ssssssssdMMMNhsssssssssshNMMMdssssssss. Theme: Ambiance [GTK2/3]
/sssssssshNMMMyhhyyyyhdNMMMNhssssssss/ Icons: Ubuntu-mono-dark [GTK2/3]
+sssssssssdmydMMMMMMMMddddyssssssss+ Terminal: gnome-terminal
/ssssssssssshdmNNNNmyNMMMMhssssss/ CPU: Intel i7-6700HQ (8) @ 3.500GHz
.ossssssssssssssssssdMMMNysssso. GPU: NVIDIA GeForce GTX 980M
-+sssssssssssssssssyyyssss+- Memory: 8543MiB / 48025MiB
`:+ssssssssssssssssss+:`
.-/+oossssoo+/-.
1
2
3
4
5
6
7
8
9
10
11
12
13
14
15
16
17
18
19
36  ✘  screenfetch                                                                                                                                                                                  1s  ~ 
./+o+- longervision@longervision-GT72-6QE
yyyyy- -yyyyyy+ OS: Ubuntu 18.04 bionic
://+//////-yyyyyyo Kernel: x86_64 Linux 5.3.0-53-generic
.++ .:/++++++/-.+sss/` Uptime: 20h 56m
.:++o: /++++++++/:--:/- Packages: 4116
o:+o+:++.`..```.-/oo+++++/ Shell: fish 3.1.2-630-gad020e84d
.:+o:+o/. `+sssoo+/ Resolution: 1920x1080
.++/+:+oo+o:` /sssooo. DE: GNOME
/+++//+:`oo+o /::--:. WM: GNOME Shell
\+/+o+++`o++o ++////. WM Theme: Adwaita
.++.o+++oo+:` /dddhhh. GTK Theme: Ambiance [GTK2/3]
.+.o+oo:. `oddhhhh+ Icon Theme: ubuntu-mono-dark
\+.++o+o``-````.:ohdhhhhh+ Font: Ubuntu 11
`:o+++ `ohhhhhhhhyo++os: CPU: Intel Core i7-6700HQ @ 8x 3.5GHz
.o:`.syhhhhhhh/.oo++o` GPU: GeForce GTX 980M
/osyyyyyyo++ooo+++/ RAM: 7910MiB / 48025MiB
````` +oo+++o\:
`oo++.

Skill 11 - How to SSH Before Logon?

Solution:
Connect to network before user login

1
2
3
$ cd /etc/NetworkManager/system-connections
xxxxx@yyyyy:/etc/NetworkManager/system-connections$ ls
ZZZZZZZZZZ

Then, modify file ZZZZZZZZZZ, remove everything after permission=.

Skill 12 - How to SSH-KEYGEN?

All you need is on the Internet: ssh-keygen - Generate a New SSH Key?

Skill 13 - New Installed Kernel Does Not Show In Menu While Rebooting?

Solution: Not rebooting to the lastest kernel after update to grub 2

1
2
$ sudo grub-install /dev/sdb
$ sudo update-grub

Reason: grub is NOT installed under the RIGHT hard drive.

Skill 14 - Meson Conflicts Against pathlib?

Solution:

1
$ pip uninstall pathlib

More details can be found https://github.com/Kozea/WeasyPrint/issues/807.

1
2
3
4
5
6
7
8
9
10
 12  ✔  python
 4s  ~/.local/lib/python3.6/site-packages
Python 3.6.9 (default, Jul 17 2020, 12:50:27)
[GCC 8.4.0] on linux
Type "help", "copyright", "credits" or "license" for more information.
>>> from pathlib import Path
>>> print(Path().read_text)
Traceback (most recent call last):
File "<stdin>", line 1, in <module>
AttributeError: 'PosixPath' object has no attribute 'read_text'

Skill 15 - Run gdb with user root

  • Create a script called gdb in e.g. my home directory, containing: pkexec /usr/bin/gdb "$@"
  • make it executable
  • modify the launch.json in VSCode to call the script (obviously change username accordingly) by adding miDebuggerPath:
1
2
3
4
5
...
"externalConsole": false,
"miDebuggerPath": "/home/<username>/gdb",
"MIMode": "gdb",
...
  • whilst debugging, use top or such like to verify the process is running as root.

Solution: How to debug programs with “sudo” in VSCODE.

Skill 16 - Command Line to Check Multiple Versions of A Package

pkg-config --debug --modversion glib-2.0 really helps. Refer to https://askubuntu.com/questions/488187/pkg-config-modversion-glib-2-0-reports-older-version.

Skill 17 - Pip Workaround

Basically, this is just an pip issue.

1
2
3
4
➜  pip list --outdated
WARNING: pip is being invoked by an old script wrapper. This will fail in a future version of pip.
Please see https://github.com/pypa/pip/issues/5599 for advice on fixing the underlying issue.
To avoid this problem you can invoke Python with '-m pip' instead of running pip directly.

Therefore, python -m pip is used instead:

1
2
3
➜  bin python -m pip list --outdated
➜ bin python -m pip --version
pip 21.3.1 from /home/jetbot/.local/lib/python3.6/site-packages/pip (python 3.6)

Skill 18 - HOWTO – Resize partitions in raw disk (dd) image files (.img)

Refer to HOWTO – Resize partitions in raw disk (dd) image files (.img)

Skill 19 - error: failed to push some refs to ‘XXX.XXX.XXX.XXX:~/myWebsite.git’

The Issue

1
2
3
4
5
6
7
8
9
10
11
12
13
14
15
16
17
18
19
20
21
22
23
24
25
➜  myWebsite git:(master) git push        
Enumerating objects: 1498, done.
Counting objects: 100% (1498/1498), done.
Delta compression using up to 48 threads
Compressing objects: 100% (1227/1227), done.
Writing objects: 100% (1498/1498), 1.20 MiB | 10.40 MiB/s, done.
Total 1498 (delta 182), reused 0 (delta 0), pack-reused 0
remote: Resolving deltas: 100% (182/182), done.
remote: error: refusing to update checked out branch: refs/heads/master
remote: error: By default, updating the current branch in a non-bare repository
remote: is denied, because it will make the index and work tree inconsistent
remote: with what you pushed, and will require 'git reset --hard' to match
remote: the work tree to HEAD.
remote:
remote: You can set the 'receive.denyCurrentBranch' configuration variable
remote: to 'ignore' or 'warn' in the remote repository to allow pushing into
remote: its current branch; however, this is not recommended unless you
remote: arranged to update its work tree to match what you pushed in some
remote: other way.
remote:
remote: To squelch this message and still keep the default behaviour, set
remote: 'receive.denyCurrentBranch' configuration variable to 'refuse'.
To XXX.XXX.XXX.XXX:~/myWebsite.git
! [remote rejected] master -> master (branch is currently checked out)
error: failed to push some refs to 'XXX.XXX.XXX.XXX:~/myWebsite.git'

Solution

1
git config receive.denyCurrentBranch ignore

Skill 20 - Find ALL Broken Symbolic Links

Refer to How can I find broken symlinks

1
find . -type l -exec sh -c 'file -b "$1" | grep -q "^broken"' sh {} \; -print

Skill 21 - VLC Hangs At checking for protobuf-lite.... How?

Just add --disable-chromecast.

1
./configure --enable-thumbnailer --enable-preparser --disable-chromecast

Skill 25 - 10 Cool Command Line Tools For Your Linux Terminal

Refer to 10 Cool Command Line Tools For Your Linux Terminal

Skill 26 - nginx service failed.

1
2
3
4
5
6
7
8
⋊> ~ systemctl status nginx.service                                                                                                                                                                                                          17:12:04
× nginx.service - A high performance web server and a reverse proxy server
Loaded: loaded (/lib/systemd/system/nginx.service; enabled; vendor preset: enabled)
Active: failed (Result: exit-code) since Wed 2023-06-21 17:12:04 PDT; 13s ago
Docs: man:nginx(8)
Process: 13424 ExecStartPre=/usr/sbin/nginx -t -q -g daemon on; master_process on; (code=exited, status=0/SUCCESS)
Process: 13427 ExecStart=/usr/sbin/nginx -g daemon on; master_process on; (code=exited, status=1/FAILURE)
CPU: 188ms

Solution:

sudo service nginx restart

after

1
2
sudo fuser -k 80/tcp
sudo fuser -k 443/tcp

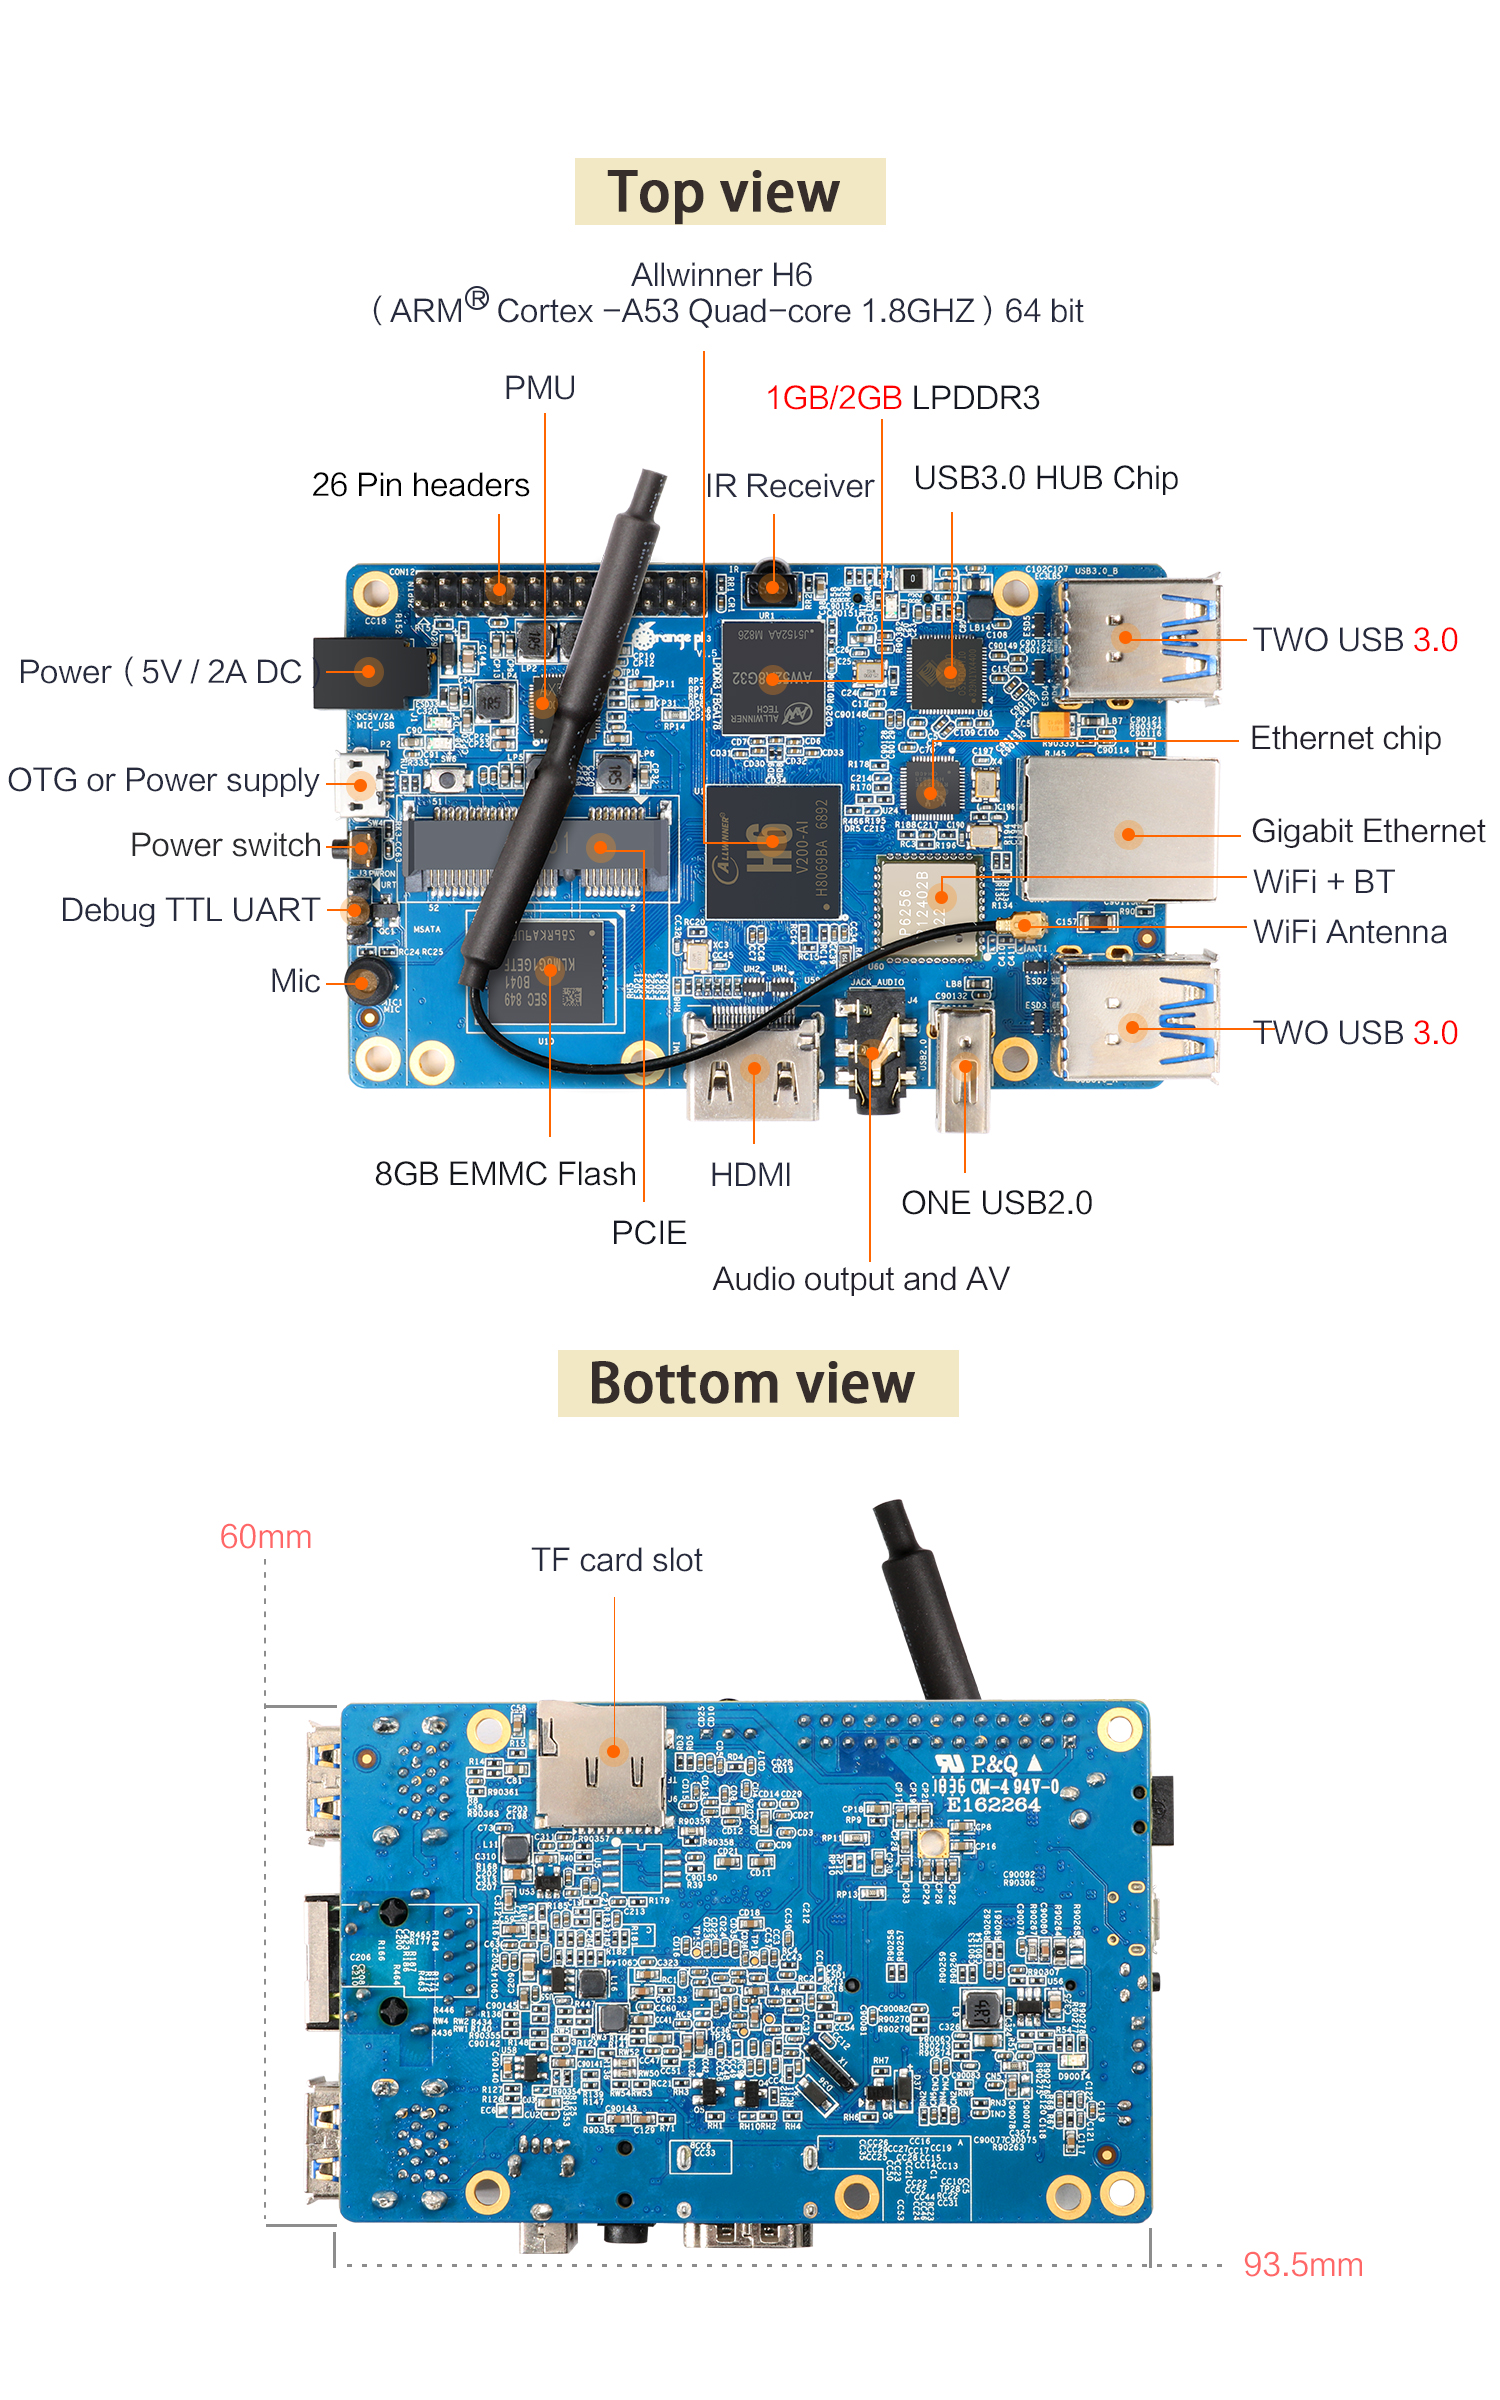
Today, let’s have some fun of Orange Pi 3, which adopts AllWinner H6 as its CPU. The board looks like (cited from Orange Pi 3 ):

Orange Pi 3

By following our previous blog Install Armbian Ubuntu Desktop with the Newest Supported Mainline Linux Kernel onto Orange Pi Plus 2, we’ll have the Nightly Built Armbian Ubuntu Desktop installed onto Orange Pi 3.

PART A: Install Ubuntu Desktop Nightly Built By Armbian onto Orange Pi 3

1. Download Armbian Ubuntu Desktop for Orange Pi 3

We FIRST go visiting the website https://dl.armbian.com/orangepi3/nightly/ and click on the LAST link, for today May 12, 2019, a file named Armbian_5.86.190512_Orangepi3_Ubuntu_bionic_dev_5.1.0.7z will be automatically downloaded.

Then, we extract this .7z file by

1
2
3
4
5
6
7
8
9
10
11
12
13
14
15
16
17
18
19
20
21
22
23
➜  7z x Armbian_5.86.190512_Orangepi3_Ubuntu_bionic_dev_5.1.0.7z 

7-Zip [64] 16.02 : Copyright (c) 1999-2016 Igor Pavlov : 2016-05-21
p7zip Version 16.02 (locale=en_CA.UTF-8,Utf16=on,HugeFiles=on,64 bits,8 CPUs Intel(R) Core(TM) i7-6700HQ CPU @ 2.60GHz (506E3),ASM,AES-NI)

Scanning the drive for archives:
1 file, 218882367 bytes (209 MiB)

Extracting archive: Armbian_5.86.190512_Orangepi3_Ubuntu_bionic_dev_5.1.0.7z
--
Path = Armbian_5.86.190512_Orangepi3_Ubuntu_bionic_dev_5.1.0.7z
Type = 7z
Physical Size = 218882367
Headers Size = 301
Method = LZMA2:25
Solid = +
Blocks = 1

Everything is Ok

Files: 4
Size: 1111510096
Compressed: 218882367

2. Install Armbian Ubuntu Desktop for Orange Pi 3

Exactly the same as in our previous blog Install Armbian Ubuntu Desktop with the Newest Supported Mainline Linux Kernel onto Orange Pi Plus 2, we have the TF card formatted and dd the system into it.

PART B: SSH Into Orange Pi 3, Update & Upgrade, Locale Configuration, Network Configuration

Exactly the same as in our previous blog Install Armbian Ubuntu Desktop With Kernel 5.0 onto Banana Pi M3, we should be able to SSH into Orange Pi 3, update & upgrade the system, configure both network and locale.

1. SSH Into Armbian

1
2
3
4
5
6
7
8
9
10
11
12
13
14
15
16
17
18
19
20
21
22
23
24
25
26
27
28
29
30
31
32
33
34
35
36
37
38
39
40
41
42
43
44
45
46
47
48
49
50
51
52
53
54
55
56
➜  ~ ssh root@192.168.1.101
root@192.168.1.101's password:
You are required to change your password immediately (root enforced)
___ ____ _ _____
/ _ \ _ __ __ _ _ __ __ _ ___ | _ \(_) |___ /
| | | | '__/ _` | '_ \ / _` |/ _ \ | |_) | | |_ \
| |_| | | | (_| | | | | (_| | __/ | __/| | ___) |
\___/|_| \__,_|_| |_|\__, |\___| |_| |_| |____/
|___/

Welcome to ARMBIAN 5.86.190512 nightly Ubuntu 18.04.2 LTS 5.1.0-sunxi64
System load: 0.01 0.13 0.08 Up time: 5 min
Memory usage: 4 % of 1997MB IP: 192.168.1.101
CPU temp: 40°C
Usage of /: 3% of 29G

Last login: Mon May 13 08:59:30 2019 from 192.168.1.11
Changing password for root.
(current) UNIX password:
Enter new UNIX password:
Retype new UNIX password:


You are using an Armbian nightly build meant only for developers to provide
constructive feedback to improve build system, OS settings or user experience.
If this does not apply to you, STOP NOW!. Especially don't use this image for
daily work since things might not work as expected or at all and may break
anytime with next update. YOU HAVE BEEN WARNED!

This image is provided AS IS with NO WARRANTY and NO END USER SUPPORT!.

Creating a new user account. Press <Ctrl-C> to abort

Please provide a username (eg. your forename): Sky
Trying to add user sky
Adding user `sky' ...
Adding new group `sky' (1000) ...
Adding new user `sky' (1000) with group `sky' ...
Creating home directory `/home/sky' ...
Copying files from `/etc/skel' ...
Enter new UNIX password:
Retype new UNIX password:
passwd: password updated successfully
Changing the user information for sky
Enter the new value, or press ENTER for the default
Full Name []:
Room Number []:
Work Phone []:
Home Phone []:
Other []:
Is the information correct? [Y/n] y

Dear sky, your account sky has been created and is sudo enabled.
Please use this account for your daily work from now on.

root@orangepi3:~#

2. Kernel Doublechecking

1
2
3
4
5
6
7
8
9
10
root@orangepi3:~# uname -r
5.1.0-sunxi64
root@orangepi3:~# uname -a
Linux orangepi3 5.1.0-sunxi64 #5.86.190512 SMP Sun May 12 22:26:37 CEST 2019 aarch64 aarch64 aarch64 GNU/Linux
root@orangepi3:~# lsb_release -a
No LSB modules are available.
Distributor ID: Ubuntu
Description: Ubuntu 18.04.2 LTS
Release: 18.04
Codename: bionic

3. Update & Upgrade

1
2
3
4
5
6
7
8
9
10
11
12
13
14
15
16
17
18
19
20
21
22
23
24
25
root@orangepi3:~# sudo apt update
Hit:1 http://ports.ubuntu.com bionic InRelease
Get:2 http://ports.ubuntu.com bionic-security InRelease [88.7 kB]
Get:3 http://ports.ubuntu.com bionic-updates InRelease [88.7 kB]
Get:4 http://ports.ubuntu.com bionic-backports InRelease [74.6 kB]
Get:6 http://ports.ubuntu.com bionic-security/main arm64 Packages [250 kB]
Get:7 http://ports.ubuntu.com bionic-security/main armhf Packages [229 kB]
Get:8 http://ports.ubuntu.com bionic-security/universe armhf Packages [240 kB]
Get:5 https://beta.armbian.com bionic InRelease [23.3 kB]
Get:9 http://ports.ubuntu.com bionic-security/universe arm64 Packages [245 kB]
Get:10 https://beta.armbian.com bionic/main arm64 Packages [179 kB]
Get:11 http://ports.ubuntu.com bionic-updates/main arm64 Packages [484 kB]
Get:12 https://beta.armbian.com bionic/main armhf Packages [205 kB]
Get:13 http://ports.ubuntu.com bionic-updates/main armhf Packages [465 kB]
Get:14 https://beta.armbian.com bionic/bionic-utils arm64 Packages [97.5 kB]
Get:15 https://beta.armbian.com bionic/bionic-utils armhf Packages [97.2 kB]
Get:16 http://ports.ubuntu.com bionic-updates/universe arm64 Packages [834 kB]
Get:17 https://beta.armbian.com bionic/bionic-desktop armhf Packages [27.3 kB]
Get:18 http://ports.ubuntu.com bionic-updates/universe armhf Packages [783 kB]
Fetched 4411 kB in 39s (113 kB/s)
Reading package lists... Done
Building dependency tree
Reading state information... Done
All packages are up to date.
root@orangepi3:~#

4. Locale Configuration

1
2
3
4
5
root@orangepi3:~# dpkg-reconfigure tzdata

Current default time zone: 'Asia/Hong_Kong'
Local time is now: Mon May 13 21:57:02 HKT 2019.
Universal Time is now: Mon May 13 13:57:02 UTC 2019.

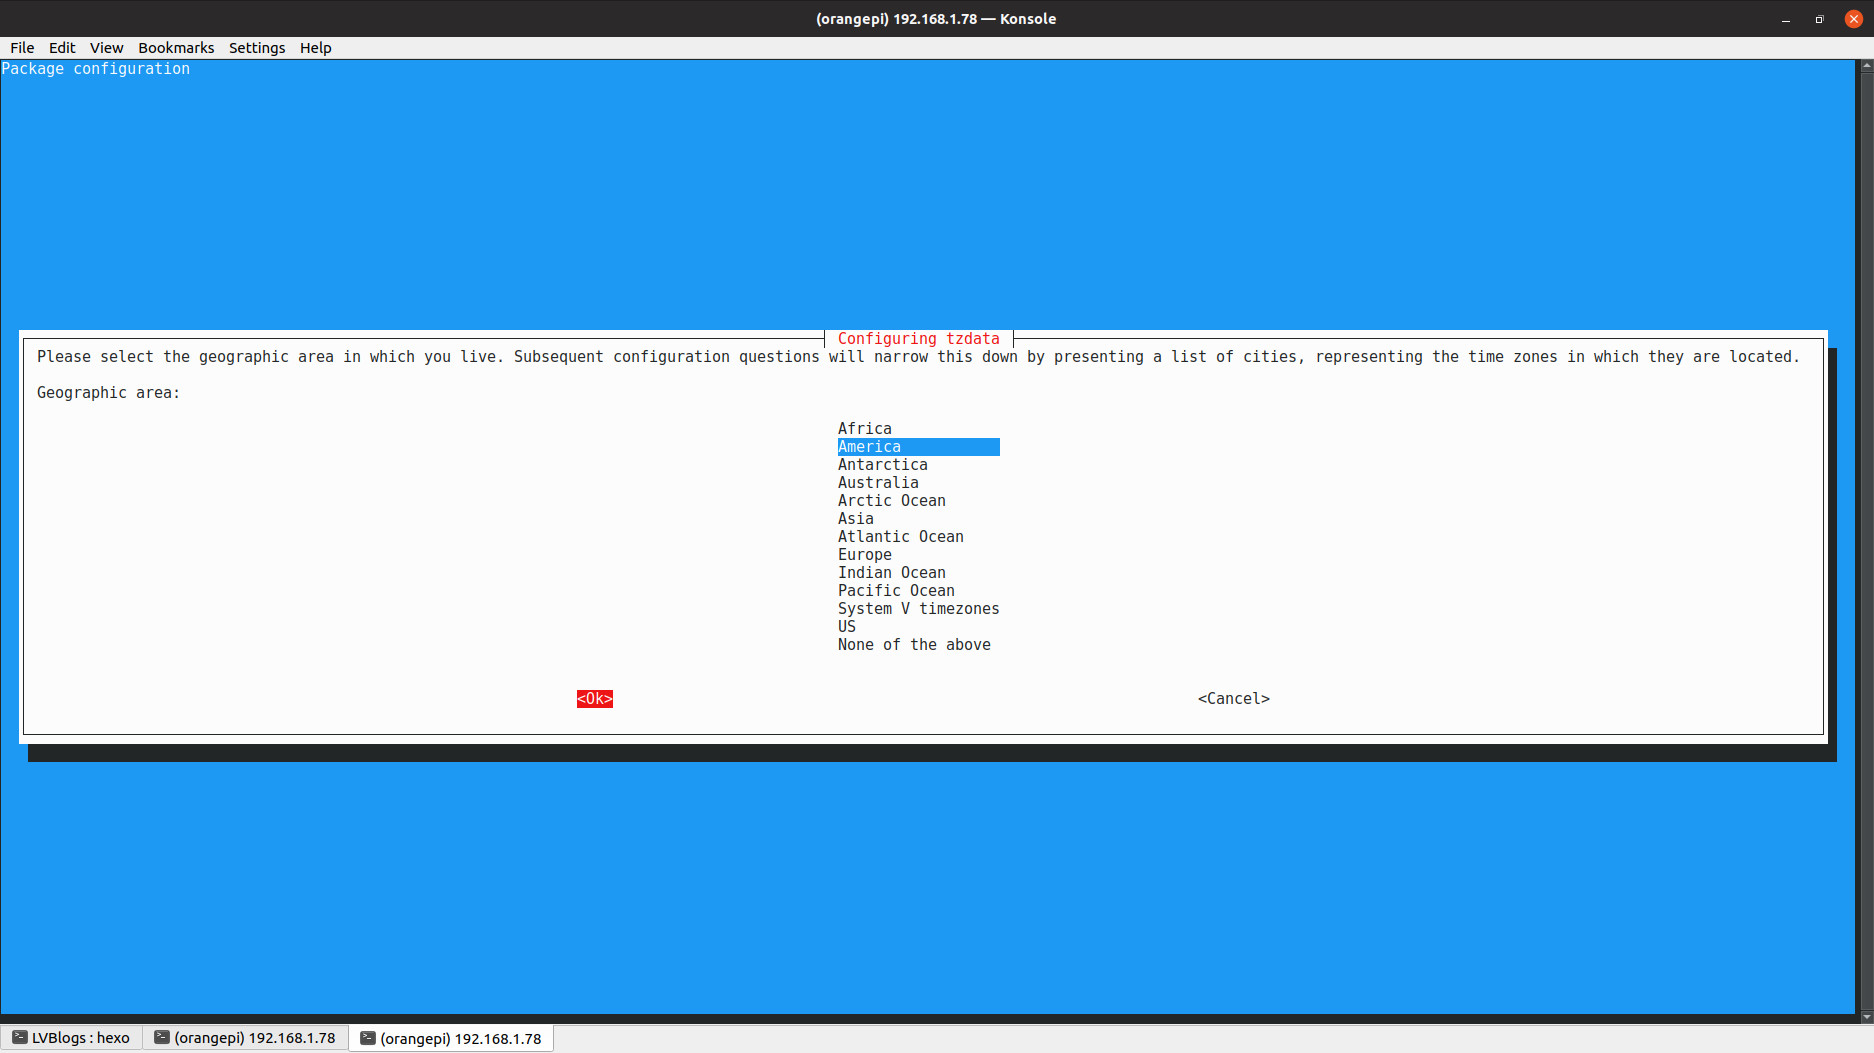
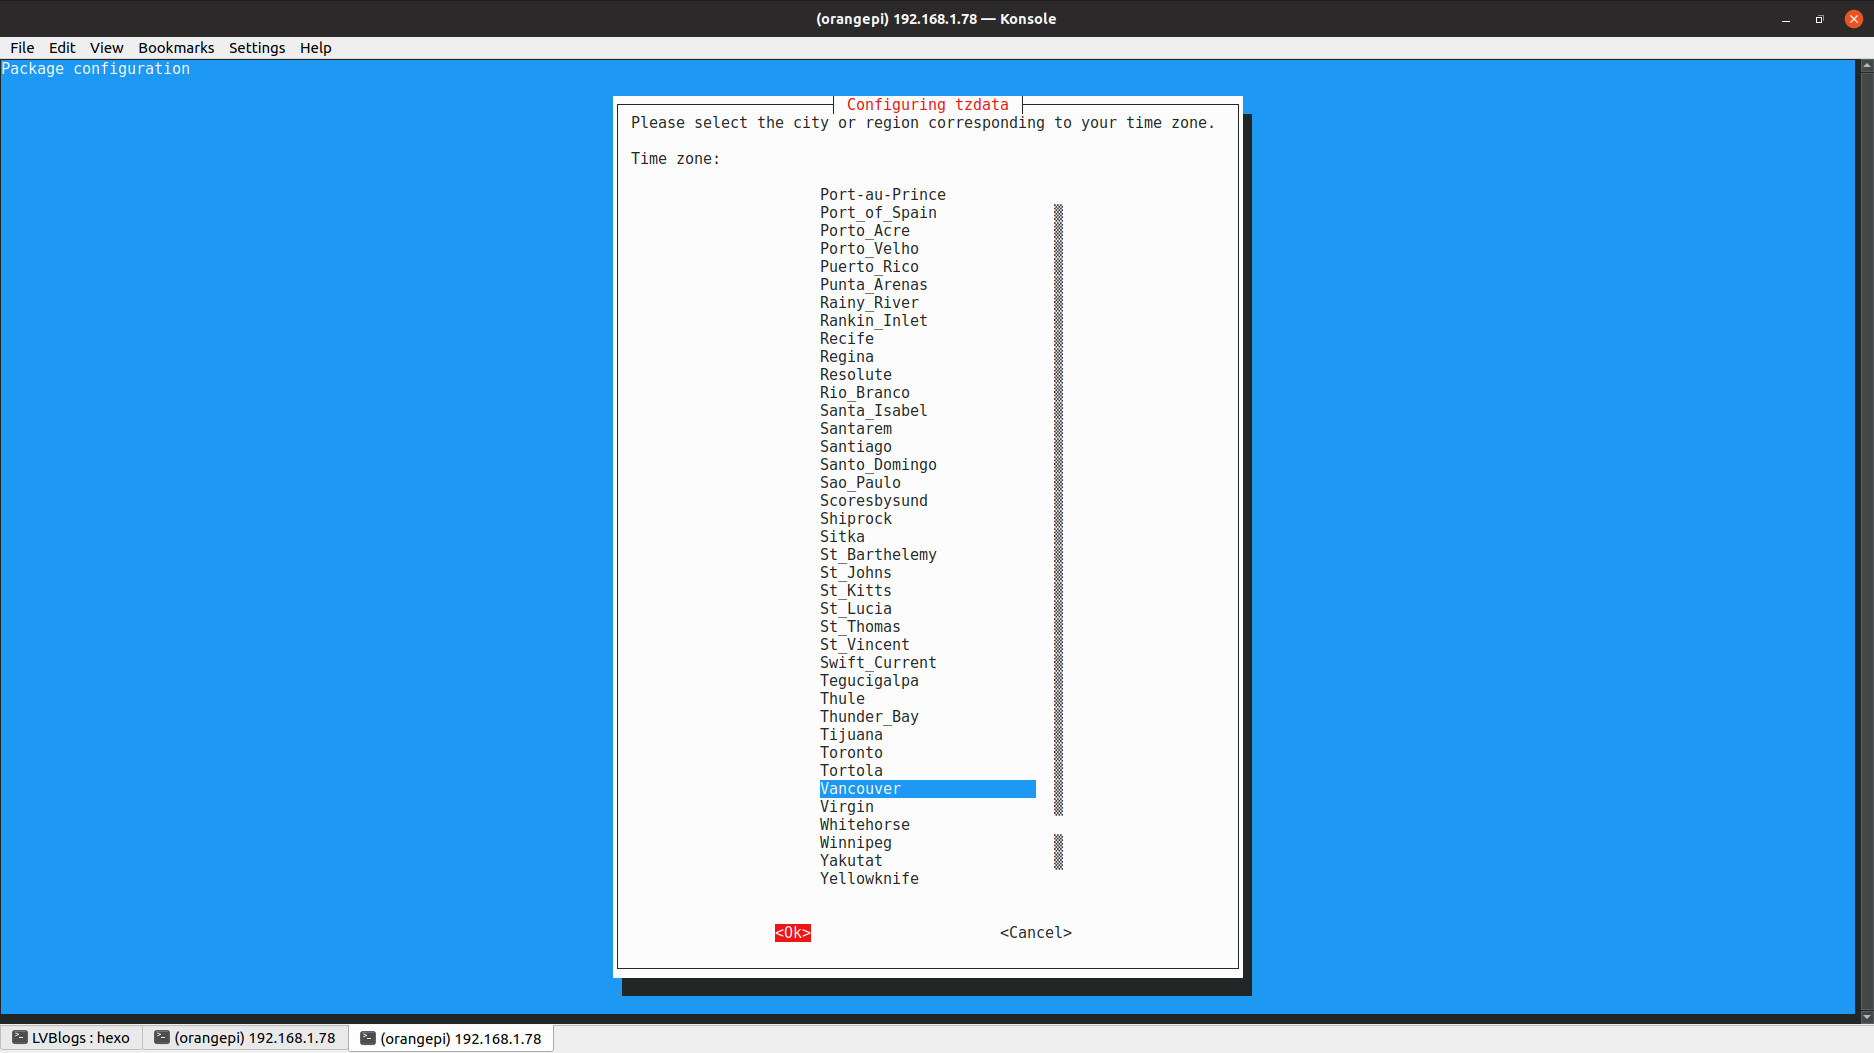
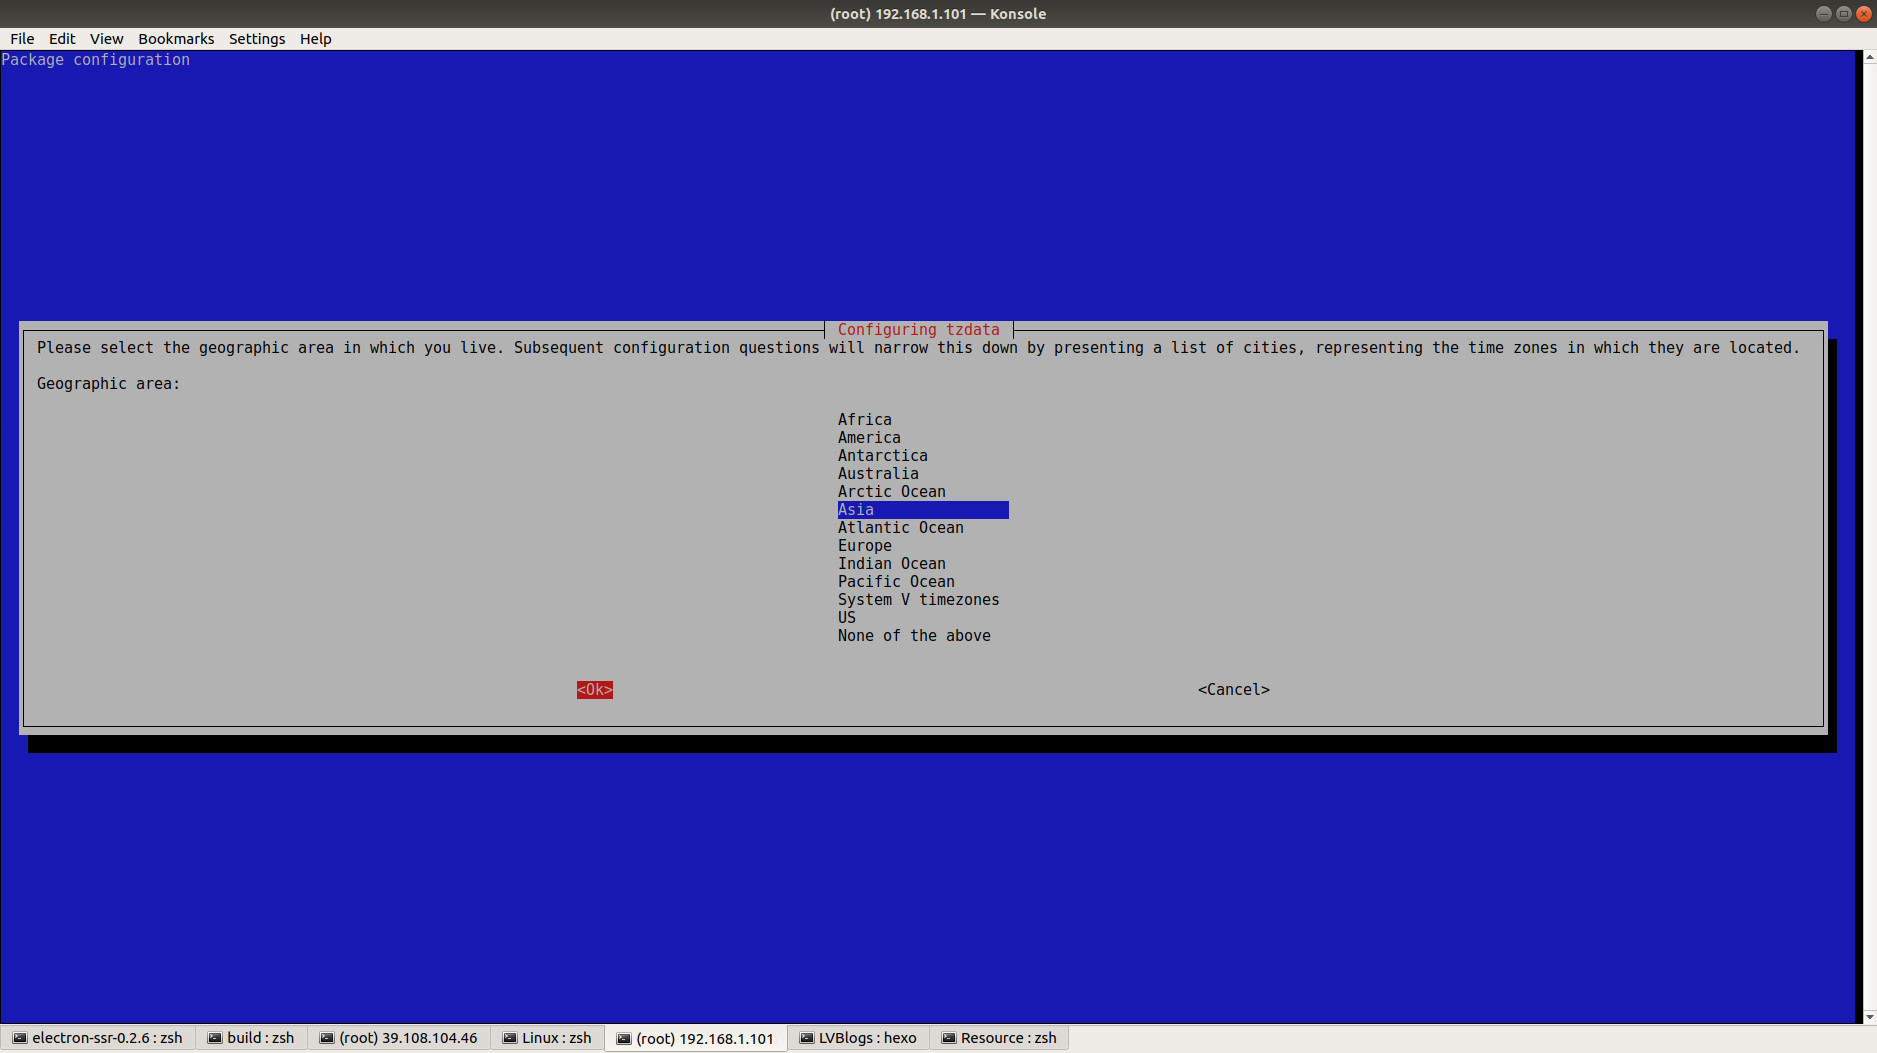
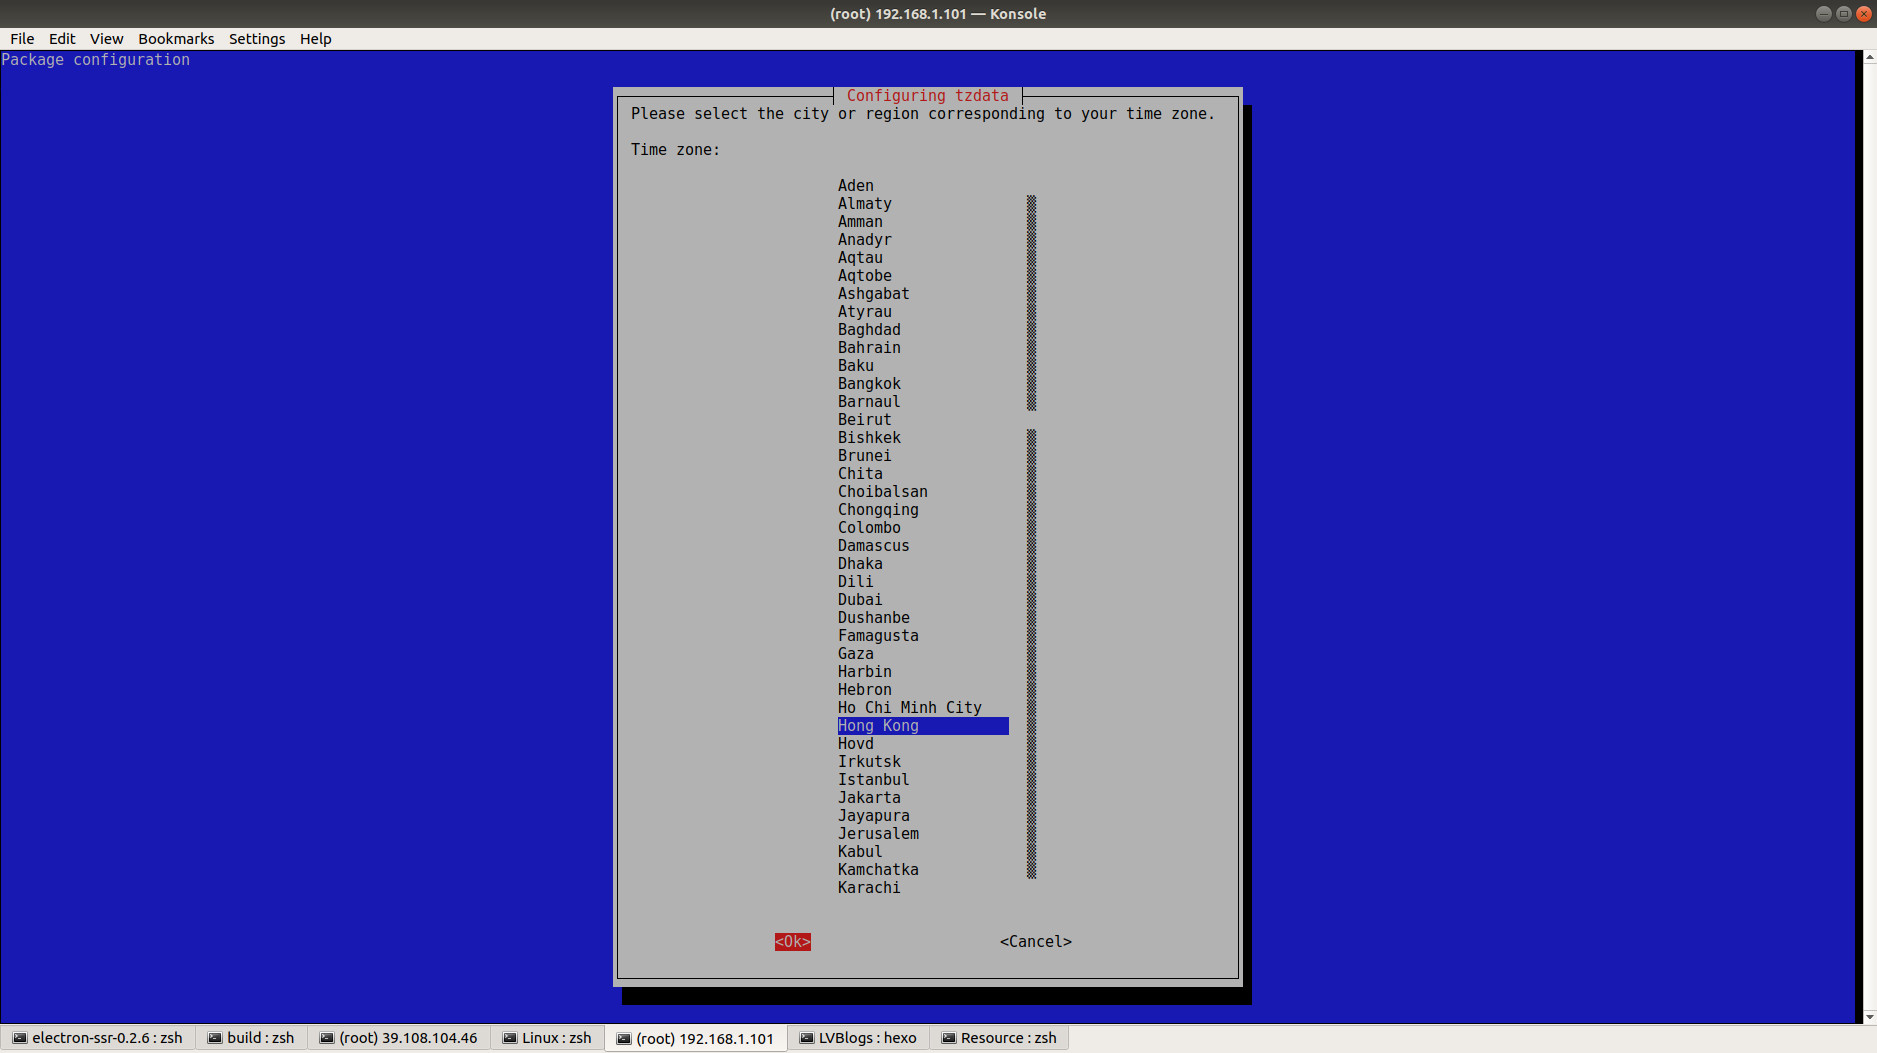
During the above process, you’ll set the following 2 pages correspondingly:

System Locale Asia

System Locale HongKong

By using the command date, we can see the timezone has been successfully reset.

1
2
root@orangepi3:~# date
Mon May 13 22:11:20 HKT 2019

5. Network Configuration

1). How to connect to wireless?

Wifi module does NOT function well.

1
2
3
4
5
6
7
8
9
10
11
12
13
root@orangepi3:~# ip -c address
1: lo: <LOOPBACK,UP,LOWER_UP> mtu 65536 qdisc noqueue state UNKNOWN group default qlen 1000
link/loopback 00:00:00:00:00:00 brd 00:00:00:00:00:00
inet 127.0.0.1/8 scope host lo
valid_lft forever preferred_lft forever
inet6 ::1/128 scope host
valid_lft forever preferred_lft forever
2: eth0: <BROADCAST,MULTICAST,UP,LOWER_UP> mtu 1500 qdisc mq state UP group default qlen 1000
link/ether 02:07:a1:4a:a5:38 brd ff:ff:ff:ff:ff:ff
inet 192.168.1.101/24 brd 192.168.1.255 scope global dynamic noprefixroute eth0
valid_lft 6426sec preferred_lft 6426sec
inet6 fe80::c8b:b3a4:2793:72b3/64 scope link noprefixroute
valid_lft forever preferred_lft forever

Orange Pi M3

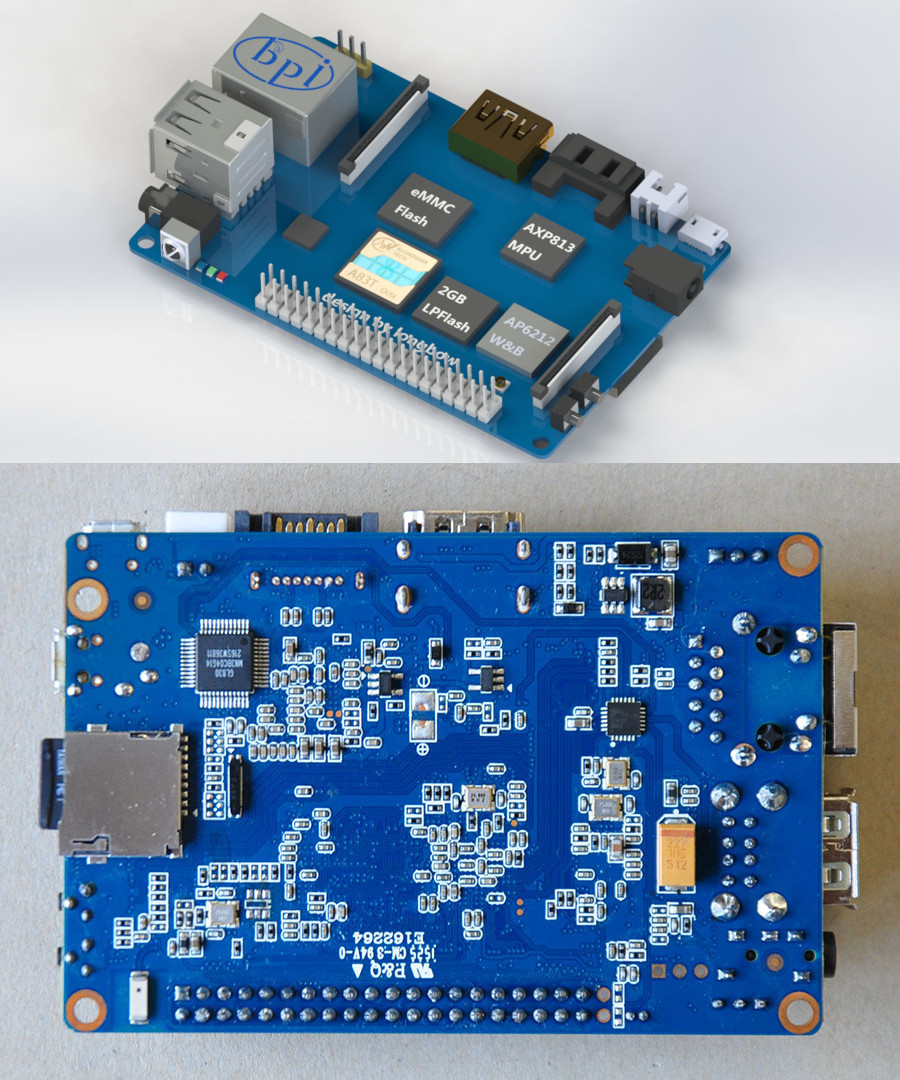
Hello, everybody. I’m now back in ShenZhen, China, and testing several types of Single Board Computers. I’ve got to say: Made In China is amazing. Banana Pi M3 is a SBC with AllWinner A83T ARM CPU, which is also of credit-card size. Some detailed features can be found on the open source technical supporter Sunxi. Please pay attention to the following key points:

  • A83T SoC’s CPU is of 32-bit address
  • A83T SoC comes with Power VR SGX544MP1 GPU
  • Current Linux Kernel 5.X ALREADY provides support for A83T, please refer to Github

Now, we follow our previous blog Install Armbian Ubuntu Desktop onto Banana Pi Pro to install Armbian Ubuntu Desktop onto Banana Pi M3.

PART A: Install Ubuntu Desktop Built By Armbian onto Banana Pi M3

1. Download Armbian Ubuntu Desktop for Banana Pi M3

We FIRST go visiting the website https://www.armbian.com/bananapi-m3/ and click Armbian Bionic icon, a file named Armbian_5.83_Bananapim3_Ubuntu_bionic_next_4.19.38_desktop will be automatically downloaded.

Then, we extract this .7z file by

1
2
3
4
5
6
7
8
9
10
11
12
13
14
15
16
17
18
19
20
21
22
23
24
25
26
27
28
29
➜  operatingsystems 7z x Armbian_5.83_Bananapim3_Ubuntu_bionic_next_4.19.38_desktop.7z -oArmbian_5.83_Bananapim3_Ubuntu_bionic_next_4.19.38_desktop 

7-Zip [64] 16.02 : Copyright (c) 1999-2016 Igor Pavlov : 2016-05-21
p7zip Version 16.02 (locale=en_CA.UTF-8,Utf16=on,HugeFiles=on,64 bits,8 CPUs Intel(R) Core(TM) i7-6700HQ CPU @ 2.60GHz (506E3),ASM,AES-NI)

Scanning the drive for archives:
1 file, 441800089 bytes (422 MiB)

Extracting archive: Armbian_5.83_Bananapim3_Ubuntu_bionic_next_4.19.38_desktop.7z
--
Path = Armbian_5.83_Bananapim3_Ubuntu_bionic_next_4.19.38_desktop.7z
Type = 7z
Physical Size = 441800089
Headers Size = 308
Method = LZMA2:25
Solid = +
Blocks = 1

Everything is Ok

Files: 4
Size: 1946176594
Compressed: 441800089
➜ operatingsystems ll Armbian_5.83_Bananapim3_Ubuntu_bionic_next_4.19.38_desktop
total 1.9G
-rw-rw-r-- 1 jiapei jiapei 1.9G Feb 10 22:50 Armbian_5.83_Bananapim3_Ubuntu_bionic_next_4.19.38_desktop.img
-rw-rw-r-- 1 jiapei jiapei 833 Feb 10 22:50 Armbian_5.83_Bananapim3_Ubuntu_bionic_next_4.19.38_desktop.img.asc
-rw-r--r-- 1 jiapei jiapei 19K Feb 10 22:50 armbian.txt
-rw-rw-r-- 1 jiapei jiapei 129 Feb 10 22:50 sha256sum.sha

2. Install Armbian Ubuntu Desktop for Banana Pi M3

After the extracted image file is prepared, it’s the time to install the Armbian Ubuntu Desktop onto our TF card. We FIRST format the TF card:

1
2
3
4
5
6
7
8
9
10
11
12
13
14
15
16
17
➜  ~ sudo umount /dev/mmcblk0p1
umount: /dev/mmcblk0p1: not mounted.
➜ ~ sudo mkfs.ext4 /dev/mmcblk0
mke2fs 1.44.1 (24-Mar-2018)
Found a gpt partition table in /dev/mmcblk0
Proceed anyway? (y,N) y
Discarding device blocks: done
Creating filesystem with 7579648 4k blocks and 1896832 inodes
Filesystem UUID: 5c3be436-4e8c-43e4-ab21-6d5232420881
Superblock backups stored on blocks:
32768, 98304, 163840, 229376, 294912, 819200, 884736, 1605632, 2654208,
4096000

Allocating group tables: done
Writing inode tables: done
Creating journal (32768 blocks): done
Writing superblocks and filesystem accounting information: done

Afterwards, use dd to install the downloaded Armbian Ubuntu Desktop image.

1
2
3
4
➜  Armbian_5.83_Bananapim3_Ubuntu_bionic_next_4.19.38_desktop sudo dd bs=4M if=Armbian_5.83_Bananapim3_Ubuntu_bionic_next_4.19.38_desktop.img of=/dev/mmcblk0 conv=fsync
464+0 records in
464+0 records out
1946157056 bytes (1.9 GB, 1.8 GiB) copied, 258.486 s, 7.5 MB/s

PART B: SSH Into Armbian, Update & Upgrade, Network Configuration, Locale Configuration

NOTE: Whenever you met some unsolvable issue after you boot into Armbian, please use the command armbianmonitor -U to log the issue.

1. SSH Into Banana Pi M3

We now unplug the TF card from the host and put it into the Banana Pi M3, Armbian Ubuntu Desktop boots successfully. The default username and password are respectively: root and 1234. In our case, Banana Pi M3 is connected to a network cable first, and it’s NOT hard for us to get the IP address of Banana Pi M3 by using command line nmap (Details can be checked via Google). After setting up a NEW user as well as password by following the previous blog Install Armbian Ubuntu Desktop onto Banana Pi Pro, you should be able to log into Banana Pi M3 with account root:

1
2
3
4
5
6
7
8
9
10
11
12
13
14
15
16
17
18
19
20
21
22
23
➜  ~ ssh root@192.168.1.80
The authenticity of host '192.168.1.80 (192.168.1.80)' can't be established.
ECDSA key fingerprint is SHA256:xLRt0ppGzbutHHcE3JRyaKw9A0baub3MDAxFF9GNfdk.
Are you sure you want to continue connecting (yes/no)? yes
Warning: Permanently added '192.168.1.80' (ECDSA) to the list of known hosts.
root@192.168.1.80's password:
____ ____ _ __ __ _____
| __ ) __ _ _ __ __ _ _ __ __ _ | _ \(_) | \/ |___ /
| _ \ / _` | '_ \ / _` | '_ \ / _` | | |_) | | | |\/| | |_ \
| |_) | (_| | | | | (_| | | | | (_| | | __/| | | | | |___) |
|____/ \__,_|_| |_|\__,_|_| |_|\__,_| |_| |_| |_| |_|____/


Welcome to ARMBIAN 5.83 stable Ubuntu 18.04.2 LTS 4.19.38-sunxi
System load: 0.08 0.10 0.08 Up time: 33 min
Memory usage: 12 % of 2013MB IP: 192.168.1.80
Usage of /: 6% of 29G

[ General system configuration (beta): armbian-config ]

Last login: Thu Apr 18 08:53:31 2019 from 192.168.1.21

root@bananapim3:~#

2. Kernel Doublechecking

Finally, we have the system and kernel doublechecked.

1
2
3
4
5
6
7
8
9
10
root@bananapim3:~# uname -r
4.19.38-sunxi
root@bananapim3:~# uname -a
Linux bananapim3 4.19.38-sunxi #5.83 SMP Sun Feb 10 21:36:17 CET 2019 armv7l armv7l armv7l GNU/Linux
root@bananapim3:~# lsb_release -a
No LSB modules are available.
Distributor ID: Ubuntu
Description: Ubuntu 18.04.2 LTS
Release: 18.04
Codename: bionic

3. Update & Upgrade

1
2
3
4
5
6
7
8
9
10
11
12
13
14
15
16
17
18
19
20
21
22
23
24
25
26
27
28
29
30
31
32
33
34
35
root@bananapim3:~# sudo apt update
Get:1 https://apt.armbian.com bionic InRelease [18.9 kB]
Get:2 https://apt.armbian.com bionic/main armhf Packages [288 kB]
Hit:3 http://ports.ubuntu.com bionic InRelease
Get:4 http://ports.ubuntu.com bionic-security InRelease [88.7 kB]
Get:5 http://ports.ubuntu.com bionic-updates InRelease [88.7 kB]
Get:6 http://ports.ubuntu.com bionic-backports InRelease [74.6 kB]
Get:7 http://ports.ubuntu.com bionic-security/main armhf Packages [216 kB]
Get:8 https://apt.armbian.com bionic/bionic-utils armhf Packages [4767 B]
Get:9 http://ports.ubuntu.com bionic-security/restricted armhf Packages [3968 B]
Get:10 http://ports.ubuntu.com bionic-security/universe armhf Packages [238 kB]
Get:11 http://ports.ubuntu.com bionic-security/multiverse armhf Packages [1924 B]
Get:12 http://ports.ubuntu.com bionic-updates/main armhf Packages [452 kB]
Get:13 http://ports.ubuntu.com bionic-updates/restricted armhf Packages [6488 B]
Get:14 http://ports.ubuntu.com bionic-updates/universe armhf Packages [713 kB]
Get:15 http://ports.ubuntu.com bionic-updates/multiverse armhf Packages [3592 B]
Get:16 http://ports.ubuntu.com bionic-backports/main armhf Packages [1020 B]
Get:17 http://ports.ubuntu.com bionic-backports/universe armhf Packages [3468 B]
Fetched 2203 kB in 45s (48.6 kB/s)
Reading package lists... Done
Building dependency tree
Reading state information... Done
155 packages can be upgraded. Run 'apt list --upgradable' to see them.
root@bananapim3:~# apt list --upgradable
Listing... Done
......
root@bananapim3:~# sudo apt upgrade
.....
Processing triggers for libc-bin (2.27-3ubuntu1) ...
Processing triggers for resolvconf (1.79ubuntu10.18.04.3) ...
Processing triggers for initramfs-tools (0.130ubuntu3.7) ...
update-initramfs: Generating /boot/initrd.img-4.19.25-sunxi
update-initramfs: Converting to u-boot format
root@bananapim3:~# uname -a
Linux bananapim3 4.19.25-sunxi #5.78 SMP Mon Apr 8 07:46:22 CEST 2019 armv7l armv7l armv7l GNU/Linux

4. Locale Configuration

Clearly, from the above login info, our timezone seems to be wrong. Command dpkg-reconfigure tzdata is able to reset our timezone.

1
2
3
4
5
root@bananapim3:~# dpkg-reconfigure tzdata

Current default time zone: 'Asia/Shanghai'
Local time is now: Thu Apr 18 18:47:22 CST 2019.
Universal Time is now: Thu Apr 18 10:47:22 UTC 2019.

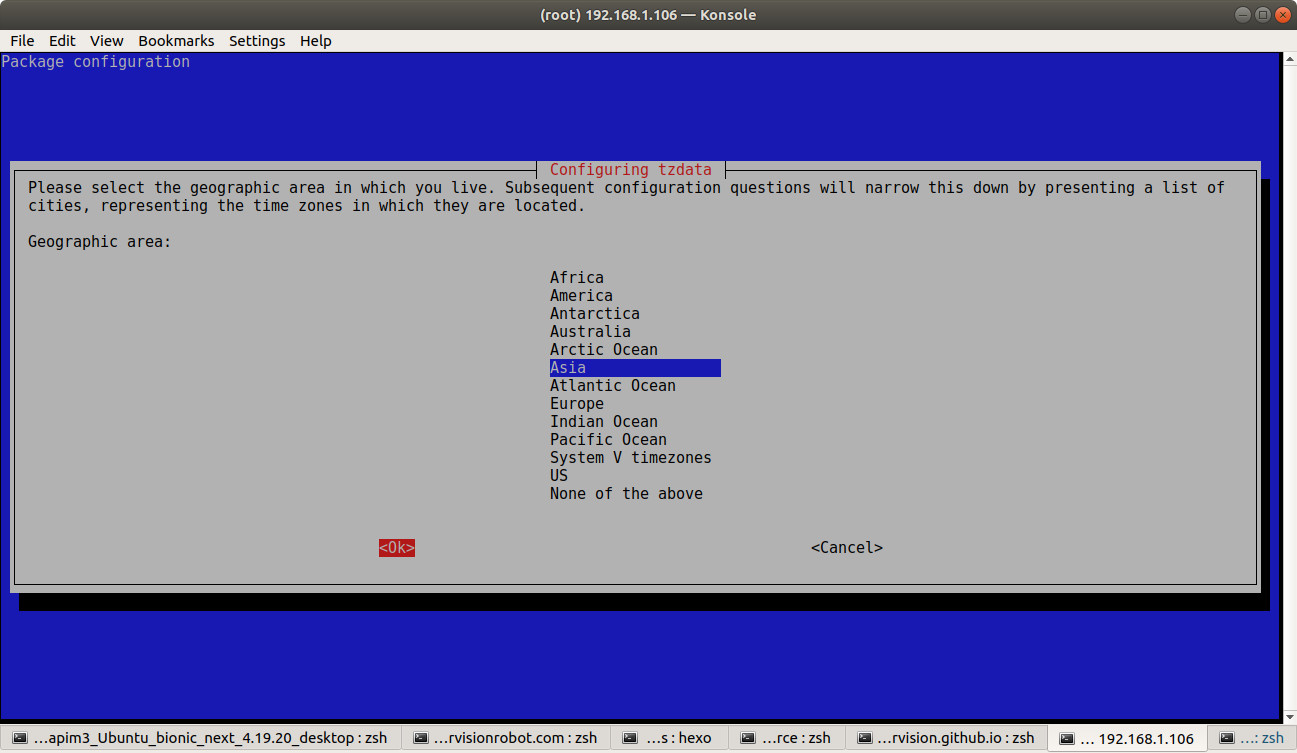
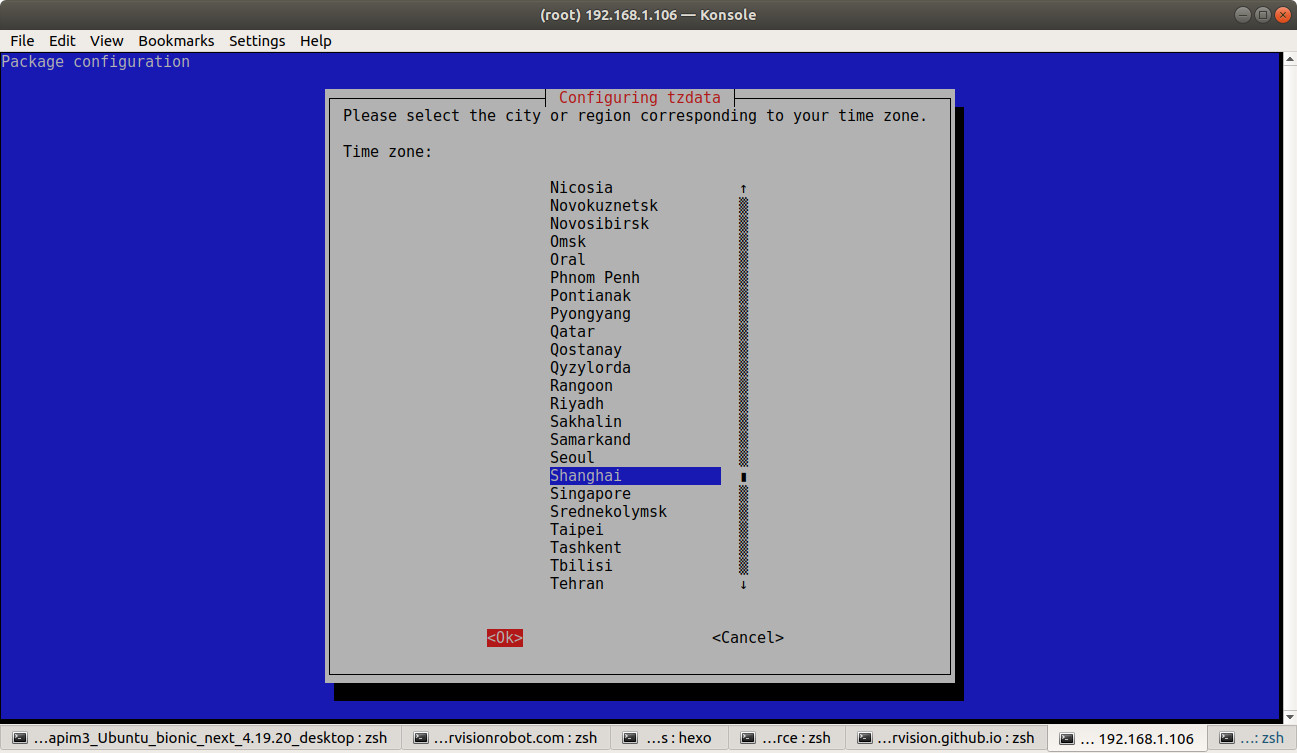
During the above process, you’ll set the following 2 pages correspondingly:

System Locale Asia

System Locale Shanghai

By using the command date, we’ll see the timezone has been successfully reset.

1
2
root@bananapim3:~# date
Tue Apr 18 18:49:25 CST 2019

5. Network Configuration

1). How to connect to wireless?

Please refer to Armbian docs - How to connect to wireless?,

1
root@bananapim3:~$ nmtui-connect SSID

However, according to my CURRENT issue posted at Build NEWEST Linux Kernel 5.0.9 on Banana Pi M3, AllWinner A83T‘s Wifi module does NOT function well.

1
2
3
4
5
6
7
8
9
10
11
12
13
14
15
lvision@bananapim3:~$ ip -c address
1: lo: <LOOPBACK,UP,LOWER_UP> mtu 65536 qdisc noqueue state UNKNOWN group default qlen 1000
link/loopback 00:00:00:00:00:00 brd 00:00:00:00:00:00
inet 127.0.0.1/8 scope host lo
valid_lft forever preferred_lft forever
inet6 ::1/128 scope host
valid_lft forever preferred_lft forever
2: dummy0: <BROADCAST,NOARP> mtu 1500 qdisc noop state DOWN group default qlen 1000
link/ether 5a:cb:89:ad:49:96 brd ff:ff:ff:ff:ff:ff
3: eth0: <BROADCAST,MULTICAST,UP,LOWER_UP> mtu 1500 qdisc mq state UP group default qlen 1000
link/ether 02:01:06:95:68:df brd ff:ff:ff:ff:ff:ff
inet 192.168.1.80/24 brd 192.168.1.255 scope global dynamic noprefixroute eth0
valid_lft 3069140548sec preferred_lft 3069140548sec
inet6 fe80::8ea3:62cb:7b8b:e872/64 scope link noprefixroute
valid_lft forever preferred_lft forever

Clearly, wlan0 does NOT exist.

PART C: Upgrade Linux Kernel From 4.XX To 5.XX

1. Generate Configure File

1
2
3
4
5
6
7
8
9
10
11
12
13
14
15
16
lvision@bananapim3:~/Downloads/linux-5.1.7$ make sunxi_defconfig
HOSTCC scripts/basic/fixdep
HOSTCC scripts/kconfig/conf.o
HOSTCC scripts/kconfig/confdata.o
HOSTCC scripts/kconfig/expr.o
LEX scripts/kconfig/lexer.lex.c
YACC scripts/kconfig/parser.tab.h
HOSTCC scripts/kconfig/lexer.lex.o
YACC scripts/kconfig/parser.tab.c
HOSTCC scripts/kconfig/parser.tab.o
HOSTCC scripts/kconfig/preprocess.o
HOSTCC scripts/kconfig/symbol.o
HOSTLD scripts/kconfig/conf
#
# configuration written to .config
#

2. Browse Configure File

Then, we can take a look at our configuration content by using:

1
lvision@bananapim3:~/Downloads/linux-5.1.7$ less .config

which is pasted at my pastebin sunxi_defconfig.

3. make menuconfig

1
2
3
4
5
6
7
8
9
10
11
12
13
14
15
lvision@bananapim3:~/Downloads/linux-5.1.7$ make menuconfig
UPD scripts/kconfig/mconf-cfg
HOSTCC scripts/kconfig/mconf.o
HOSTCC scripts/kconfig/lxdialog/checklist.o
HOSTCC scripts/kconfig/lxdialog/inputbox.o
HOSTCC scripts/kconfig/lxdialog/menubox.o
HOSTCC scripts/kconfig/lxdialog/textbox.o
HOSTCC scripts/kconfig/lxdialog/util.o
HOSTCC scripts/kconfig/lxdialog/yesno.o
HOSTLD scripts/kconfig/mconf
scripts/kconfig/mconf Kconfig


*** End of the configuration.
*** Execute 'make' to start the build or try 'make help'.
1
2
3
4
5
6
7
8
9
10
11
12
13
14
15
16
lvision@bananapim3:~/Downloads/kernel/linux-5.1.7$ make -j 4 Image modules dtbs
...
LD [M] sound/soc/tegra/snd-soc-tegra-trimslice.ko
LD [M] sound/soc/tegra/snd-soc-tegra-utils.ko
LD [M] sound/soc/tegra/snd-soc-tegra-wm8753.ko
LD [M] sound/soc/tegra/snd-soc-tegra-wm8903.ko
LD [M] sound/soc/tegra/snd-soc-tegra-wm9712.ko
LD [M] sound/soc/tegra/snd-soc-tegra20-ac97.ko
LD [M] sound/soc/tegra/snd-soc-tegra20-das.ko
LD [M] sound/soc/tegra/snd-soc-tegra20-i2s.ko
LD [M] sound/soc/tegra/snd-soc-tegra20-spdif.ko
LD [M] sound/soc/tegra/snd-soc-tegra30-ahub.ko
LD [M] sound/soc/tegra/snd-soc-tegra30-i2s.ko
LD [M] sound/soundcore.ko
LD [M] sound/usb/snd-usb-audio.ko
LD [M] sound/usb/snd-usbmidi-lib.ko

Appendix

We can of course follow our previous blog Install Armbian Ubuntu Desktop with the Newest Supported Mainline Linux Kernel onto Orange Pi Plus 2 to upgrade the NEWEST U-Boot and Linux Kernel for Banana Pi M3, which is NOT going to be discussed here again.